Plastination Laboratory Designs and Safety Considerations. William R. Collins, UCSD School of Medicine, University of California, La Jolla, CA 92093, USA.
PLANNING A PLASTINATION LABORATORY:
A. Budget considerations:
B. Space requirements:
C. Equipment requirements:
GETTING STARTED:
A. Licenses:
B. Selecting equipment:
SAFETY CONSIDERATIONS:
C. Handling fresh material:
Starting Plastination On A Limited Budget. Gilles G. Grondin, Departement of Biologie, Facult6 des Sciences, University de Sherbrooke, Sherbrooke, QUEBEC, CANADA, J1K2R1.
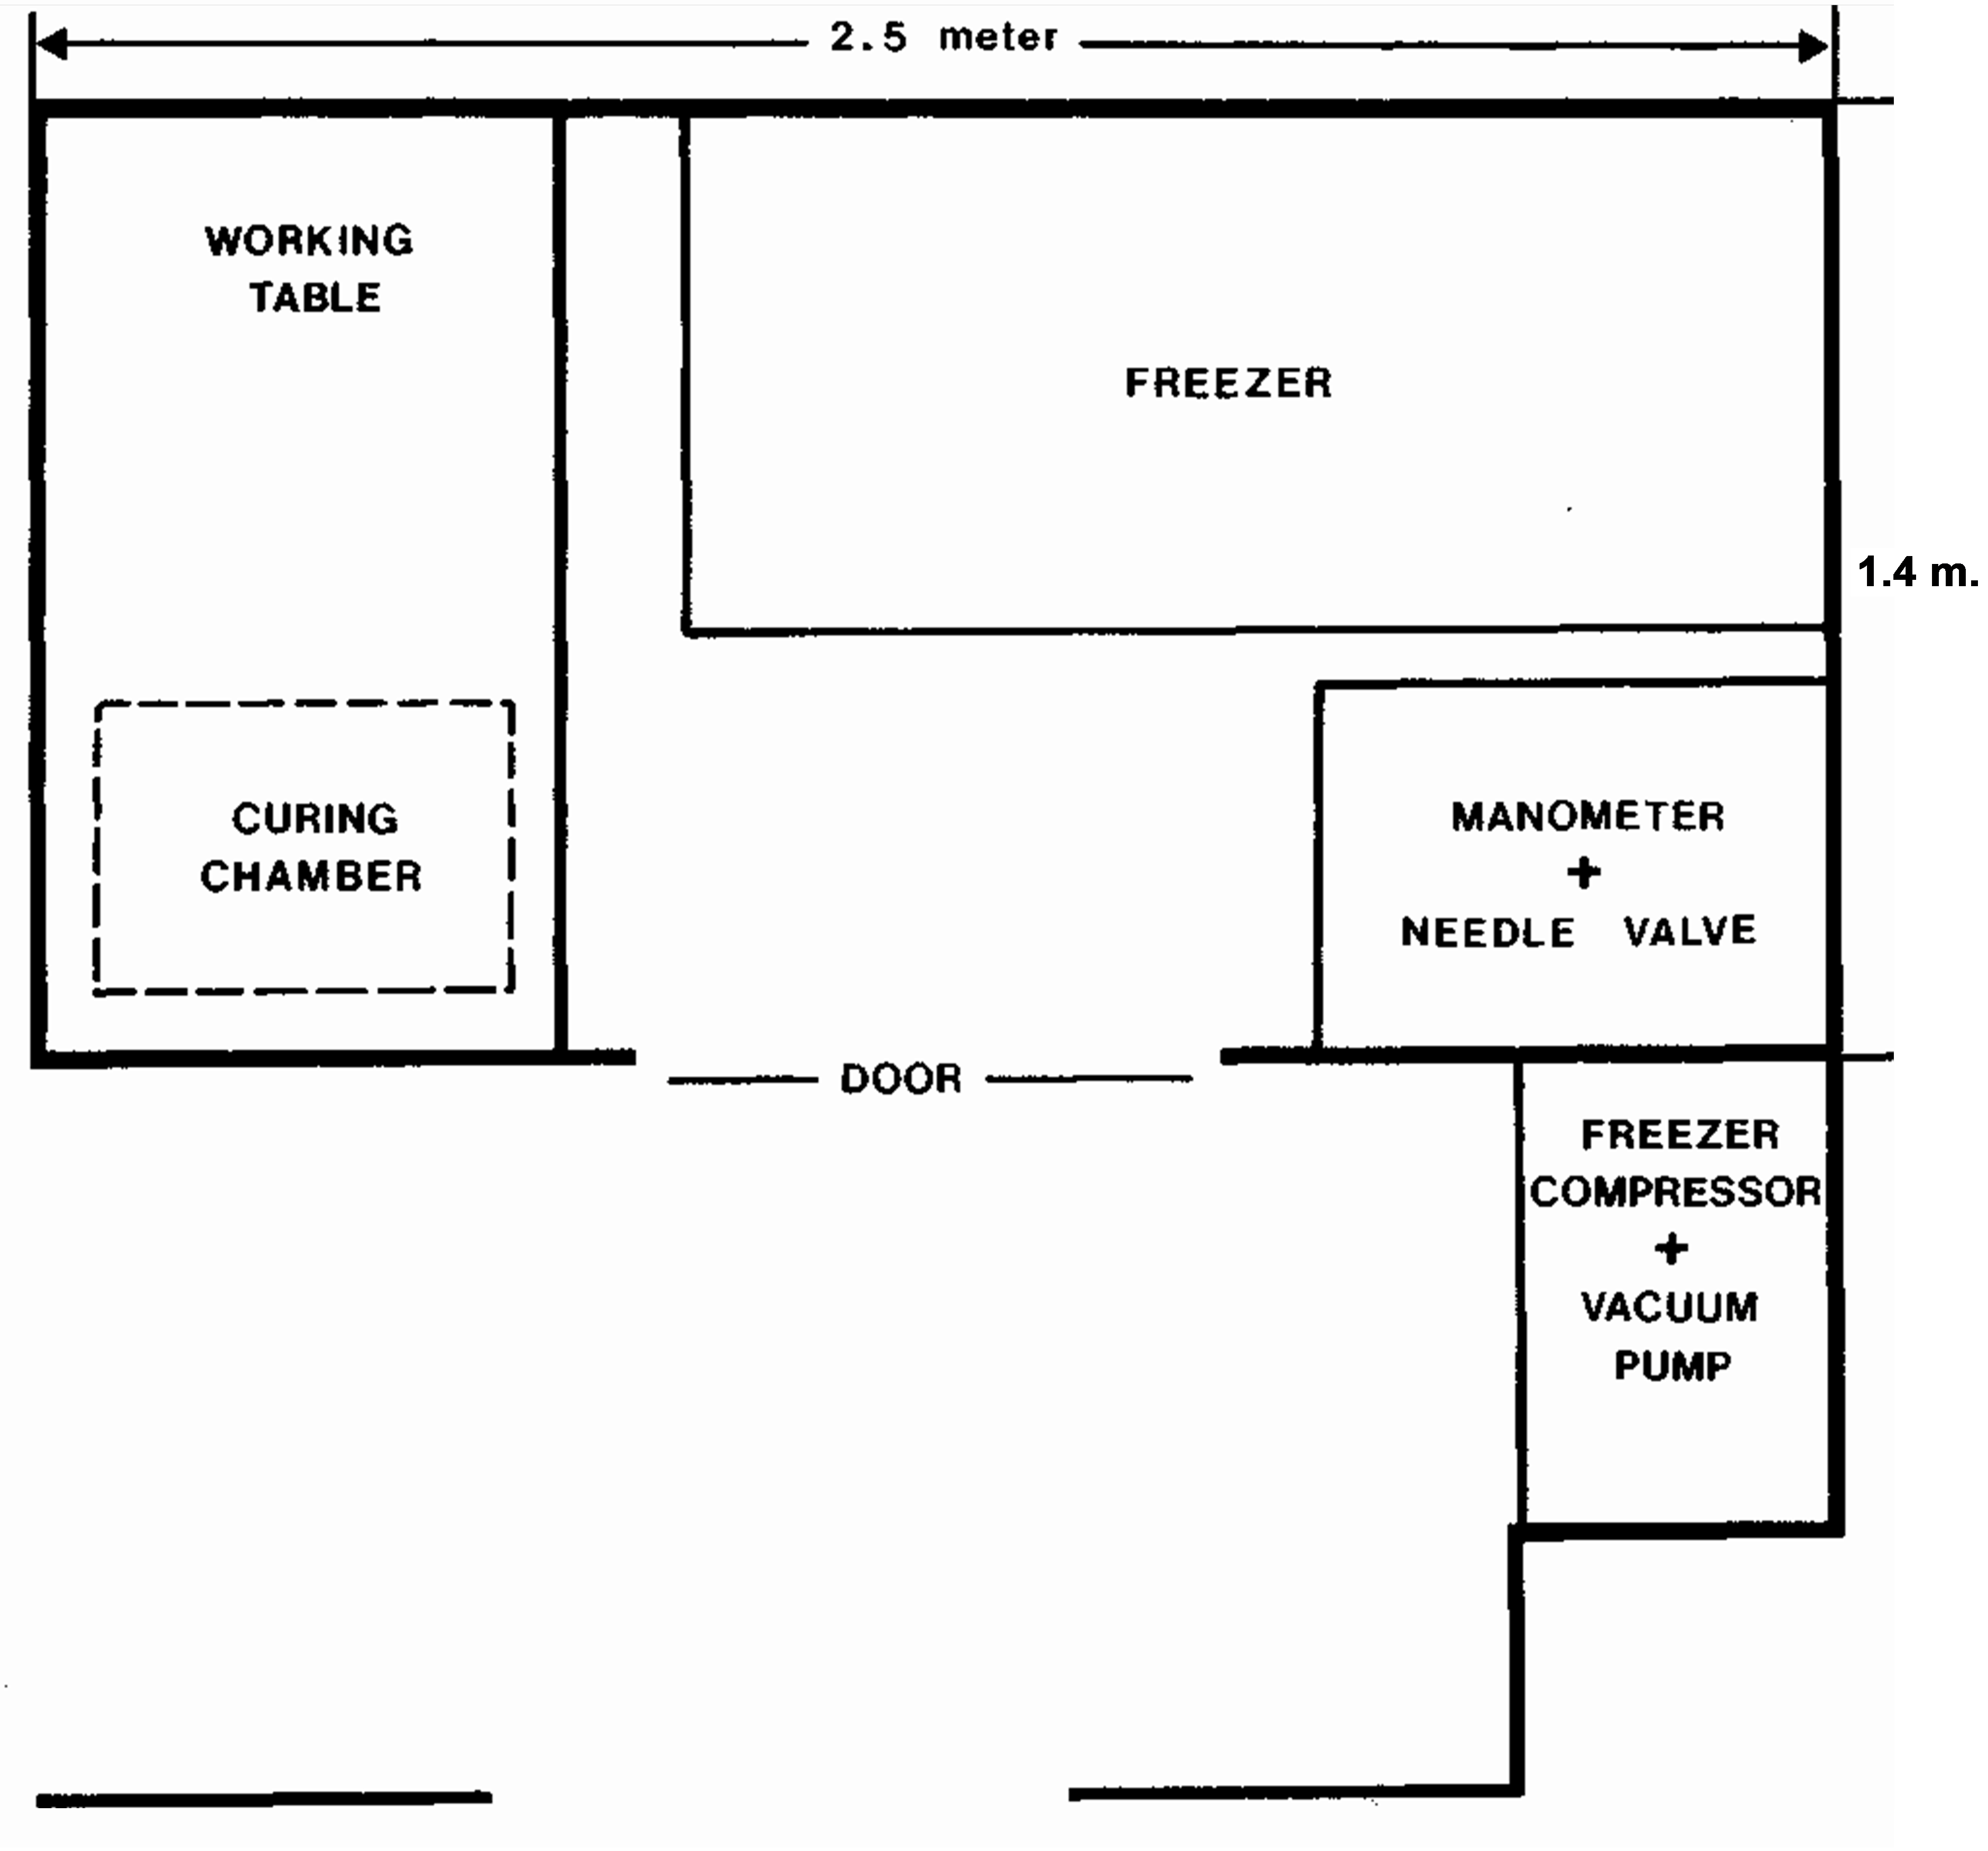 After three and one half years of effort, a plastination laboratory was started for less than $3,000.00 (Canadian $) in Sherbrooke. The pre- plastination years were used to identify and to collect various pieces of surplus equipment which could be used for plastination (old vacuum pump, glass desiccator, tubing and connections, needle valves from a scrapped freeze-dryer) and to harass instructors and administrators concerning finances and laboratory space. The resultant laboratory space was 3.5 square meters (2.5 m x 1.4 m). A glass ceiling was placed below the light fixtures to seal the lights from the room environment thus making the area explosion proof. Ventilation was installed and electrical outlets removed at a cost of $360.00. A household deep freezer was purchased and the thermostat and compressor were removed and installed outside of the plastination room, cost $870.00. A Bennert-type manometer, gas mask and hydrometer were purchased, cost $700.00. Finally, after purchasing 40 liters of acetone and 10 kg of Biodur S 10 silicone resin (cost $900.00), we were ready to commence. Dehydration was carried out in old 4 liter jugs which were covered with glass. A glass desiccator served as a plastination kettle and the curing chamber was a plastic bag inside an old aquarium. We were able to accommodate specimens about the size of a hand, but even with these size restrictions plastination began. After instructors had seen and touched the plastinated specimens, they realized their value and wanted more and larger specimens. At this point it was much easier to get money for a larger vacuum chamber and to discuss the possibility of moving into a larger laboratory. We realized that starting plastination at Sherbrooke might be a long term adventure, but believed that our goal was possible even on a limited budget if we were persistent and were willing to recycle equipment. Once plastination is commenced and specimens are produced, you can easily demonstrate its worth and improve your laboratory.
"Forced Air" Impregnation Of Air-Dried Lungs - A Recent Development In Plastination Producing Life-Like Lung Specimens. Robert W. Henry, College of Veterinary Medicine, The University of Tennessee, Knoxville, TN, USA.
Air-dried lungs at room temperature were impregnated with a mixture of S10/S3 (polymer-mix) and xylene. Compressed air from the laboratory bench was used to propel the polymer-xylene mix from the air ways into the parenchyma of the lung tissue and on through to the surface of the lung. The lungs were dried using air from the laboratory air supply line. Mixtures of xylene and S10/S3, which varied from 15% to 45%, were forced into lungs, to impregnate the lungs with silicone, via forced air rather than using dehydration and vacuum. The trachea was cannulated and the lungs positioned such that one-half of the polymer-xylene mix was poured into the left portion of the airway and the other half of the mix into the right portion of the airway. Laboratory air (dried medical air), at a high velocity and pressure (30 - 50 Ibs/sq. in.), blown into the trachea for four to ten days, in an attempt to force the polymer-xylene mix from the air ways into the lung parenchyma and on to the surface of the lung. To assure that the polymer-xylene mix reached all areas of the lungs, the lungs were continually turned during the first 10-20 minutes impregnation. For the next 4 to 10 days, the lungs were inverted daily to alleviate pooling of the polymer-xylene mix. The trachea and surface of the lungs were coated daily with excess polymer-xylene mix. When air impregnation was completed, S6 was volatilized by bubbling air through the liquid S6 and directed into the trachea for 15 minutes a day for 3 days. A plastic bag was placed around the lung preparation to serve as curing chamber. Air impregnated lungs, if dried in proper anatomical position, maintain their anatomical relationships. Higher percent xylene lungs were more spongy after curing than lower percent xylene lungs as xylene evaporates at room temperature leaving proportionately less polymer in the lungs. Conversely, lower percent xylene lungs were firmer and more durable because more polymer remained in the lungs.
Plastination - Dehydration of specimens. Robert W. Henry College of Veterinary Medicine, The University of Tennessee, Knoxville, TN, USA.
Specimens to be plastinated are often moist which necessitates the removal of tissue fluid (dehydration) before forced impregnation or plastination can be carried out. Dehydration removes the specimen fluid (water), as well as some fat. The fluid is replaced with an organic solvent. To be a dehydrating agent, the solvent must be miscible with water and may be of a variety of chemical structures (ketones or alcohols).Either alcohol or cold acetone may be used as a dehydrant for plastination. Methylene chloride (chlorinated hydrocarbons) is not a dehydrating agent. Shrinkage accompanies dehydration and may be minimized by 1) using cold acetone (known as freeze substitution) or 2) starting dehydration in a lower % of ethanol. With freeze Substitution, the ice in the specimen is replaced by the dehydrating liquid (acetone). It is essential to use an adequate volume of dehydrating liquid (either cold acetone or ethanol). The recommended ratio is: 10 Volumes of dehydrating fluid to 1 volume of tissue. It is necessary to monitor the concentration of the Dehydration fluid at weekly intervals. Once the fluid Content has remained similar for a few days, the specimen is moved to a fresh dehydrating solution, Cold ACETONE (-25°C): Usually has been considered the best method of dehydration, However, dehydration with acetone must be carried out in the cold and not at room temperature; warm of acetone will cause excessive shrinkage, Disadvantage: Must be done in a deep freezer, Advantages: Minimal shrinkage; Acetone serves as the intermediary solvent; Superior specimens; and Shorter dehydration time. ETHANOL: Specimens are started in a low % of ethanol (50%) at room temperature, allowed to equilibrate and later placed in ascending concentrations of ethanol, i.e.: 60%, 70%, 80%, 90%, 100%. Advantages: Carried out at room temperature; therefore, less deep freezer space is necessary. Specimens can be stored in 70% ethanol. Specimens from embalmed tissues, containing standard embalming fluids, are cleansed of the polyvalent alcohols (glycerin or ethylene glycol) or phenols. Specimens are defatted. Disadvantages: Shrinkage; Intermediary solvent is necessary; Specific gravity of ethanol and alcohol are similar 0.79 making it difficult to determine when the ethanol has been totally replaced with acetone.
Plastination - Forced impregnation. Robert W. Henry, College of Veterinary Medicine, The University of Tennessee, Knoxville, TN, USA.
Forced impregnation is another important step of plastination. Successful impregnation is possible only after complete dehydration and the availability of an intermediary solvent. As various polymers are available and each require a slightly different process, we will discuss impregnation with silicone polymer, The silicone polymer (S10) is mixed with a curing (hardening) agent (S3) which commences the process of end-to-end linkage of the molecules. At room temperature, this linking is hastened, Therefore, the polymer mix may only be utilized for a few weeks at room temperature before the polymer mixture turns into a various blob and a few more weeks into a solid block. For this reason, the silicone mixture is kept at -25°C. This temperature is sufficiently cold to retard the end-to-end linkage of molecules which enhances the flexibility of the final. Hence, in the cold, the polymer may be used for many years. Once the mixture is prepared (1 part S3 to 100 parts S10), it is placed into a vacuum chamber which has been placed in a deep freezer. The dehydrated specimens are submerged in the polymer. A mesh placed on top of the specimens will keep the specimens submerged. The specimens are allowed to stand in the polymer mix over night and hence equilibrate with the polymer. The vacuum is increased gradually over a period of 3 - 5 weeks until nearly total vacuum (one atmosphere) has been reached. This gradual increase in vacuum allows the intermediary solvent which has a lower boiling point (acetone: +56°C and methylene chloride: +40°C), than that of the polymer mix, to be extracted from the specimen and evacuated through the exhaust system of the pump. The loss of the intermediary solvent from the tissue results in a pressure difference between the interstitiu of the specimens and the polymer mix allowing the polymer to be drawn into the tissue. The extraction of the volatile intermedium (boiling) must be slow enough to allow sufficient time for the polymer to enter the specimen. Extraction of intermedium is monitored by observing bubble formation on the surface of the polymer mix. When boiling is too fast, the polymer does not have enough time to flow to all parts of the specimen. This may allow the structural framework of the tissue to collapse and the specimen may shrink. Vacuum is controlled by an air inlet valve and pumping speed.
Plastination - Gas curing (hardening). Robert W. Henry, College of Veterinary Medicine, The University of Tennessee, Knoxville, TN, USA.
Curing or hardening of the polymer varies for each polymer used. Curing for the standard silicone procedure will be discussed. After impregnation of the specimen with polymer, the polymer must be hardened. Curing takes place on the surface of the specimens first and then progresses to the interior of the specimen. For the S10 process, Biodur Gas Cure (S6) is the hardening agent. S6 begins the process of side-to-side linkage of the polymer molecules. Side- to-side linkage produces a stronger product. Basically, the S6 vaporizes and reacts with the polymer. Two curing procedures have evolved over the years: Slow cure - in which the specimen is allowed to remain at room temperature for several weeks prior to exposure to S6. This enhances more S3 activity and hence more end-to-end linkage and a more flexible specimen. Exposure to heat may also be used with this methodology. The other procedure is: Fast cure - whereby the impregnated specimen is exposed to a concentration of S6. Volatilization may be enhanced by bubbling air through the S6. The environment for the fast cure should be dehumidified via a desiccant (calcium chloride). An increase in humidity may cause white silicate salt precipitations on the surface of the specimen. A hollow organ may have a concentration of volatilized S6 directed into its lumen to assure that the organ remains dilated and hence in a dilated position after the polymer is hardened. Both the slow and fast cure method utilize Biodur S6 and exposure to S6 is carried out in a closed chamber at room temperature. Once the specimen is exposed to S6, the surface of the specimen is hardened after 12 to 36 hours. However, the interior of the specimen will take longer to harden and is dependent on the S6 penetrating to the depths of the specimen. Yet the specimen may be used before curing is completed to its depths. After curing is complete, the specimen can be stored indefinitely at room temperature.
Plastinated specimens, an aid to understanding standard imaging planes for two-dimensional, real-time echo cardiography m the dog. Robert W. Henry and Janice M. Bright, Department of Animal Science, College of Veterinary Medicine, University of Tennessee, Knoxville, TN 37901 USA.
Ultrasonography is a valuable method for evaluating structure and function of the heart. Two- dimensional, real-time echocardiography (2DE) provides images in a single plane, and standard imaging planes have been described for evaluation of the canine heart. Single frame images from these standard imaging planes were obtained from real- time, 2DE examination of healthy dogs. The images are presented with plastinated specimens which were sectioned along corresponding imaging planes in order to illustrate three dimensional anatomy relative to the two dimensional sector. In addition, labelled photographs of the sectioned specimens are displayed adjacent to the echocardiographic images. Standard imaging planes are designated and transducer positions, used to obtain standard imaging planes, are described. To enhance the student's ability to interpret standard imaging planes, a cadaver heart was prepared for plastination by separation of the lungs from the heart and transecting the pulmonary vessels as long as possible. The caudal vena cava and a pulmonary vein were cannulated with an appropriate size of tubing and the heart was flushed to remove blood with warm tap water through both cannulas. The other large vessels were closed by ligating a bleached cork in place (larger end into vessel). The remaining smaller vessels were closed with suture or hemostatic clips. The heart was hydrostatically dilated with cold water, dilated- fixed with a 5% Kaiserling's solution, dehydrated in cold (-25 °C) acetone, and impregnated with Biodur S10-S3 polymer-mixture. Following impregnation, the heart was drained of the excess polymer-mix and exposed to Biodur S6 (gas curing agent). During curing, the heart was manicured daily to remove excess polymer-mix which accumulated on the surface of the specimens. After curing the heart was sectioned along the planes of standard images.
A new perspective in teaching human anatomy. Alexander Lane, Triton College and University of Illinois at Chicago, Chicago, IL, USA.
Currently, my research involves a comparison between mathematically computed clinical sections of the human body and sheet plastinated cadaver sections. Computers are making a tremendous impact on the teaching of human anatomy and diagnostic medicine. For instance, as a result of the computer imaging devices, more progress has been made in diagnostic medicine in the past 15 years than in the entire previous history of medicine. There are five major computer body scanning systems. This research is confined to three of these modalities. Comparisons are made between scans from ultrasound (sonography), magnetic resonance imaging (MR) and computed tomography (CT). All of these systems present the body in thin slices without surgery for study and diagnosis.
Sheet plastinated cadaver sections are suitable for a comparison with computer scans because of the similarities in thickness. The purpose of this study is to add a new perspective to the usual methods and approaches in teaching Human Anatomy. This new perspective is needed in order to update teaching methodology and meet the need to properly identify and interpret structures seen on modern computer body scans. Similarities and differences are stressed to demonstrate comparison and correlation between cadaver sections and computed clinical images. The cadaver sections provide a standard and a means of demonstrating the limitations of the imaging modalities. Further, the cadaver section provides confirmation that the slice one gets using an imaging device is a true representation of that area of the body. In this new perspective, structures of each cadaver or clinical section are classified into four anatomical categories ( Lane, 1990). This methodology not only enhances learning but also helps to differentiate the quality of the resolution by imaging devices of various anatomical structures. For example, some imaging devices depict the visceral structures with high resolution but musculoskeletal unit structures are shown poorly by the same device. LANE, Alexander: Sectional anatomy: Standardized methodology, J Int Soc Plastination 4:16-22, 1990.
High purity solvent recycling of acetone in the Plastination laboratory. Roger R. Roark, Jr., V. P., B/R Instrument Corporation, Easton, MD, 21601, USA.
The recovery of high purity acetone from Plastination techniques has become an interesting topic due to strict regulations promulgated by the U.
For any solvent recycling operation to be successful, the first priority must be solvent quality that is equal to or better than the original purchased. Acetone with large amounts of water and other contaminants are generated in the plastination process. The recycling system must have a distillation system with sufficient theoretical plates to achieve the separation. B/R Instrument has determined that at least ten plates are necessary for a good acetone-water separation. Twenty to thirty theoretical plate spinning band columns have been shown to recycle a 50:50 acetone- water mix to 99% + pure acetone. The formation of para formaldehyde from formalin contamination is a problem. Further research in this area is needed.
Economic and environmental concerns have made high purity solvent recycling and attractive alternative to solvent purchase and disposal. Like other laboratories generating waste, the plastination laboratory must strongly consider this option.
Sheet plastination of the brain, P 35 technique, filling technique. Wolfgang Weber, Department of Veterinary Anatomy, Iowa State University, Ames, Iowa 50011, USA.
Sheet plastinated specimens have the highest acceptance of preserved body slices. Since the development of the P 35 technique, cross sections of the brain never were as detailed even when stained, never were as durable, and never were as easy to handle. There are two techniques for sheet plastination. Brain sheets are done with a polyester- compound, BIODUR P 35. While, cross sections of the body are done with an epoxy compound, BIODUR E 12. The procedures are similar, but for the sake of clarity, each procedure will be described in a separate article.
LIST OF NECESSARY EQUIPMENT:
A Vacuum chamber; Manometer; Biodur Polymers: P 35 and A 9, Biodur cobalt accelerator (PB 11), Meat slicer; 2 UVA-lamps, 45°C oven. Stainless steel or aluminum grids; Grid basket (HD 09 or HD 10); Square buckets or appropriate containers for storage and dehydration of specimens. To assemble each flat chamber: 2 Tempered glass plates (5mm) (HS 01), 2 Thin glass plates (1-2mm) (HS 03), 6mm Gasket (HS 06), 4 small (HS 32) and 15 large (HS 30) Fold back clamps or 2 inch binder clamps, Plastic sleeve or hose (to serve as a funnel), and Pressure sensitive tape.
FIXATION OF BRAIN: 10-20% formalin solution.
SLICING THE BRAIN: Flush in tap water. Divide brain into two pieces, return one portion to the water and lay a wet filter paper on the cut surface of the other portion to keep the specimen moist and serve as a support for the slice. Meat slicer at 4mm. Place on a stainless steel grid (filter paper side down)
FLUSH THE BRAIN SLICES: 4 hours via tap water.
COOL IN DEIONIZED WATER: Store overnight at (5°C) in the deionized water.
FREEZE SUBSTITUTION: Submerge in - 20°C cold 100% acetone. One acetone bath of adequate fluid/tissue ratio is sufficient for brain slices.
IMMERSION INTO POLYMER: Polymer mixture of P 35 (resin) arid A 9 (hardener), a ratio of 100:2 and keep in the dark. Immersion 1: After 48 to 96 hours of freeze substitution, transfer to cold polymer mixture. Immersion 2: After 24 hours, transfer specimens into a new polymer mix (100:2) for 24 hours.
IMPREGNATION: New reaction mixture of P 35 (polymer) and A 9 (hardener) (100:2 ratio) and deaerate. Room temperature, in the dark, and for 21 hours. Increase the vacuum hourly and stabilize at 20mm Hg and leave over night. Do not evacuate below 12mm of Hg.
PREPARATION OF "DOUBLE GLASS PLATES": Tempered glass plates of 5mm and 1-2mm (window glass) thickness are combined to form one side of the flat chamber. Tape the top edge, place fold back clamps on bottom edge.
CASTING: Place 6mm gasket on a "double glass plate" and remove the clamps. Place brain slice on glass. Place second double glass plate, thin glass toward specimen, on specimen. Align gasket and place fold back clamps along edge.
FILLING THE MOLD: Stand mold upright (taped side up), insert plastic sleeve and fill chamber with fresh polymer mix (P 35/A 9). (100:2) (600 cc). Allow trapped air bubbles to rise by spreading the double glass plates and storing for 30 minutes in dark (to prevent early curing of the sheet)
CURING: Initiate with UV-light, complete in a 45°C oven. Light Curing: Light source applied to both sides for 45 minutes. Heat Curing: Place in 45 "C oven for 5 days.
DISMANTLING: Remove from oven in 5 days. Cool to room temperature.
TRIMMING: Table, radial, or band saw. Smooth edges
- belt sander.
CLEANING THE GLASS PLATES: Detergent in a dishwasher at 85°C.
DISPOSAL OF OLD POLYMER: Harden polymer with Cobalt promoter (0.5%).