Magnetic Resonance Imaging of Plastinated Specimens: Study of Tissue Characteristics and Evaluation of the Hardening Process of the S10 Technique. C.A.C. Baptista2, R.W. Henry,1 G. Williams,2 R. Brinker,2 Medical College of Ohio, Toledo, OH, 1The University of Tennessee, Knoxville, TN; 2Medical College of Ohio, Toledo, OH, USA.
Magnetic resonance (MR) imaging, a new, flexible tool for clinical diagnosis, provides diagnostic quality images. While the DEC microVAX workstation software has been developed to analyze and to study MR images. To document that the MR images obtained from the GE signa MR scanner reproduce the anatomy of the scanned organ accurately, plastinated specimens seemed ideal for this purpose. Both pre and post- plastination organs were scanned. The pre-plastinated, scanned organs were hearts perfused with a mixture of gelatine and para-magnetic contrast (gadopentetate dimeglumine). The post-plastinated scanned S10 specimens were lungs and brains which were scanned at known intervals after exposure to the curing agent (S3). All specimens were scanned in a GE Signa 1.5 Tesla MR Scanner and the images stored in a Vax 3600 computer. Pre-plastinated specimens scanned nicely. Post-plastinated specimens yielded good images prior to curing and up to 10 days of exposure to gas cure. From this point, as curing proceeded, the quality and quantitative value of the MR images declined proportionately. Conclusions of our investigation include: (1) The scanning of phantoms, for example, cadaver hearts, verified that MR reproduced the anatomical detail of the scanned organ; (2) Plastinated organs were useful for interpreting MR images and thin sections of plastinated organs maintain their shape and form; (3) Since, the MR images are generated from "vibration" of hydrogen protons, it was better to scan the organs before plastination: (A) Quality of the MR image obtained from plastinated specimens had an indirect relationship to the time of hardening of the specimen. (B) Imaging of plastinated specimens should be limited to the beginning of the hardening process, that is, between the withdrawal of the specimens from the impregnation chamber and up to 10 days of hardening.
Plastination as an Additional Option in Anatomy Museum Preparation. Russell Barnett, Anatomy Museum, University of Otago, New Zealand.
Plastination was introduced to the Department of Anatomy at the University of Otago in such a way as to demonstrate to our teaching staff the potential this material has for a medical curriculum. We are currently involved with only the S10 and PEM27 plastination techniques but as the realization of the advantages of the technique increases, so to is the demand for plastinated specimens and a need for expansion of or facilities. Although we are involved with various other preservation techniques, which some believe for security and ethical reasons still have their place, I believe the use of plastinated specimens will prove to be far more beneficial in the long term.
Preparation of Holograms from Plastinated Specimens. Harmon Bickley, Mercer University School of Medicine, Macon, GA, USA.
Because of their striking three-dimensional quality, it is reasonable to expect that holograms would make excellent teaching media for medical subjects such as anatomy and pathology. The preparation of holograms from fresh or fixed human soft tissue, however, is almost impossible (without an extremely expensive pulse laser) because of the long photographic exposure time required and the unusual vulnerability of the process to even the slightest movement. Quite in contrast, plastinated specimens, which are comparatively rigid and practically free of water, make ideal subjects for holography. Holograms have been prepared (by Dr. Bert Myers of the Veterans Administration Medical Center, New Orleans, Louisiana, USA) using plastinated specimens provided by Mercer University School of Medicine. Although they represent the first efforts in a project of this kind, these holograms have proven useful as teaching media. With further development in holographic technology, master holograms of even higher quality could be prepared and copies could be shared among all medical teaching institutions.
Plastination of Old Formalin Fixed Specimens. Mario Cannes, P. Fuda, L Padella, A. Rosate, Universita Degli Di Torinto, Torino, ITALY.
This paper offers an alternative for the study of gross anatomy for Medical Schools experiencing a scarcity of organs for various reasons. The objective of our work was to use old formalin fixed specimens as a source of material for plastination. This resulted from a decreased organ and body supply in Torino and much of Italy, even with an organized Organ Donation Program. Fortunately at the University of Torino Medical School, we had a large collection of formalin-fixed specimens, preserved from previous years anatomical dissections. The standard S10 procedure was used, so the really different aspect was represented by the specimen source. These specimens had not been subjected to perfusion and washing as indicated in the plastination manual nor to injection of coloring substances. They were fixed in alcohol, followed by formalin at not well-defined concentrations, and held at room temperature. Before dehydration in -25 °C acetone, excess fixative was washed out. Forced impregnation of Biodur S10/S3 was conducted in the vacuum chamber at -25'C, followed by standard procuring and curing with minor modifications. The structural integrity of these specimens seems similar to fresh plastinated organs.
We have not examined the microscopic characteristics of these plastinated specimens. This will be the next step, as we consider possible implications in the field of the paleopathology. We suggest using this approach to supplement Medical School teaching sets, where there is a scarcity of organ donors, or as in our case, the presence of a very restrictive law.
The Technique and Use of Plastinated Specimens in Teaching and Research: Gross Anatomical Sections of the Head and Neck. Margaret Cooper, St. Louis University School of Medicine, St. Louis, MO, USA.
With the advent of CT and MRI technology, the need for understanding sectional anatomy has become extremely important. This is especially true in regard to sectional anatomy of the head and neck. The plastination technique is advantageous in providing sections for study purposes. Head and neck specimens were scanned by CT or MRI prior to sectioning and marked, using the laser beam as a guide, during the scanning process. The specimen was frozen and 4- 8mm slices were prepared on a Hobart band saw, using the markings as guides. Following cleaning and rinsing in water, the sections, which should be kept in order, were dehydrated in a series of graded alcohols and 100% acetone (which is an intermediary solvent and completes the dehydration process) and placed in Biodur S10/S3 mix in a vacuum chamber at a pressure of 10-15 mm Hg for a week. All of the preceding were done at room temperature. Following impregnation, the specimens were allowed to drain for a week, prior to gas cure exposure. Upon removal from the gas cure, the specimens were labelled with a predetermined code and put back into the cure. After a short period of being exposed to ambient air, the specimens were ready for use. Students compare the plastinated sections with the CT or MRI films and therefore, quickly learn the anatomical features of the head and neck sections. The advantage of using plastinated head and neck sections is their repeated use by many students without any deterioration. The keys to good sections are cutting a frozen specimen with a sharp blade, cleaning the section thoroughly, proper plastination technique, and labelling the sections for identification purposes.
Plastination in Adversity. Edward V. Crabill, University of Pittsburgh, Pittsburgh, PA, USA.
For their laboratory experience, gross anatomy students at our school study museum specimens, models, and prosections prepared by faculty and graduate students. Because the prosections are used extensively each year by approximately 75 students, delicate structures, especially in the Head and Neck preparations, had a relatively short life. Decreasing availability of dissectors (and cadavers) hindered our efforts to replenish the supply of prosections. Therefore, the relative permanence and durability that plastination provides seemed ideally suited to our needs. Unfortunately, establishing a plastination laboratory coincided with the start of extensive renovations of the Dental School building, and space for laboratories, existing or new, was at a premium. After a few unsuccessful attempts to work in shared quarters, a more suitable laboratory, which also serves as a departmental store room, was made available in October, 1987. Although there have been constant problems with the effects of the renovation project upon health, safety and cleanliness, the laboratory is now marginally satisfactory. All specimens plastinated to date are from routinely embalmed cadavers, some of which have been in use for 15-20 years. Irreparably damaged structures were trimmed away, salvageable structures were repaired, and deeper regions and structures were dissected. Only a few relatively new dissections of superficial structures of the head and neck have been prepared. The plastination procedure is routine with few exceptions. After impregnation with S10, dissected structures are thoroughly drained and carefully positioned and anchored prior to the gas cure. To provide for a slow, but steady curing process, an interval timer is used to control the gas-cure pump. To date, 35 head and neck dissections, 8 kidneys, 17 hearts, and 3 joint preparations have been prepared and used in our teaching labs with great success.
Application of Plastination in Meat Inspection Pathology. Boris G. de Gritz, College of Veterinary Medicine, Helsinki, FINLAND.
Since the early eighties, the total number of animals slaughtered in Finnish abattoirs has decreased from over 3 million units in 1981 (excluding poultry) to less than 3 million units in 1984 and the trend is still decreasing. Because of the decline in the number of animals slaughtered and the improvements in the veterinary service, the number of detected disease conditions has reduced. Various animal diseases, e.g. tuberculosis, have not been recorded in recent years. The above mentioned circumstances necessitate the collection of samples of representative pathological conditions from inspected carcasses and viscera for preservation. Additionally, the obvious documentary value of a museum display of such specimens is of educational importance. A comprehensive selection of plastinated specimens of each disease condition, which is important for meat inspection, will be useful in teaching meat inspection pathology to veterinary students.
Plastination at Baylor College of Medicine. Gregory Duncan, Baylor College of Medicine, Houston, TX, USA.
In setting up a plastination lab, the first need is space. Without available space, the equipment and specimen preparation had to be integrated into existing laboratory space. Most equipment was obtained from university and departmental storage rooms. The limited space and budget allowed only for the establishment of plastination at room temperature. A recent source of chemicals has been the Environmental Safety Office, who are called upon to dispose of methylene chloride, acetone, and ethanol. Obtaining polymer and dehydration chemicals are our continuing costs. Second hand equipment has some repair and refurbishing costs that are indefinite but must be expected. A cost of operation that was overlooked was that of dry ice used in the acetone condensing bath. Results with room temperature S10 have been good and shrinkage has been at an acceptable level using acetone as the dehydrant and volatile medium. Methylene chloride use has been discontinued. Utilization of plastinated specimens has been restricted due to loss of specimens and intermixing of plastinated specimens with wet specimens in the anatomy labs. Therefore, specimens must be monitored in some fashion to prevent this occurrence. Specimens are now on display in the anatomy museum. Future applications include plastination of all wet museum specimens and lab prosections that are easily and frequently damaged, such as pelvic diaphragm, lateral pelvic wall, and posterior pharynx. Plastination specimens may be repaired by gluing.
Plastination in Bone Histology. F. Eitel, R. Seibold, Chirurgische Klinik Poliklinik Ludwig-Maximilians Universitat, Miinchen, WEST GERMANY.
A decisive factor influencing fracture healing is microcirculation. As a result of methodological difficulties in determining microcirculation in bone tissue, there are numerous methods for representation of this variable (Table 1).
Table 1
INVESTIGATION OF VASCULARIZATION (direct functional variable)
Measurement of the venous outflow
Clearance techniques (85Sr, 125J)
Erythrocyte labelling with radioisotopes
Microsphere technique
Dilution methods
Intramedullary pressure
measurements Vital microscopy
INVESTIGATION OF VASCULARITY (indirect functional parameter)
Storage of radioisotopes in bone tissue
Capillary- occluding microsphere techniques
Microangiography for representation of the vascular pattern (with India ink, soot dispersion, barium sulfate, plastics or dyes)
Histomorphological investigation techniques (fluorescent microscopy of labelled bone)
Each of these methods has its specific advantages and disadvantages. The method chosen must be appropriate to the problem to be investigated, i.e. in the one case flow studies or in another case representation of indirect functional parameters (Table 2) are indicated.
Table 2
Vascularity is determined as an isomorphic parameter of the microcirculation. Definition of parameters which can be represented by microangiography Vascularity (Pattern of vascular distribution):
Density indicates: the degree of tissue supply (number of vessel filled by contrast medium per unit bone volume).
Direction of branching reflects: the direction of flow (number of vessel branches open to periostea! or endosteal surfaces or in the longitudinal axis of bone per unit bone volume).
Vascular network indicates: the capacity to compensate interruptions of the vascular bed, e.g. after trauma or after surgery ( number of anastomoses between anatomically separated vessel areas per unit bone volume).
In respect to the investigation of fracture healing, microangiographic studies are well established. Direct gross and microscopic visualization of the vascular pattern in bone was first described by Splalteholz (1911). This technique involves injection of the specific vascular network with India ink, demineralization of the whole bone, dehydration and clearing of the cortex with a mixture of methylsalicylate and benzylbenzoate. The following disadvantages of this technique are apparent:
1) length of time (6 weeks) for demineralization of long bones, 2) toxic and odorous nature of methylsalicylate, 3) bone must be examined in the fluid methylsalicylate which does not maintain the original form of the bone for an extended period, and 4) because the bone is not embedded in a solid material, standardized bone sections are not obtainable. This study addresses improvements in microangiographic techniques.
Plastination techniques originally developed for macroscopic sections (von Hagens, 1981) can be modified to prepare microscopic sections (Eitel et al., 1986). Particularly good penetration of the histological section occurred during preparation when standard techniques for freeze substitution, defatting and forced impregnation with resin were employed. Various polymers and polymer mixtures were used and their results compared, to determine the advantages and disadvantages of each polymer-mix. Biodur E50, Biodur E7, Biodur E700 and flexibilisator AE15 were used for plastination of bone sections. Sectioning techniques and the use of histological stains have been described for both calcified and decalcified bone. The modified Spaltehdz technique was used for decalcification of primarily plastinated specimens. These decalcified specimens under went a second plastination procedure (according to sheet plastination). Utilizing these techniques, plane parallel standardized sections were produced for morphometric examination of the vascular structure of the bone and soft tissue and the filling quality of various contrast media were assessed. Variables influencing the degree of filling and the visualization of vessels were determined (Table 3) and compared to a reference method (intravital microscopy of pancreatic vascularization).
Table 3
Variables which influence the degree of filling and the visualization of the vessels:
CONTRAST MEDIUM
Nature of the contrast medium (particle size, adhesivity)
Viscosity of the contrast medium
NATURE OF APPLICATION
Vessel contents (preflushing to remove blood)
Infusion pressure and duration
Time of injection (intra vitam/post mortem)
FUNCTIONAL STATE OF THE VESSEL REGION TO BE VISUALIZED
Width of the vascular lumen (tonus, vasomotion)
Flow volume/unit of time
PREPARATION TECHNIQUE
Fixative (degree of shrinkage) Means of decalcification
Section thickness
Barium sulfate accurately filled the arterial system to a vessel diameter of 0.05 mm. Epoxy resin (Biodur E20, MEK, Biodur E2) filled capillaries to a mean diameter of 0.011 mm, but only 12% of the capillaries visualized by intravital microscopy demonstrated a constant filling by epoxy resin. Improved microangiography techniques were demonstrated following plastination and using the modified Spalteholz method. Plastination appears to be useful for the examination of microscopic specimens. Plastinated sections allow different methods of evaluation (light microscopy, fluorescent microscopy, microradiography and microangiographic studies) on the same specimen. The disadvantages of the original Spalteholz method are overcome by the described modifications.
References
Spalteholz DW: Uber das Durchsichtigmachen von menschlichen Praparaten. Hirzel, Leipzig, 1911.
von Hagens G: Emulsifying Resins for Plastination. Der Praparator 25:43,1981.
Eitel F, R Seibold, B Hohn, L Schweiberer: Modification and Standardization of a Microangiographic Technique (Spalteholz). Unfallchirurg 89:326-336,1986.
Applications of Plastination in Embryoloaical and Histoloqical research. Helga Fritsch, Medical University of LQbeck, Lubeck, WEST GERMANY.
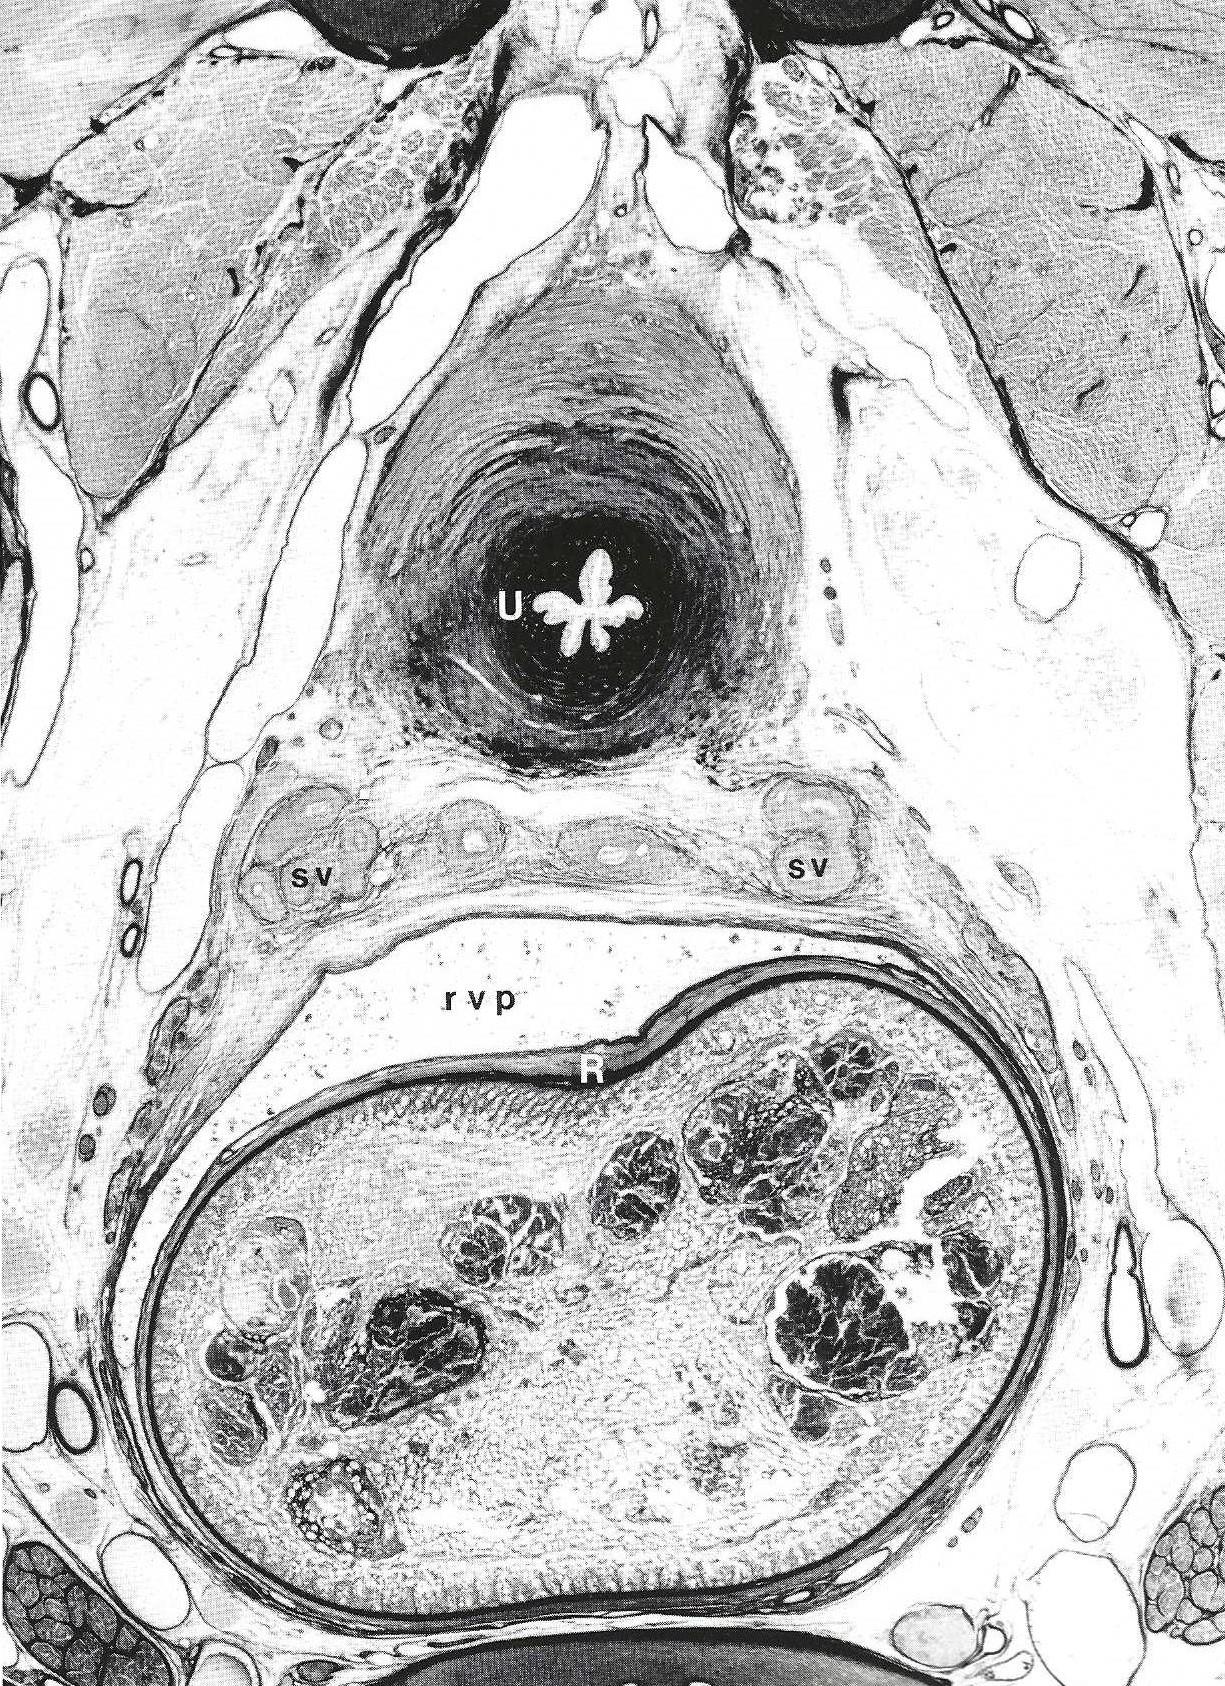
Figure 1 - Transverse section (600/µm) through the pelvis of a male fetus (191 mm C-R length) X 14. U = urethra, sv = seminalvesicle, rvp = rectovesical pouch, R = rectum.
Research into topographical relationships between human fetuses and adults requires a method that provides: 1) Preserved topographical relations between various tissue components; 2) An insight into the architecture of the connective tissue; and 3) Preparations of fetuses comparable to preparations of adults. Since neither the commonly used paraffin method nor the celloidine technique meet these requirements, we developed a new histological method based on the plastination technique [1]. In order to study the topography of the connective tissue in the human pelvis and to investigate its developmental changes, pelvis of fetuses impregnated with the epoxy resin E12 were serially cut with a diamond-wire saw [2]. The sections (300 - 600//Jm) were mounted on microscopic slides and the free surface was smoothed and polished to remove the traces of the diamond wire [3]. The sections were stained with methylene- blue/azure II and counterstained with basic fuchsin [4]. This staining technique yielded excellent results (Fig. 1, pg. 7) and conserved tissue. Topographical relations were preserved, allowing the study of developmental changes of: The pelvic connective tissue surrounding the rectum [1, 5], the topography of the pelvic autonomic nerves [6], and the ligamentum teres. Three- dimensional computer assisted reconstructions of certain structures were performed on serial sections. This technique is suitable in other fields of basic clinical research such as dermatological studies concerning the nail organ [7].
References
1. von Hagens G, et al.: Anat Embryo! 175:411-421, 1987.
2. Fritsch H: Anat Embryo! 177:513-522,1988.
3. - -, L Hegemann: Anat Anz (in press), 1990.
4. - -: Stain Technol 64:75-79,1989.
5. - -: Anat Anz 170:273-280, 1990.
6. - -: Anat Embryo! 180:57-64,1989.
7. Hegemann L, H Fritsch: hautnah dermatologie 2:4-8,1990.
Pre-Natal Cervical Lordotic Curvature. M. R. Haffajee, University of Durban-Westville, Durban, SOUTH AFRICA.
In the preparation of plastinated specimens of foetuses ranging in age from three to six months, it was noted that a cervical curvature was present after utilizing both the S10 and PEM techniques. Previously, it was accepted knowledge that a pre-natal, cervical-lordotic curvature only occurred late in the intra-uterine life and was accentuated when head elevation begins at about three months, postnatally. This discovery, in plastinated specimens, led us to question whether its existence was a result of plastination or whether it existed in the fresh state. Grey's Anatomy (7th Edition) confirms the presence of two primary curvatures, namely, the thoracic embryonic axis concave anteriorly, as well as, the sacral curvature concave anteriorly. Bagnall (1977) verified the existence of a cervical curve radiographically in foetuses as young as 91/2 weeks of age when ossification centres could be identified. Our investigation using a series of fresh abortuses, measured the cervical and thoracic curvatures pre and post plastination (S10 technique). The curvatures were measured as radii of matched circumferences of the curvatures. Thus the smaller the radius, the greater was the curvature. The results verified the existence of a pre- natal cervical lordotic curvature, generally a greater curvature than the thoracic curvature. This cervical lordotic curve was more or less constant about a mean, even as the foetus' age increased. Following plastination, the cervical lordosis actually increased but disproportionately with age. As the foetus aged, the thoracic curve tended to increase towards a relatively fixed curvature, but less than the cervical curve. These changes in the thoracic curve may result from its relative immobility as compared to the cervical curve.
Reference
Bagnall, KM, PF Harris, PRM Jones: A radiographic study of the human fetal spine. The development of the secondary cervical curvature. J Anat 123:777-782, 1977.
Dehydration of Specimens for Plastination. Robert W. Henry, College of Veterinary Medicine, The University of Tennessee, Knoxville, TN, USA.
Usually specimens to be plastinated are moist. Therefore, it is necessary to remove the tissue water (dehydrate) prior to forced impregnation or plastination. During dehydration, specimen fluid (water), as well as, some fat is replaced with an organic solvent. The solvent must be miscible with water to be a dehydrating agent and may be of various chemical structure (alcohols or ketones). For plastination either alcohol or cold acetone may be used. Methylene chloride (chlorinated hydrocarbons) is not a dehydrating agent. An inherent problem of dehydration is shrinkage which may be minimized by: 1) starting dehydration in a lower % of ethanol or 2) using cold acetone (freeze substitution). In freeze substitution, the ice in the specimen is replaced by the acetone (dehydrating liquid). When using either ethanol or cold acetone, it is important to use an adequate volume of dehydrating liquid. A suggested ratio is: 1 volume of tissue to 10 volumes of dehydrating fluid. The concentration of the dehydration fluid must be monitored at prescribed intervals (weekly). After the water content has remained similar for two or three days, the specimen is moved to a new dehydrating solution. ETHANOL: Room temperature specimens are started out in a low % of room temperature ethanol (50%), allowed to equilibrate and later placed in ascending concentrations of ethanol, ie: 60%, 70%, 80%, 90%, 100%. Advantages: Carried out at room temperature; therefore, less deep freezer space is necessary. Specimens can be stored in 70% ethanol. Specimens from embalmed tissues, containing standard embalming fluids, are cleansed of the polyvalent alcohols (glycerin or ethylene glycol) or phenols. Specimens are defatted. Disadvantages: shrinkage; an intermediary solvent is necessary; the specific gravity of ethanol and alcohol are similar 0.79. Cold ACETONE (-25 °C): For the past few years, this has proven to be the BEST METHOD of dehydration. Acetone dehydration must be carried out in the cold and not at room temperature. Room temperature acetone will cause excess shrinkage. Advantages: Acetone serves as the intermediary solvent; Minimal shrinkage; Superior specimens; and Shorter dehydration time. Disadvantage: must be done in a deep freezer.
Preparing and Plastinating Veterinary Anatomy and Pathology Specimens. Robert W. Henry, College of Veterinary Medicine, The University of Tennessee, Knoxville, TN, USA.
Veterinary specimens offer an array of opportunities and challenges to the plastinator. Specimens range from extremely small to immense. Equipment should be versatile to accommodate a variety of needs. For consistently good results, hollow organs should be fixed, dehydrated and cured in the dilated state. Gravity or air may be incorporated in the dilation process. Hollow organs may be cut to allow cleaning of fecal material from the organ and then closed with suture material prior to dilation. In particular, the anatomical position of the organ or specimen should be considered and appropriately positioned during fixation, otherwise, the final product will be distorted. Whole body slices are fantastic aids for study of sectional anatomy, CT scans or MR images. Fibrous tissue or skin covered specimens must be perforated and polymer injected to minimize shrinkage. Polymer is easily removed from hairy specimens prior to curing. Reptiles, opened on the ventral midline may be plastinated. Dried lungs, which are anatomically preserved, may be forced-air- impregnated with a S10/S3-xylene mix. Fixation and dehydration vats should be similar in size to your plastination chamber. Therefore, if the specimen fits into the dehydration vat, it will fit into the plastination chamber. Thickened polymer may be thinned with xylene (3-50%) and used for impregnation of lungs or gastrointestinal organs. Impregnate slowly. It takes time to produce beautiful specimens.
Room-Temperature "Forced Air" Impregnation of Dried Lungs with S10/S3-xvlene mix. Robert W. Henry, College of Veterinary Medicine, The University of Tennessee, Knoxville, TN, USA.
Air-dried lungs were successfully impregnated with S10/S3-xylene mix at room temperature by using a laboratory air source to propel the polymer from the air ways into the parenchyma of the lung tissue and to the lung surface. After thorough drying, six mixtures of S10/S3 and xylene, varying from 15% to 40%, were used to impregnate lungs, using forced air rather than vacuum. The trachea was cannulated and the lungs positioned so that one-half of the polymer-xylene mix was poured into the right tracheobronchial tree and one half into the left portion of the tracheobronchial tree. High velocity laboratory air was utilized, for four to seven days, to force the polymer mix from the air ways into the lung parenchyma. During the first 15 minutes of impregnation, the lungs were turned in all directions to assure that polymer reached all areas of the lungs. Thereafter, the lungs were inverted daily. The trachea and surface of the lungs were coated daily with polymer mix. After one week of air impregnation, the lungs were cured by bubbling air through 86 and into the trachea for 15 minutes a day for 3 days with a plastic bag surrounding the lung preparation to serve as curing chamber. Air impregnated lungs maintain their anatomical relationships. High percent xylene lungs are more spongy than lower percent xylene lungs. Conversely lower percent xylene lungs are firmer.
Plastination of Granular Hvdroxvlapatite and Attached Tissue. GUnther Hotz, H. Gilde, R. Mannl, T. Honer, Department of Maxillo-Facial Surgery, Universitat Heidelberg, Heidelberg, WEST GERMANY.
A plastination and sawing-grinding technique for undecalcified histological sections of bone, which contain implants of granular hydroxylapatite with soft and hard tissue is presented. The clear and thin sections contained minimal artifacts, especially along the tissue-implant interface. Both the hard and soft tissues adjacent to the granular implant was preserved. The sections were beneficial for observation of cell morphology and for obtaining morphological data.
Fixation Solutions for Color Preservation in Plastination. Half Kessler, Institut Fur Pathologic, München, GERMANY.
Color plays an important role when presenting many pathological findings. Most solutions used for color retention in fixation, which use formalin-salt mixtures and an alcohol bath for color development, can be used for silicone plastination. Two of these methods are presented: Method after KAISERLING: Fixation in a solution of: 15 g potassium nitrate, 30 g potassium acetate, 200 ml concentrated Formalin, in 1000 ml distilled water. Fixation is completed when the specimen is grey-brown. After fixation, color development is in 80 - 95% alcohol for less than 12 hours and then start dehydration; or store the specimen in a solution of: 200 g potassium acetate, 400 ml glycerine, in 1000 ml distilled water. When ready for dehydration, rinse in water for 24 hours. Method after JORES: Fixation in a solution of: 50 g synthetic salt of Carlsbad, 50 g chloral hydrate, 50 ml concentrated Formalin, in 1000 ml distilled water for 7 to 14 days. Rinse in water for 24 hours and start dehydration; or store the specimen in a solution of: 300 g potassium acetate, 600 ml glycerine, in 1000 ml distilled water. When ready for dehydration, rinse in water for 24 hours. If possible, dehydrate and defat via freeze-substitution with acetone.
Foetal Anatomy Using the PEM and S10 Techniques. G. Mathura, University of Durban-Westville, SOUTH AFRICA.
Freshly obtained foetuses were plastinated using either the standard PEM or S10 technique. After plastination, a suitable container was selected which would allow 15-25 mm of resin to surround the foetus, as resin is used as an embedding media to facilitate maneuverability and cutting of thin slices. Catalyzed resin (15 mm thick) was poured into the container and allowed to harden to form a base upon which the specimen is to lie. The foetus was centered on the hardened resin and more resin was poured to cover one quarter of the foetus. When this had hardened, a similar amount of resin was poured covering half the foetus. Finally, the entire foetus was covered by 15 mm of resin. It is important to pour the resin in stages, since the heat generated during the setting period of a thick layer may damage the foetus. When the resin had set and cooled, it was removed from the container and either sagittal, horizontal or coronal sections were made. A band saw with a sharp, fine-toothed blade was used to cut off the excess resin and the foetus was carefully cut in 3-5 mm slices. Resin dust settling on the foetus was gently vacuumed off, the slice was shaped and sanded as desired, and painted with a warm mixture of resin.
Forced Impregnation. P.P.C. Nel, Department of Anatomy and Cell Morphology, University of the Orange Free State, Bloemfontein, South Africa.
Forced impregnation is the central most step in plastination. The art of plastination is the ability to match the quantity of the solvent with the type of tissue and specimen size and at the same time other variations, such as the vapor pressure, and still avoid shrinkage. Preparation of material for forced impregnation can be divided into three main steps: Fixation and dehydration, Preparation of the polymer mixture, and Introduction of the specimen into the polymer mixture. For the proper polymer mix, combine the proper quantity of hardener and polymer (irrespective of the technique used) and stir thoroughly. Place the mixture under vacuum to draw out the air that was stirred into the polymer by mixing. The specimen must be submerged into the polymer mix directly and quickly from the volatile intermedium. If the specimen surface dries, the finished product may show white spots which are small points of shrinkage. Specimens soaked in acetone tend to float while those soaked in methylene chloride sink. The specimen should not be forced against the bottom of the vacuum chamber or float out of the polymer as the polymer mixture must surround the specimen for uniform impregnation. Forced impregnation may be divided it into three steps: Specimen placed into the polymer mix, Intermedium "boiled out" of the specimen, and Polymer drawn into the specimen. The volatile intermedium has a high vapor pressure and a low boiling point (acetone: +56"C and methylene-chloride: +408C). The polymer mix, in contrast, has a low vapor pressure and a high boiling point. The intermedium is extracted out of the specimen which causes a pressure difference between the specimen and the impregnation bath. This pressure difference allows the polymer to be drawn into the tissue. The extraction of the volatile intermedium (boiling) must be slow enough to allow sufficient time for the polymer to enter the specimen. Boiling is monitored by observing bubble formation on the surface of the polymer mix. If boiling is too fast, the polymer does not have enough time to flow to all parts of the specimen and the structural framework of these areas may collapse and the specimen will shrink. Boiling is controlled by a air inlet valve and pump speed. Impregnation time is dependent both on polymer viscosity and specimen thickness.
Developing a Plastination Laboratory for a New Medical Curriculum. Marita L. Nelson, John A. Burns School of Medicine, University of Hawaii, Honolulu, HAWAII, USA.
When recent curricular revision, to a problem-based learning format, eliminated all formal lecture and laboratory courses, we had to find other ways of teaching human gross anatomy to medical students. Our three choices were: cadaver demonstrations by advanced medical students on request, short elective regional dissection courses, and independent study of prosected cadaver specimens. Plastination was the method chosen to preserve prosections for long-term use. A plastination laboratory was developed and specimens were processed at room temperature to increase the speed of preparation and to minimize cost. Our specimens were processed completely in one month and shrank a maximum of 17%. Twenty-four specimens have been prepared including a series of sagittal sections through the head and neck. The latter are valuable in helping students interpret CT scans and magnetic resonance images. A collection of plastinated specimens are being prepared for use in a multipurpose learning resources facility, which we anticipate will enhance student learning in anatomy.
On the Production of Plastinated Specimens for Teaching Veterinary Morphology. Monique Nicaise, P. Simoens, H Lauwers, Faculty of Veterinary Medicine, State University Ghent, GHENT, BELGIUM.
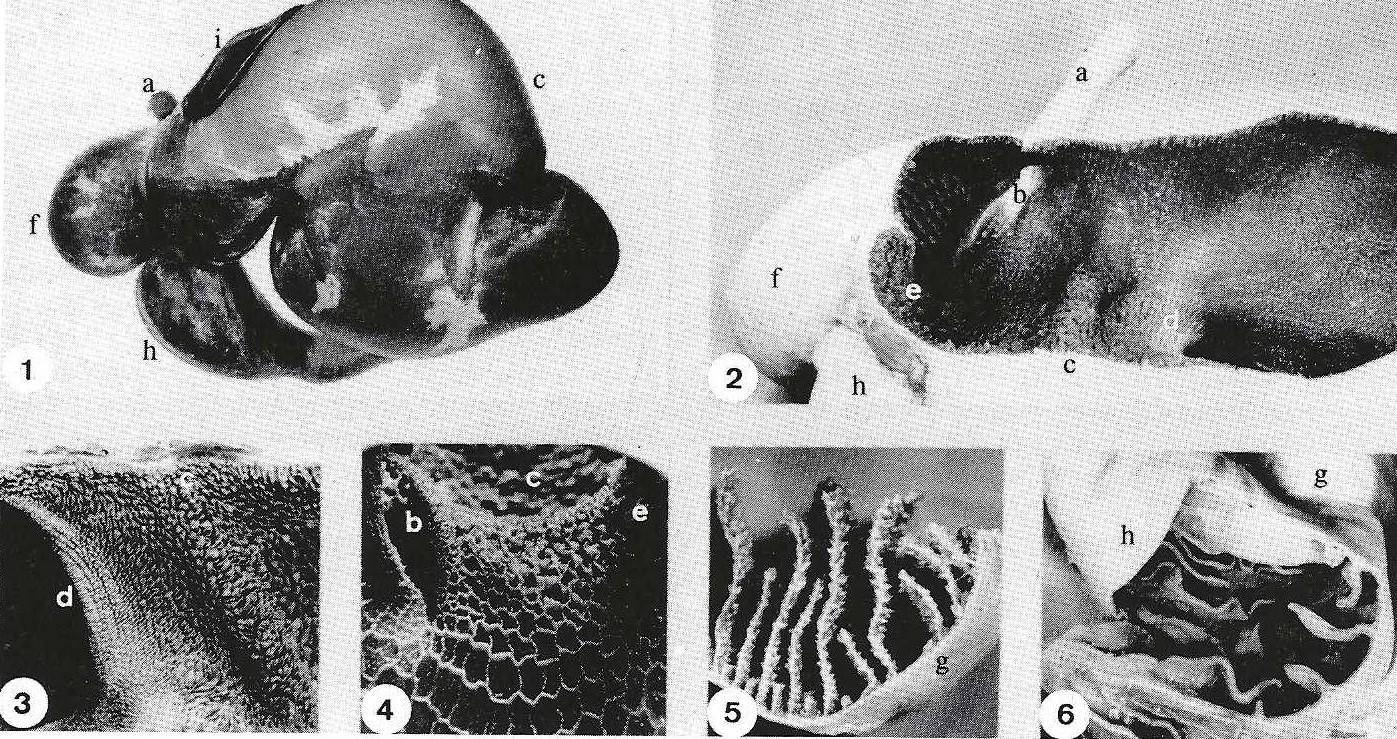
Plastinated stomachs of goats: 1 - Left lateral view. 2 - Dorsal view after removal of the dorsal ruminal wall. 3 - Ruminal papillae. 4 - Reticular ridges and cells. 5 - Omasal laminae. 6 - Abomasal folds. Esophagus (a), Reticular groove (b), Rumen (c), Cranial pillar of rumen (d), Ruminoreticular fold (e), Reticulum (t), Omasum (g), Abomasum (h), Spleen (i).
In order to obtain demonstration specimens for teaching veterinary gross anatomy, plastination by means of the standard 310-technique was started in our Institute two years ago. Some aspects of the technical procedure were experimentally tested and modified: Perfect fixation can be obtained by intravascular flushing with saline and subsequent perfusion with a fixative. However, this perfusion technique should not be performed for plastination of hearts and muscles, because haemoglobin provides good natural pigmentation which supplements that of myoglobin. JORES-solution, in which Carls bath salt is replaced by anti-oxidants, is preferred to the original Jores-fixation- solution and to the classic formalin-solution. Silicone polymer penetrates dense-connective-tissue capsules of organs very poorly. Therefore, these capsules should be removed or perforated to enhance impregnation and prevent shrinkage of the organs. In animals smaller than medium-sized dogs, impregnation of the thick wall of the left ventricle of the heart may be incomplete, with impregnation from the outer surface only. This is caused by air-bubbles which are trapped inside the ventricular lumen. Bubbles expand when vacuum increases and penetrate the cardiac wall, thus preventing impregnation by silicone. Plastinated specimens proved to be very useful for teaching veterinary anatomy (comparative, descriptive, developmental and clinical). This is illustrated by the plastinated stomach-complex of a goat (see Figure), which is superior to formalin-fixed-dried models or to commercially available models. The plastinated specimen is most similar to the fresh organ and will not collapse upon incision. Other examples are plastinated hearts, brains, joints and nematodes which were useful for demonstrations in anatomopathology, neuroanatomy, arthroscopy and parasitology, respectively. Formula of the modified JORES- solution, obtained by our experiments: Distilled water 10 L, Chloral hydrate 500 g, Formalin 800 ml, Glycerol 1 L, Ascorbic acid 40 g, and Sodium sulfate 20 g.
An Insight Into Amateur Plastination or Plastination atHome. Stephen M. Probst, Universitat Heidelberg, Heidelberg, WEST GERMANY.
It seems quite difficult to be engaged in plastination at home, since plastination is based upon the physical properties of polymers under defined physical conditions. Since vacuum pumps, manometers, and desiccator jars do not belong to the normal houseware of an average German family, I needed some persuasion to convince my parents that my luck depended on the purchase of some technical equipment for use in my own little plastination laboratory. The most important of these have been made available to me and with some improvising, I was able to produce my first specimens. This shows that even with primitive means successful plastination can be carried out, which might encourage the beginners in the well equipped professional labs. Formaldehyde fixation was carried out in tight sealed plastic or stainless steel containers. Somewhat more complicated was the dehydration process. I prefer freeze substitution, as acetone is used in smaller amounts and the cost is not much higher than the current two courses in gross anatomy (Anatomy of the Dog and Cat, Anatomy of Ungulates and Birds) will be replaced by a course in Principles of Anatomy and a species-specific anatomy course of the student's choice. The principle course will be non-species specific and will have minimal dissection by the student. The laboratory portion will be taught principally with prosected plastinated specimens. The species specific course will be chosen from a menu of courses including anatomy of the dog and cat, anatomy of the horse, anatomy of ruminants and pig, and anatomy of exotic animals and birds. Species specific anatomy courses will be in depth dissection courses with strong clinical correlation. Plastinated specimens will be used to supplement the dissection. The proposed curriculum will reduce the number of embalmed specimens used for dissection thus allowing the shifting of funds to plastination. A significant increase in the number and use of plastinated specimens is anticipated.
The Use of Plastinated Head Specimens in Planning Microsurgical Approaches to the Skull and Brain Base, K. D. Resch, A. Pernecsky, Klinikum der Universitat Mainz, Mainz, WEST GERMANY.
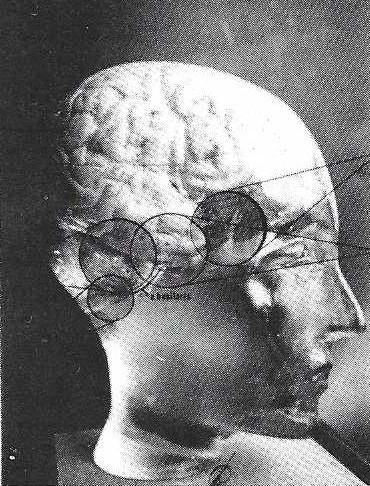 The introduction of the microtechnique to neuro surgery called for a new paradigma of the clinical anatomy of the head: the key-hole anatomy through the microscope had to be established. To transfer the idea of sophisticated, anatomical key-holes of the brain base to anatomists and surgeons, it was necessary to introduce three-dimensional plastinated head specimens with which to demonstrate the clinical anatomy. For approach analysis, approach design, and planning of an operation, plastination was useful in neuropathological anatomy and clinical cases. Four head specimens with numerous approaches and four clinical cases (1 carotid aneurysm and 3 giant basilaris aneurysms) were presented to demonstrate the principles of this method. In the future, plastinated head specimens will be helpful in working out the standards of Endoscopic Neuroanatomy.
Thin Sheet Specimens Behind Photoglass, Atfred Riepertinger, Stadtkrankenhaus Munchen-Schwabing:, Munchen, WEST GERMANY.
Thin sheet specimens behind photoglass is a new way of presentation of plastinated material. The characteristic feature of this method is that in a small area a relatively high quantity of pathological findings, be it in a particular organ or in different preparations, can be displayed. A further advantage is that the BIODUR $10 technique is used. The time for the special manufacture of thin sheet specimens is between forced impregnation and gas curing. In select cases (depending on the organ) it is possible to prepare the thin sheet after gas curing. Fixation- The fresh specimens taken during autopsy were cut in slices of 1.0 - 3.0 cm and put into a color-preserving solution after Kaiser1ing. One surface of the specimen was cut either during or after fixation. In order to obtain a clean cut, a special rotation-cutting machine was used. After seven days of immersion fixation and color development, the preparation was removed from the solution and dehydrated. Dehydration was achieved using cold acetone which was changed five times until a residual water content of less than 1% was reached and no yellow coloration was noted. Forced impregnation was in BIODUR $10 for a period of 14 days at -25 °C. After pressure equalization, the specimens were immediately taken out of the vacuum chamber. Preparation of thin sections: After the impregnated specimens had drained for two days at room temperature on a slanting support padded with an air-cushioned, plastic foil and were only slightly sticky, 1-2 mm slices were cut from the 1.0 - 3.0 cm organ slices with a rotation-cutting machine. These thin slices were placed on a BIODUR S2-pasted glass plate and covered with another glass plate. Approximately 6 kg of weight was used to press the thin section between the glass plate for about 1O minutes. The BIODUR S2 rapidly hardens the back of the thin specimens, otherwise the preparations would be distorted. GAS CURING of the slices was for 48 hours and $6 volatilization was hastened using an aquarium pump. Before gas curing, the surface was swabbed with $10 if necessary. Installation and finishing - A suitable glass pane and background was selected for the size and number of specimens. It is advisable to seal panes along their edges to prevent dust from collecting. Arrange the slices onto the base plate and glue them in place with a thin layer of silicone paste. Clear labelling completes this new way of presenting plastinated specimens.
Teaching in Macroscopic Pathology. Value of Plastination Using the Silicone ,S10 Technique, Joseph Rilschoff, K. H. Plate, C. Thomas, Philipps University of Marburg, Marburg, WEST GERMANY.
Education in macroscopic pathology deals with two obviously contradictory facts. First, in West Germany the autopsy rate has dropped dramatically during the last 15 years and thus only select cases can be used for teaching macroscopic pathology. On the other hand, imaging techniques have been markedly improved and are of central importance for the clinical diagnosis. The prerequisite of correct image interpretations, however, is a profound knowledge about the typical macroscopic changes in the diseased organ. Therefore, we started plastination in 1985 using the silicone S10 impregnation technique. Three hundred organs and organ sections were plastinated. In general pathology, seminars were performed by video presentation. Systematic pathology was taught with special regards to differential diagnosis. Methodologically, the use of a modified Kaiserling's technique (adding sugar to the original formula and restricting alcohol incubation to an eight hour maximum) yielded good color preservation which was superior to formalin fixation alone. Histologically, structural detail was well preserved as was shown by a two-step silicone dissolving technique.
1 Week Fixation: modified Kaiserling's
200ml formalin (40%)
1000ml Aqua dist.
15g K nitrate
30g K acet. acid
100g Sugar
Color Restitution: 4-8 hours
95% alcohol
Plastinated Specimens in Medical Anatomical Teaching. M. Scott, Memorial University of Newfoundland, St. Johns, Newfoundland, CANADA.
We have used plastinated specimens in teaching anatomy to medical undergraduates for four years. We have a double pump two-kettle system which has allowed us to produce two hundred human specimens ranging in size from small single organs to head, neck and upper thorax. We have restricted production to the S10 technique and are confident that we can plastinate any reasonable specimen within the size limitations of our system. Our plastinated specimens are used in gross anatomy, systems anatomy, neuroanatomy and embryology courses. The gross anatomy course runs for seven weeks using prosected specimens in a small group teaching setting. The systems anatomy is taught within multidisciplinary courses on the body systems. Neuroanatomy is taught within a course on neuroscience, and embryology is taught as a lecture course with a small laboratory component. We have limited the production of plastinated specimens to specific areas. For gross anatomy, we have produced a range of joint specimens (knee, hip, elbow, shoulder), a variety of organs (heart, kidney, liver, stomach), and "short" limbs including hands and feet. Our neuroanatomy collection includes several spinal columns dissected to show the spinal cord and spinal nerves. In teaching neuroanatomy, our goal is to supply each student with a plastinated set of specimens composed of a whole brain, a half brain, and a brain stem with cerebellum. Although the production of plastinated specimens is primarily directed towards undergraduate medical teaching, our materials are frequently used in teaching pharmacy and nursing students, as well as public displays.
Time and Money Savers in S10-Technique. Acetone Distillation. Michael D. Smith, Department of Anatomy and Neurobiology, Colorado State University, Fort Collins, CO, USA.
Several time or money saving items applicable to plastinators were discussed: constructing an S10 impregnation tank using a common household pressure cooker; use of Plexiglass, aquarium pumps, and aquariums to make S6 gas cure chambers; injection and plastination of canine brains using red latex; use of disposable cardiac catheters for heart injection; rapid separation of canine heart and lungs for dilation of the heart; sources of fetuses and other animal specimens for plastination; explanation of the features and use of commercial freeze driers as plastination machines; distillation of waste acetone produced via freeze substitution using a commercial programmable distiller; elimination of paraformaldehyde precipitate; cooler venting as a means of eliminating formaldehyde fumes associated with anatomy laboratories.
Staining of Thin Brain Slices Combined with Subsequent Plastination. Norbert Ulfig, Zentrum der Morphologic, J. Goethe-Universitat, Frankfurt, WEST GERMANY.
The configuration of subcortical structures in the human brain is often difficult to recognize in unstained sections. Subdivisions of nuclear greys are difficult to delineate, in particular, for the inexperienced student. Moreover, wet brain tissue is easily destroyed. Therefore, it appears desirable to combine the advantages of plastination with those of staining. Staining of 1-4 mm thick frozen sections (or thicker sections made with the aid of a macrotome) with astra- blue or aldehyde-fuchsin provides a sharp contrast between white and grey matter. Aldehyde fuchsin demonstrates the architectonics in the adult human brain in detail. It stains the intra neuronally stored lipofuscin granules and varying amounts of lipofuscin pigment are recognizable (pigment architectonics) in the subcortical structure. For standard S10/S3 plastination, the stained sections are placed between perforated plates to obtain sufficiently flat sections. The standard S10/S3 plastination procedure is used for impregnation. The items necessary for this technique are chemicals, buckets and vacuum chamber. Therefore, this technique can be utilized in any laboratory without much expenditure or experience. These plastinated stained brain sections are durable, convenient to handle, and can be used in teaching neuroanatomy and pathology.
Gas Curing. Andreas Weiglein, Institut fur Anatomie, Universitat Graz, Graz, AUSTRIA.
After impregnation, polymer curing has to take place to keep the polymer inside the specimen. For the S10 process, Biodur Gas Cure (S6) is used. There are two curing procedures: In one case, exposure to gas cure (S6) commences after a long precuring interval; this is called slow curing. In the other case, immediate exposure to gas cure is followed by a short final curing interval; this is called fast curing. Both slow and fast curing utilize Biodur S6. Gas curing is carried out at room temperature in a closed chamber containing a bowl with Biodur Gas Cure (S6) and a bowl with a desiccant (calcium chloride) (to absorb water condensation which may cause white silicate salt precipitations on the specimen surface. S6 evaporates at room temperature and builds up a gaseous atmosphere inside the chamber. To accelerate vaporization and circulation of the gas, a small membrane pump (used for aquariums) may be used. During slow curing, allowing the S10/S3-reaction mixture to thicken in the specimen before exposure to S6 is called precuring. To avoid shrinkage, precuring begins at room temperature. If time permits, it is best to use room temperature only. To shorten precuring, 40 or 50 °C temperature may be used as follows: 12 weeks at room temperature, 6 weeks at room temperature and 2 weeks at 40 *C, 4 weeks at room temperature and 1 week at 50 °C. Precuring is finished when the specimen is notably tacky. Then the specimen is put into the gas chamber for 2 to 4 days until it is dry to the touch. For fast curing, the specimen is initially placed in the gas chamber with a high concentration of S6 until no polymer oozes out of the specimen. For final curing, the preparation is put into a tightly closed receptacle (e.g., a plastic bag) for 2 to 3 weeks to allow the center of the specimen to cure.