This paper describes the preparation of six plastinated chicken dissections for Veterinary Anatomy teaching at the University of Pretoria, South Africa. Specimens were fixed in 10% formalin for seven to ten days, depending on the size of the specimen. Room temperature acetone baths were used for dehydration over a period of six weeks. Impregnation in S10 took place over a period of three weeks at -16 °C. The specimens were cured with S6. A peristaltic pump was used during preparation to ensure the intestines were rinsed properly, and the chemicals penetrated the whole specimen. In the curing phase, a compressor was used to inflate the duodenum and small intestines to show the digestive and reproductive tracts. The plastinated specimens were then labelled. Three chicken hearts in different stages of dissection (one intact, one from the ventrum/cranial, one from the dorsum/caudal aspect) were prepared. A muscle dissection was carried out on a whole chicken with its intestines intact. It was found to be preferable to carry out the dissection while the specimen was stored in the acetone bath. When the dissection was complete, the body wall of the chicken was cut through with an oscillating saw before impregnation in S10. Another adult chicken was used for the skeleton. All the muscle was removed, and the skeleton placed in formalin for fixation. After a week, the skeleton was placed in acetone for dehydration. The aim with this skeleton was to show how the ligaments maintain skeletal integrity. The ovary and reproductive tract were also dissected. The plastinated specimens are now available to the students in the anatomical museum. Now students, at their own pace, may study and learn the anatomy of the chicken more intensely.
chicken; plastination; veterinary anatomy
Mrs Wilma Olivier, Tel.: +27 82 639 7089, E-mail: oli4.wilma@gmail.com

![]()


Although the chicken industry plays a very important role in society, very little time is typically put aside in the Veterinary Anatomy curriculum for the teaching of avian anatomy.
It is not always possible to spend as much time as needed with the dissection of different species. When dissecting the chicken (Gallus domesticus) students typically dissect a single fresh specimen during their practical anatomy session. This may often be due to the limited use of animals and cadavers under Institutional Animal Ethical Committee guidelines (Menaka et al., 2015). Either plastinated or wet specimens can also be used, depending on the topic being taught (Mohamed & John, 2018). Fresh dissections are useful in teaching, but specimens are not always available, and so suitable substitutes are needed, which is where plastinated specimens can be highly beneficial for learning. Plastination (Hubbell et al., 2002) is the most important technique recently developed for the preservation of biological specimens (Latorre et al., 2007).
This article describes the dissection and plastination of six chickens and their various organs in order to better understand the anatomy of the chicken.
Six mature chickens were obtained from Eagles Pride Hatchery (Plot 48, Protea Road, Roodeplaat, 0035, South Africa), and euthanized. Specimens were fixed by immersion in 10% formalin for seven to ten days, depending on specimen size and intended use. Feathers were removed from the whole chicken specimens before immersion. The specimens were then rinsed in tap water for 24 hours. Excess water was allowed to drain off, and the specimens were placed in 99% acetone, at room temperature, for dehydration/defatting, and to aid dissection. Room-temperature dehydration is standard practice in our laboratory. The plastination facility is situated on the southern side (the cold side) of the building, on the ground floor. The lab is located between the two dissection halls, where the air-conditioning is always in operation. These factors help to maintain a cooler temperature in the plastination lab. Although cold temperature dehydration is standard practice (de Jong & Henry, 2007), satisfactory results have been achieved in our laboratory using room-temperature dehydration.
Dehydration and defatting took place over a period of three weeks. The specimens were immersed together in a container of 200 L acetone and agitated at weekly intervals. Acetone concentration was monitored with a standard acetonometer. Since the final acetone readings were between 98.5% and 99% it was not considered necessary to change the acetone.
Dissection of the whole chicken was carried out while the specimen was in the acetone bath. Previous attempts to dissect specimens either fresh or after formalin fixation were unsatisfactory. It was found to be preferable to dissect the specimen while it was stored in acetone. The muscles and tendons stand out clearly, and the bones can be cleaned neatly and precisely. The specimen was removed from the acetone for dissection and placed back into the acetone after dissection.
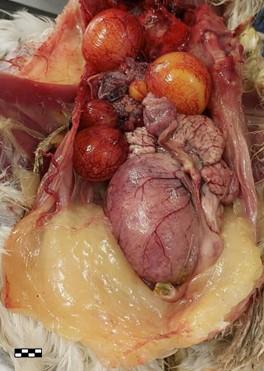
Figure 1. Fresh specimen of female domestic fowl reproductive tract with a developing egg in the magnum. Scale bar = 1 cm
One chicken was used for plastination of an intact skeleton, so the following process was used. All excess muscle was removed before the skeleton was placed in 10% formalin for fixation. To ensure complete penetration, the skeleton was immersed in formalin for three weeks. The skeleton was then removed from the formalin, rinsed in tap water for 24 hours, and placed in 99% acetone, at room temperature, to begin the removal of the fat and water from the specimen. The aim of this exercise was to let the chicken’s own ligaments hold the bones together. After three weeks the skeleton was removed from the acetone and left outside to dry before dissection was started. It was found to be much easier to work with the skeleton in this condition. All the remaining muscle (which now had a dry meat texture) was removed very carefully from the bones and the ligaments. The ligaments had to keep everything connected, as in the natural state. While removing the muscle, the skeleton was left
outside the acetone. This dry status of the muscle and ligaments assisted with the removal of the muscle and the identification of the location of the ligaments. When the skeleton was cleaned satisfactorily, it was placed back into the acetone to prepare for impregnation.
The second whole chicken was used as a nearly complete specimen with the muscles dissected as described above, but with its intestines still inside. When the dissection was complete, the chicken was cut in half longitudinally, with an oscillating saw, leaving the intestines intact. To keep the neck straight and in place, it was supported and tied down to a piece of wood (3 mm x 30 mm x 350 mm) through the whole dehydration process.
Four more chickens from the students’ Anatomy practical were used to prepare complete digestive tracts, the reproductive tract of a laying hen with a developing egg in the magnum (Fig. 1), and three hearts. The harvested specimens were cleaned thoroughly and placed in 10% formalin for fixation. With the digestive tract and the reproductive system specimens, a peristaltic pump was used to clean the various hollow viscera with water for two hours before fixation. The crop, proventriculus, and gizzard were opened and cleaned, and the hearts were dissected, before placing in 10% formalin to fix. After two weeks, these specimens were placed in 99% acetone for three weeks.
After dehydration, the specimens were impregnated in a vacuum chamber located in a deep freezer. Before any specimens were placed under vacuum, the specimens were immersed and left in the S10/S3 mixture overnight for the specimens to equilibrate in the mixture before reducing the pressure. The vacuum pump was switched on and the impregnation procedure ran for two to three weeks, as required by the specimens in the tank, and by taking pressure readings and monitoring the rate of production of bubbles. Impregnation of the skeleton took place with the whole dissected chicken and some other specimens.
Impregnation started at a pressure of 110 mmHg. After three weeks, the pressure reading was 3 mmHg with no bubbles coming to the surface. To make sure the vacuum was complete, the specimens were turned over after returning the chamber to ambient pressure then re-applying vacuum for one hour. When no further bubbles were observed, the specimens were removed from the vacuum chamber and excess silicone was carefully wiped off.
For the smaller specimens (the complete digestive and reproductive systems, the ovary and reproductive tract, hearts, and the digestive tract) impregnation was complete after twelve days.
Once impregnation was complete, the specimens were removed from the S10 mix and allowed to drain before curing with S6. Specimens were wiped every day to remove excess silicone. An aquarium pump was used for 2-3 minutes daily to vaporize the S6. It was very important to make sure no silicone droplets formed on the skeleton or ligaments. The specimens were arranged in the anatomically correct position while curing.
Hollow organs such as the duodenum and small intestines were inflated during the curing process, using an air compressor. After 2 days, 1 ml of S6 was injected into the lumen of the pressurized air inlet tubing of hollow viscera specimens via a 23-gauge needle and 5 ml syringe. This was done for 3 days. Injecting the S6 internally assisted with the internal curing of the specimen in the hollow areas. Curing took place over a period of 4 weeks.
The plastinated specimens were labelled and placed in Perspex containers to assist with the display and extend the lifespan of the specimen. Care was taken to label each part accurately. The completed skeleton specimen was placed in a Perspex container on a turntable to protect it from dust and student hands, and to enable it to be easily viewed.
In general, although there was some shrinkage of the specimens during the plastination process, the structures remained very clearly demarcated, and retained good color definition.
The plastinated specimen of the ovary and reproductive tract (Fig. 2) clearly shows the route the egg follows, with many developing eggs in different stages, with a larger developing egg in the magnum.
 Figure 2. Plastinated reproductive tract of female domestic fowl, mounted in a Perspex container. 1. Developing egg; 2. Magnum; 3. Isthmus; 7. Vagina. Scale bar = 1 cm |
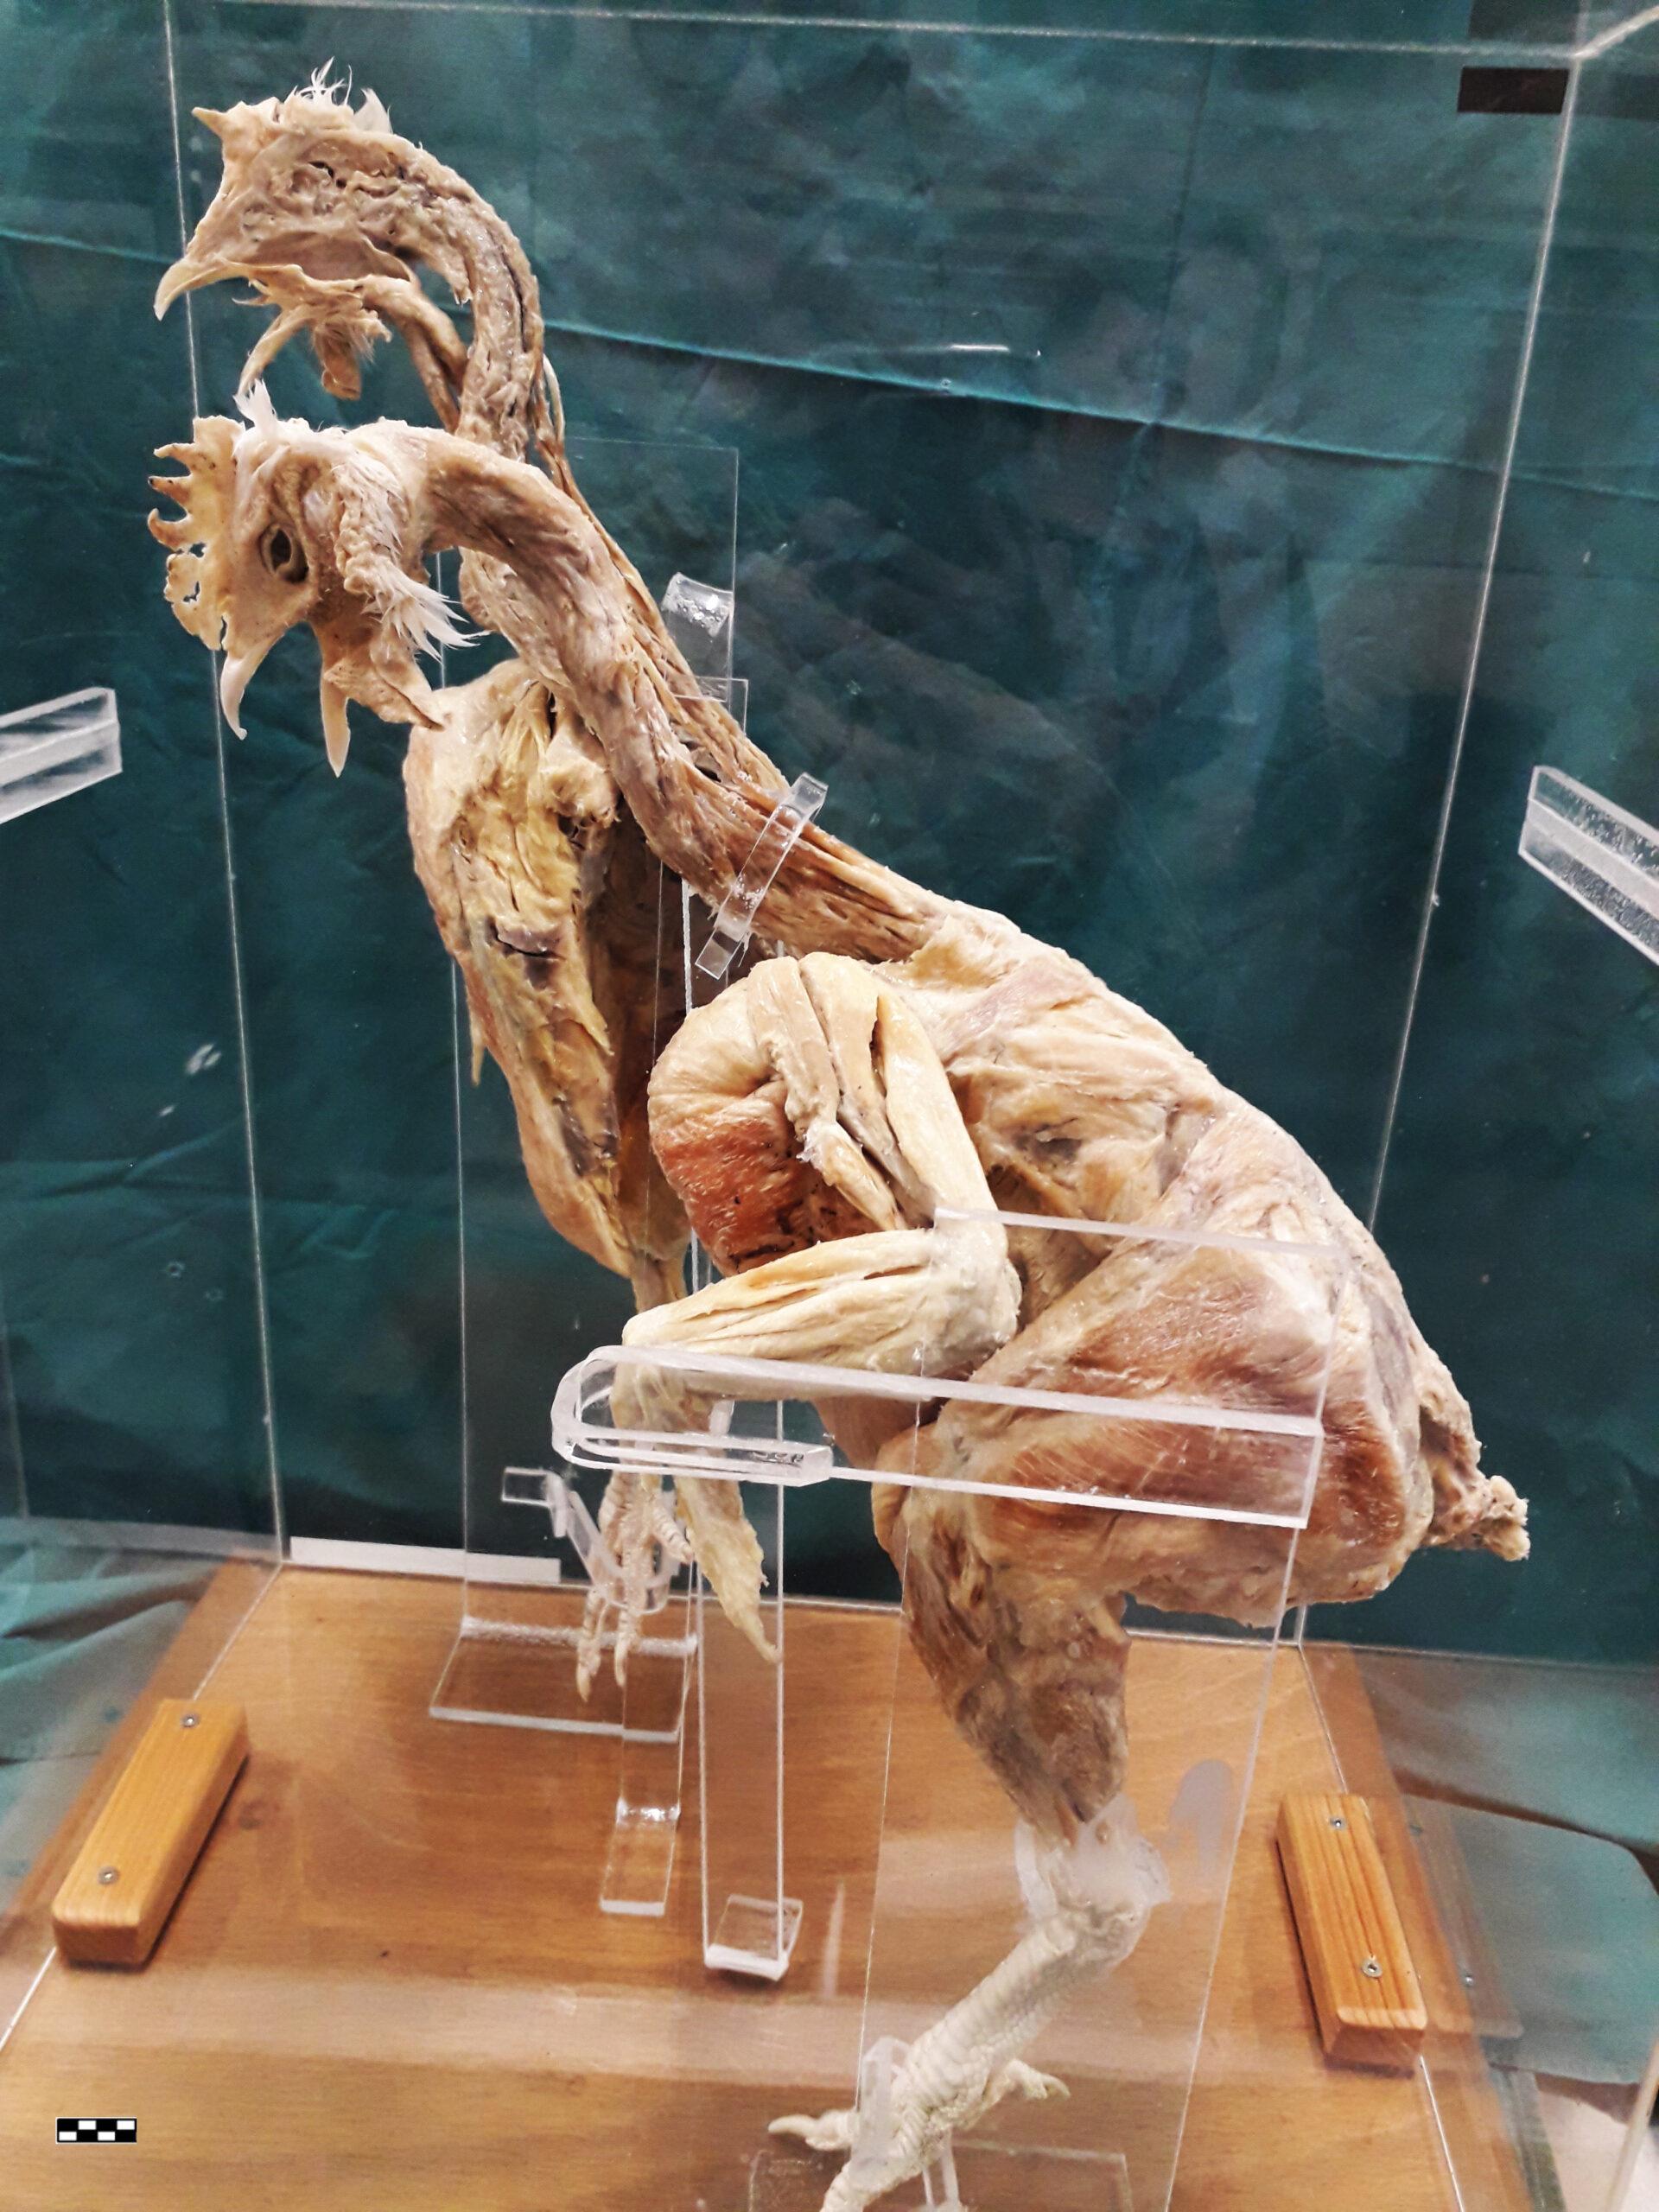 Figure 3. Muscle dissection of bisected chicken with organs intact, mounted in Perspex box. Scale bar = 1 cm |
With the muscle dissection of the whole, bisected chicken with organs intact (Fig. 3), comparison with a fresh chicken cadaver showed that minimal shrinkage took place during plastination. The differentiation between the muscles was very clear, including the complex intrinsic muscles of the neck. The color of the specimen was good, allowing for easy identification of the different structures on the dissected plastinate.
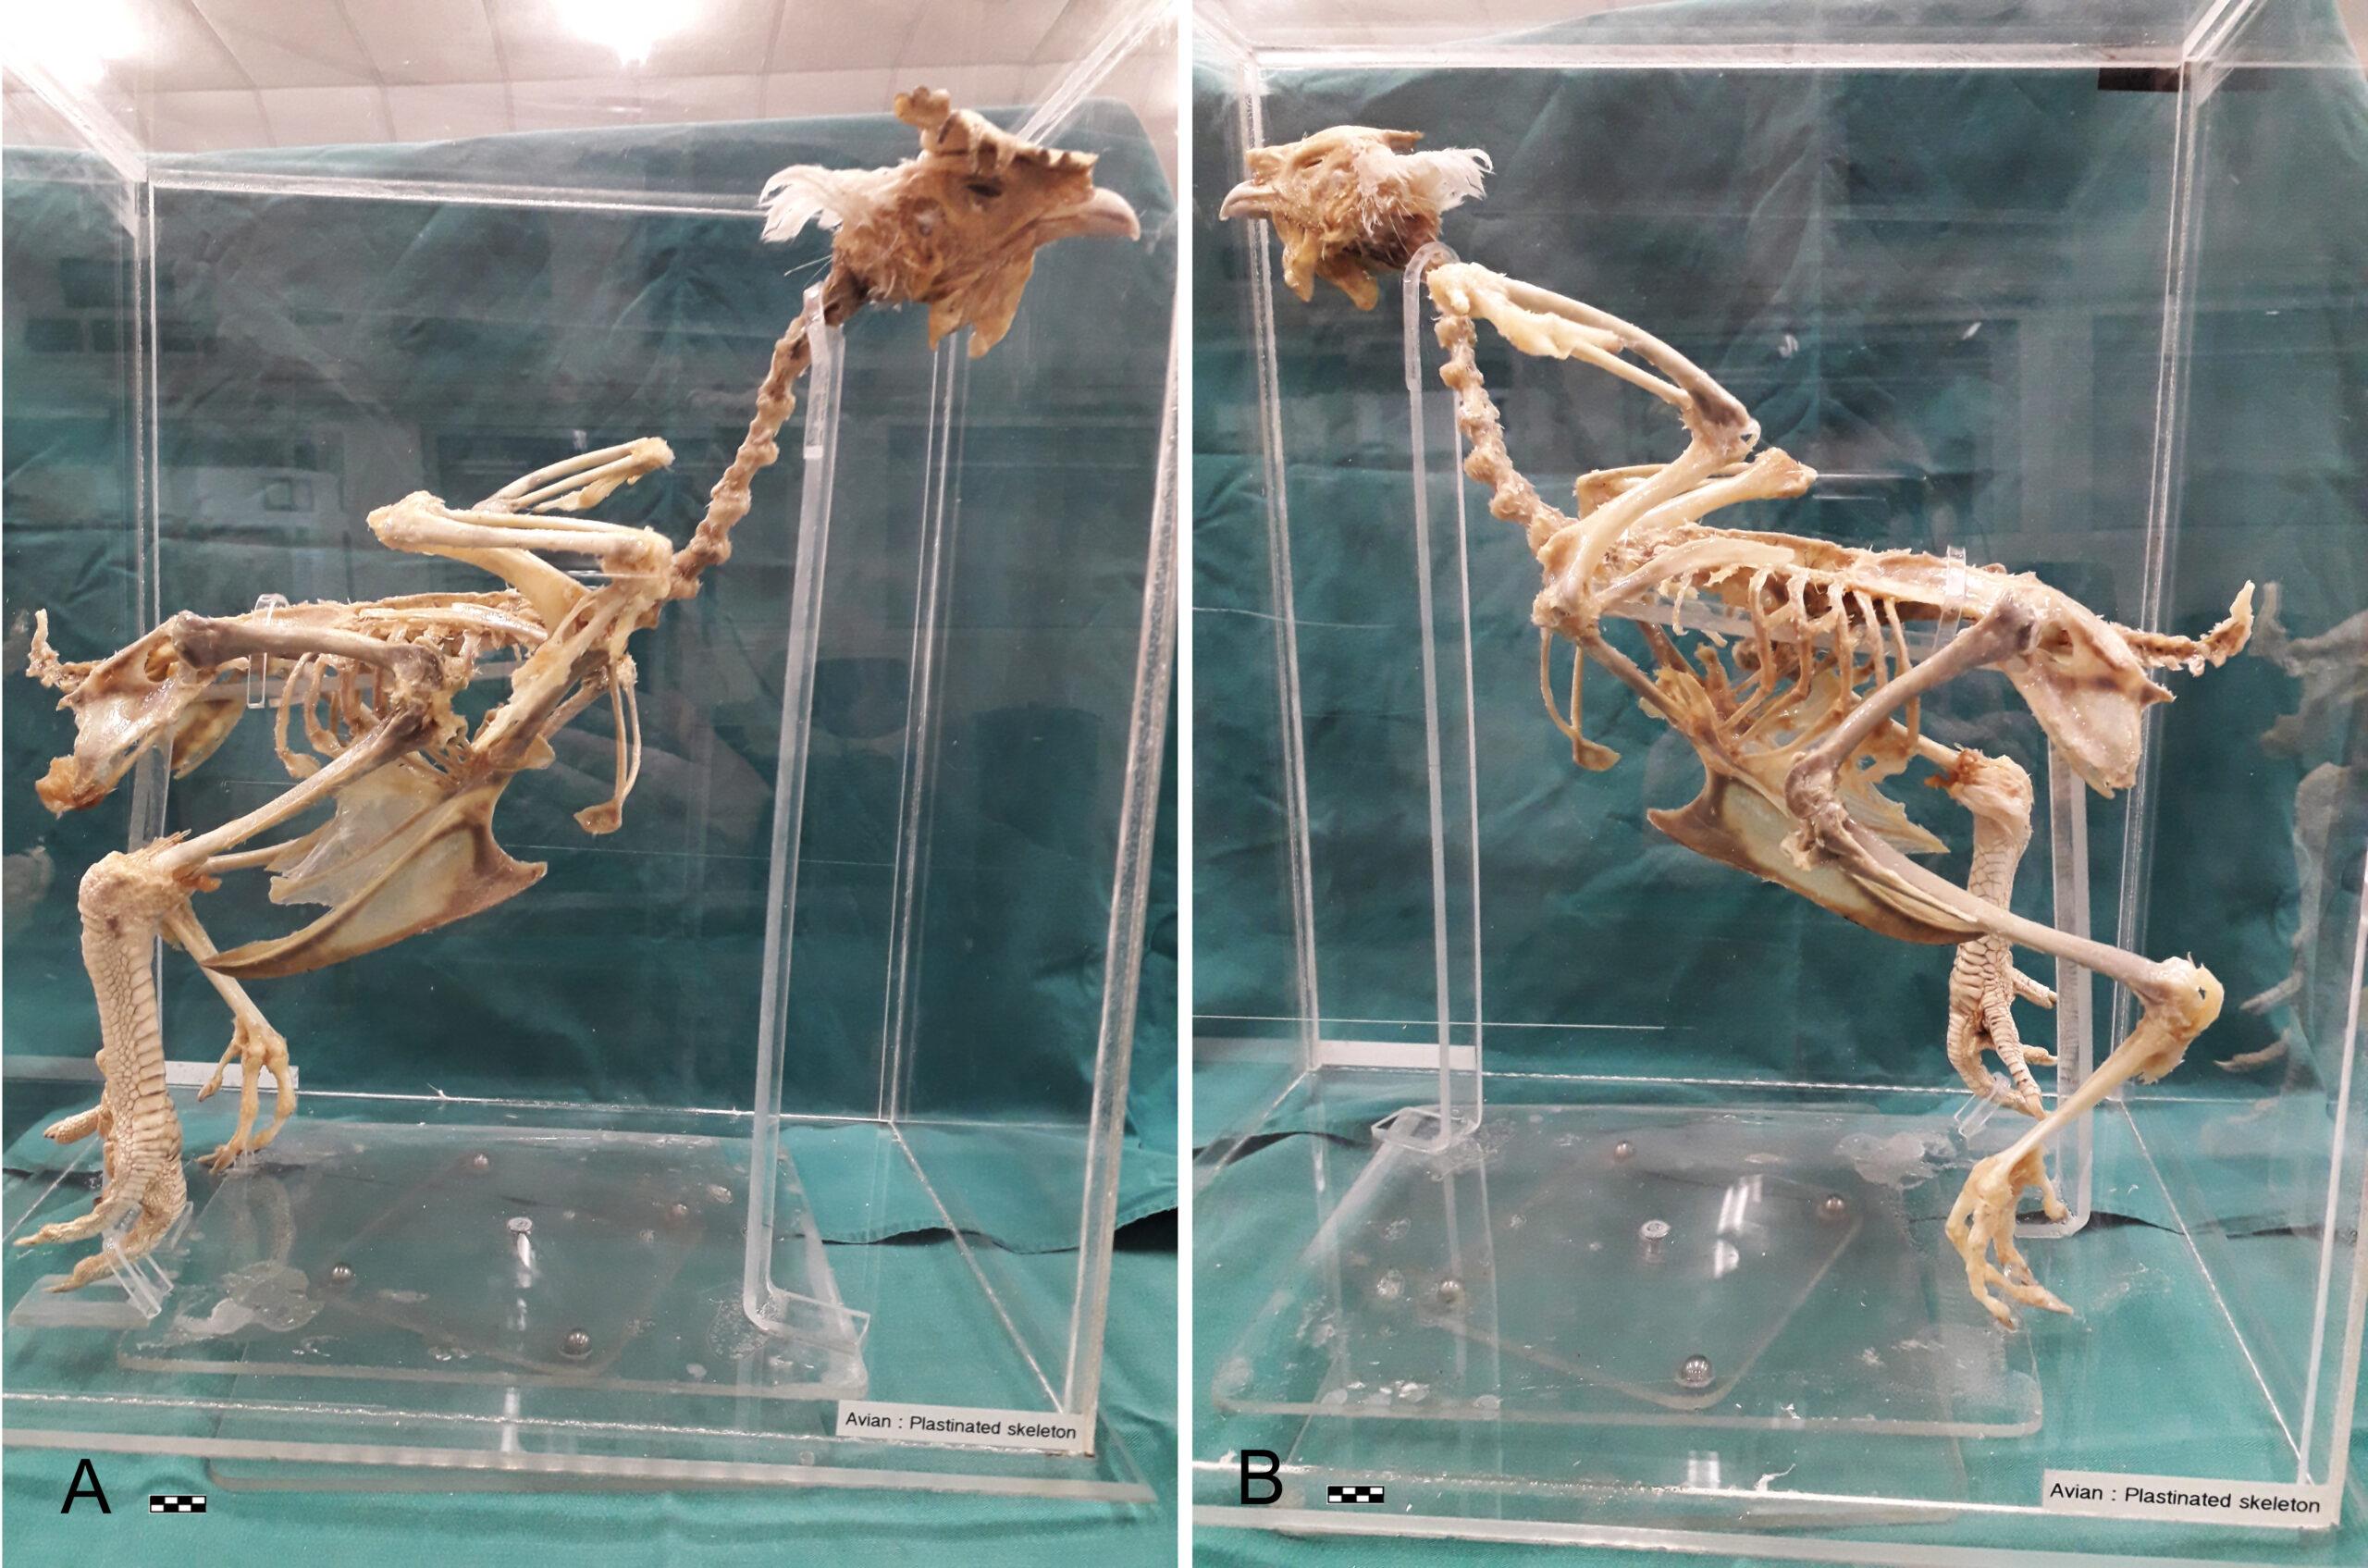
Figure 4. Right (A) and left (B) views of a plastinated chicken skeleton with ligaments. Scale bar = 1 cm
When reconstructing skeletons, there is always the possibility of the smaller bones being wrongly placed, especially in the areas that are difficult to access. With the chicken’s ligaments keeping the skeleton together before plastination (Fig. 4), it ensured that the resulting specimen was 100% accurate. Furthermore, retaining the ligaments shows how the ligaments function to maintain the integrity of the skeleton.
The plastinated digestive tract of the chicken displays the tract from the beak to the gizzard (Fig. 5). The crop, proventriculus, and gizzard were opened to show the internal structure of the hollow viscera.
The three chicken hearts show the heart from different aspects (Fig. 6): respectively, a whole heart, a heart with the right ventricle opened, and a heart demonstrating the opened left ventricle. There is no apparent shrinkage of small specimens, and the color is good.
Results of the use of an air compressor to inflate hollow viscera can be observed in the complete digestive and reproductive system specimen (Fig. 7). This is a very delicate specimen that gives a good demonstration of the digestive and reproductive system of a laying hen to the student. There was little shrinkage, and the different organs can be seen clearly.
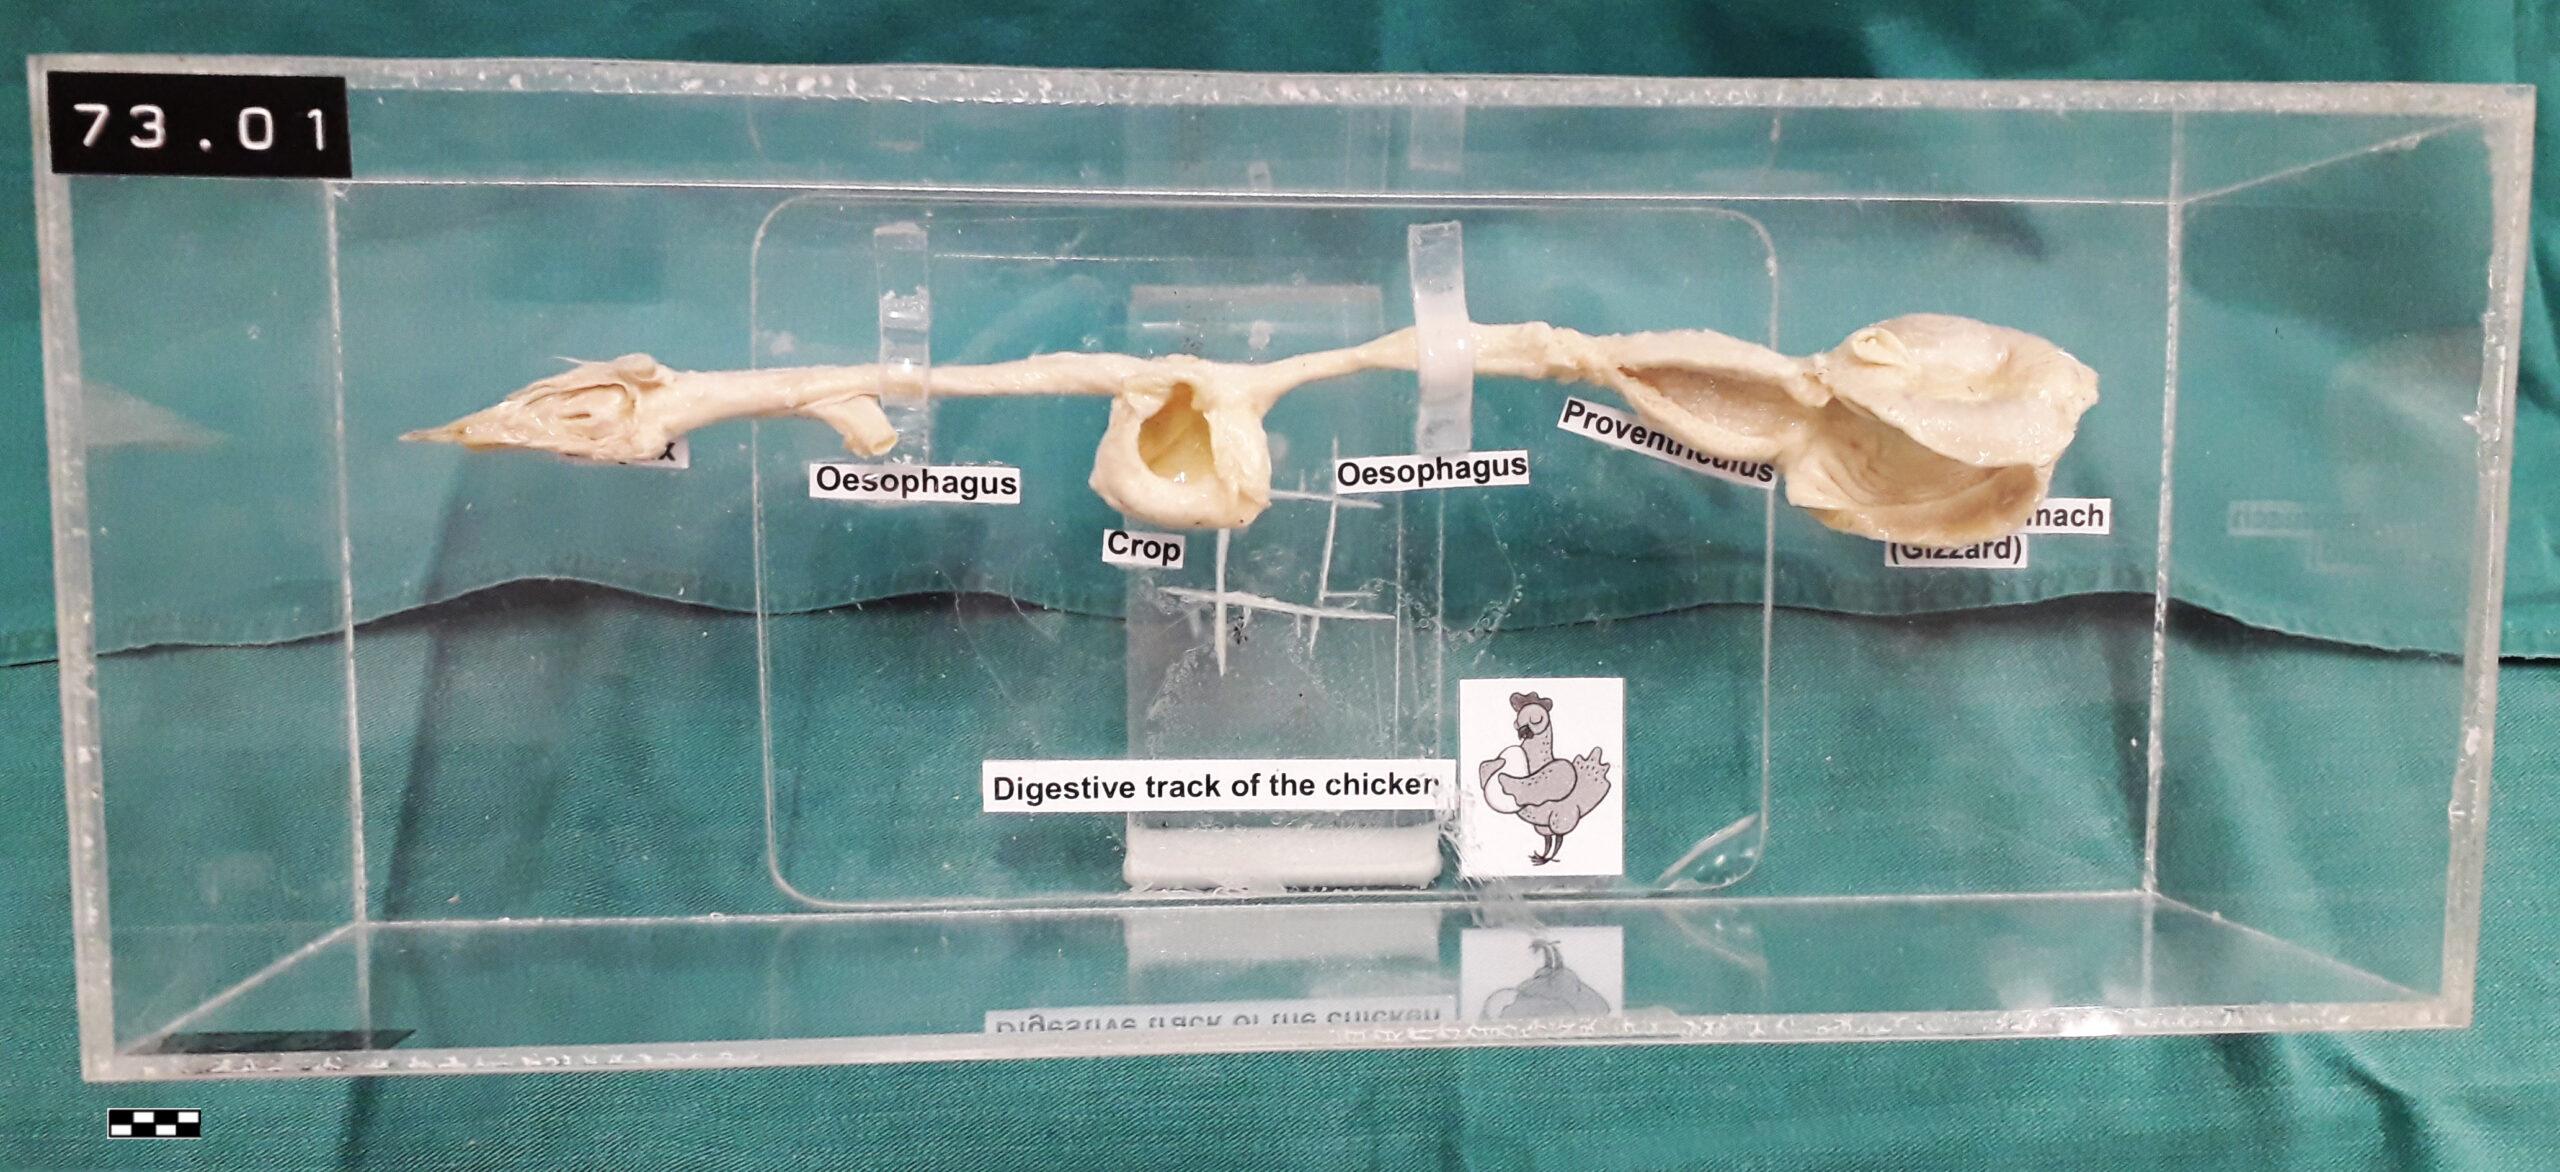 Figure 5. Digestive tract of the chicken: esophagus, crop, proventriculus, and gizzard labelled. Scale bar = 1 cm |
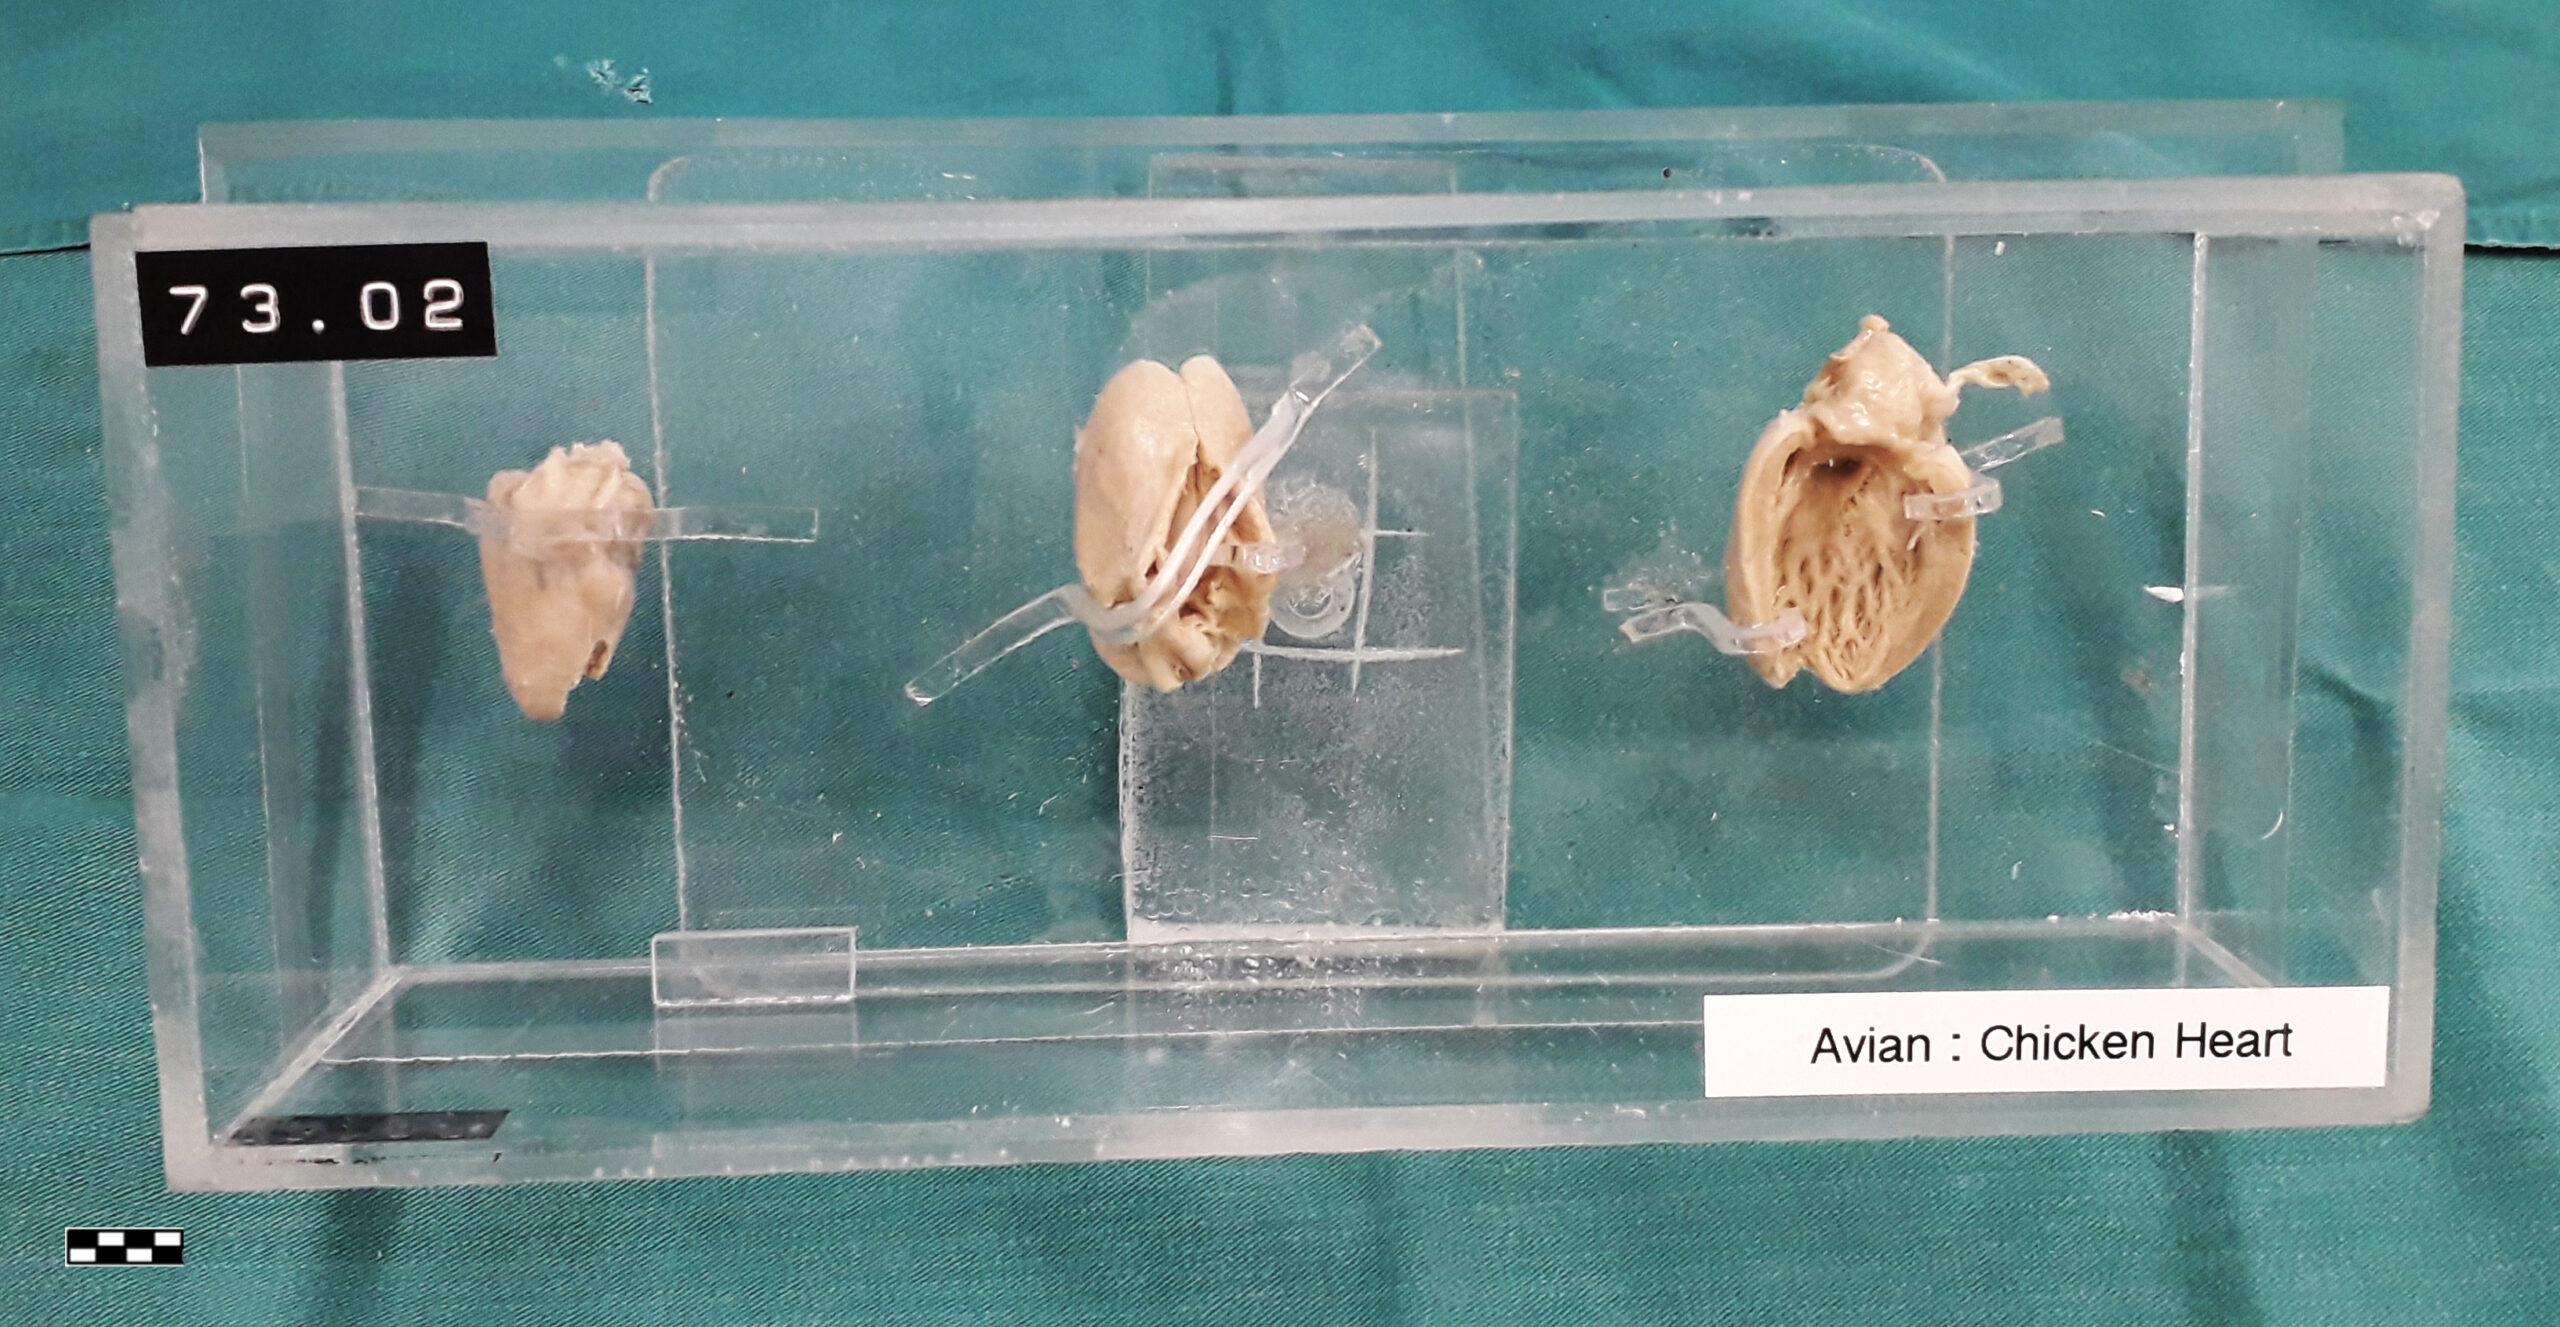 Figure 6. Different views of chicken heart: Left to right: cranial/ventral view, dorsal/posterior view, left view of interior of left ventricle. Scale bar = 1 cm |
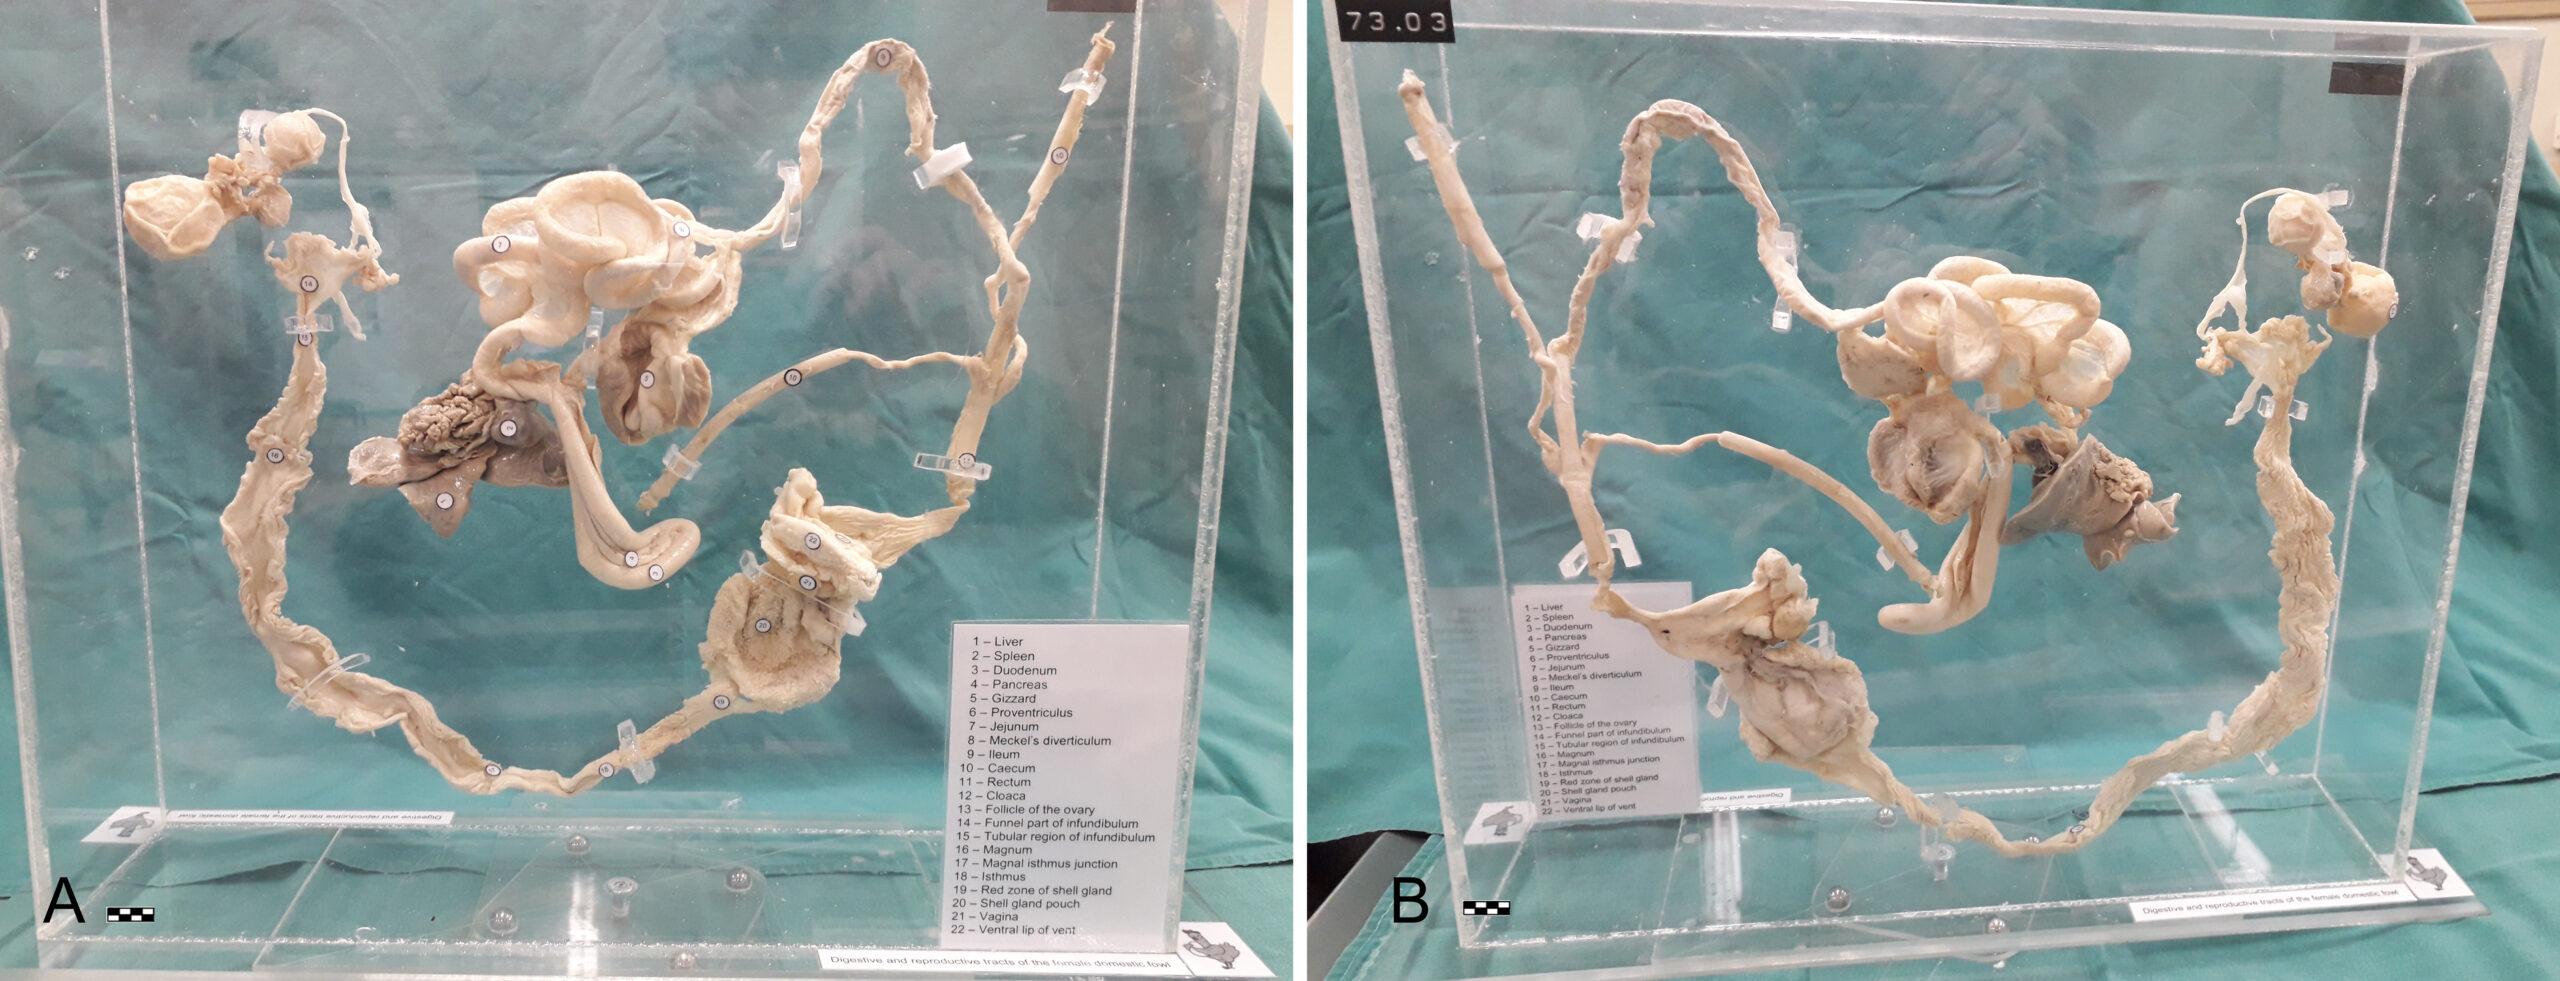 Figure 7. Right (A) and left (B) views of digestive and reproductive system of laying hen with label list. Scale bar = 1 cm |
|
Despite the economic importance of the chicken industry, most students are not lucky enough to dissect a laying hen, as it is very difficult to get hold of such specimens for practical anatomy classes. The students mostly dissect 6- to 8-week-old chickens that are not sexually mature. This shows the value of plastinated specimens as teaching aids. Plastinates are available in the museum to all students at all times, not just to a few students in the dissection hall who dissected that specific specimen.
Even when presented with fresh chicken specimens to dissect, students often struggle to remove the blood while trying to locate the organs in the demonstration. Some students may even cut out the wrong organ or open the wrong part of the organs because of the time limit and the blood. With plastinated specimens, however, the students can see each area clearly. Students can also appreciate the relations of different structures, and their functional anatomy. The advantages of plastinated specimens over wet dissections have led plastinated specimens to be widely used as a learning resource in higher education, especially in the fields of human and veterinary anatomy (Janick et al., 1997; Latorre et al., 2007; Fruhstorfer et al., 2011; Riederer, 2014; Mohamed & John, 2018).
In the case of the skeleton specimen (Fig. 4), students can see how the ligaments maintain the chicken’s skeletal anatomy, something they would not be able to see so clearly in a dissection session. Like many of the specimens in the museum, the skeleton is exhibited on a turntable to give the viewer a 360° view of the specimen.
In the specimen showing the ovary and reproductive tract (Fig. 2), students can get a very clear view of the route an egg follows, with many developing eggs forming in different stages. In the digestive and reproductive system specimen (Fig. 7), care was taken to demonstrate the complete digestive tract with all the organs visible, as well as the complete reproductive system of a laying hen. The chicken heart plastinates (Fig. 6) give the students a clear view of three different aspects of the heart, including the internal structure of the right and left ventricles.
With the availability of the different plastinated chicken specimens, students can view the plastinates in their own time. Care was taken to exhibit the plastinated specimens as anatomically correct as possible. Anecdotally, feedback from the students while working in the museum has been very positive. Students who had already qualified said they wished that they had had access to plastinated specimens, because of all the anatomical details that are so clearly visible in the plastinates.
In conclusion, plastination offers a different approach to student dissections and provides high-quality specimens that can be appreciated and used by students on a daily basis.
de Jong K, Henry RW. 2007: Silicone plastination of biological tissue: Cold-temperature technique Biodur© S10/S15 technique and products. J Int Soc Plastination 22:15-19.
https://doi.org/10.56507/DGZJ6845
Fruhstorfer BH, Palmer J, Brydges S, Abrahams PH. 2011: The use of plastinated prosections for teaching anatomy: the view of medical students on the value of this learning resource. Clin Anat 24 (2): 246-252. doi:10.1002/ca.21107.
https://doi.org/10.1002/ca.21107
Hubbell DS, Dwornik JJ, Always SE, Eliason R, Norenberg RE. 2002: Teaching gross anatomy using living tissue. Clin Anat 15:157-159.
https://doi.org/10.1002/ca.1113
Janick L, DeNovo RC, Henry RW. 1997: Plastinated canine gastrointestinal tracts used to facilitate teaching of endoscopic technique and anatomy. Acta Anat (Basel) 158(1):48-53.
https://doi.org/10.1159/000147910
Latorre RM, Garcia-Sanz MP, Moreno M, Hernández F, Gil F, López O, Ayala MD, Ramirez G, Vzquez JM, Arencibia A, Henry RW. 2007: How useful is plastination in learning Anatomy? J Vet Med Ed 34(2):172-176.
https://doi.org/10.3138/jvme.34.2.172
Menaka R, Kelawala NH, Vyas KN. 2015: Plastination technique represents a life in biological specimens - an overview. Vet Res Intern 3(2):20-23.
Mohamed J, John R. 2018: Production and use of plastinated anatomical specimens as teaching and learning tools in veterinary gross anatomy in the Caribbean. J Adv Vet Anim Res 5(1):44-52.
https://doi.org/10.5455/javar.2018.e245
Riederer BM. 2014: Plastination and its importance in teaching anatomy. Critical points for long-term preservation of human tissue. J Anat 224 (3): 309-315.
https://doi.org/10.1111/joa.12056