1- Anatomia y Embriologia, Facultad de Veterinaria, Universidad de Murcia, Campus de Espinardo, 30071 Murcia, Spain.
2- Department of Comparative Medicine, College of Veterinary Medicine, University of Tennessee, 2407 River Drive, Knoxville, TN, 37996, USA.
Epoxy slices often yellow shortly after casting and the few hours following impregnation can be overwhelming as all slices need to be cast in a short period of time. A modified technique for producing epoxy slices was developed as a measure to address these problems. Tissue slices were impregnated using only epoxy polymer; no hardener was used during impregnation. The impregnated tissue slices were cast using modified casting-mixtures of epoxy polymer, hardener and glass separator. This modification of the classic E12 method (Biodur™) was done to determine: 1. If it is possible to indefinitely extend the casting time after impregnation of epoxy slices and produce quality slices; 2. If the impregnation bath could be reused for casting; 3. If transparency, bubble removal and aesthetics of the final sheet could be enhanced; and 4. If yellowing of the cast could be reduced. The unreacted epoxy impregnated slices were stored in the impregnation mixture for up to one year prior to casting. Hardener was painted on random slices prior to casting. All slices were cast with a polymer reaction-mixture containing 20 to 27% El (hardener) and 1 or 4% AE30 (glass separator). All cast manufactured slices cured. Tissue slices, which rested on the glass, had small areas that did not cure properly. These blemishes were corrected by recasting using a thicker gasket, placing polymer reaction-mixture on the blemished surface and covering with a glass, or placing polymer reaction-mixture on the blemished surface with no glass cover. All recast slices cured and were useful. After a few days, over 50% of the slices turned yellow. However, the intensity of the yellow was much less than that of slices produced by the classic E12 method.
epoxy; slices; plastination; yellowing
R.M. LATORRE: Telephone: 34 - 968 - 364 - 697; Fax: 34 - 968 - 364 - 147; E-mail: Latorre@um.es
R.W. Henry: Telephone: 865 - 974 - 5822; Fax: 865 - 974 - 5640; E-mail: rhenry@utk.edu

![]()


Today, because utilization of sectional imaging production of appropriate, high quality anatomical aids modalities has become the norm in medicine, increased in a timely manner needs to be addressed. Various interest as well as necessity has heightened the need to polymers (silicone, polymerizing emulsion, epoxy, understand sectional anatomy. Therefore, the polyester) have been used for producing anatomical sections (von Hagens, 1979; Bickley et al., 1981; von Hagens, 1982; Guhr et al., 1987; Lischka and Prohoda, 1987) and each has their uniqueness. Sheet plastination has been an integral part of the plastination community for over two decades and epoxy slices have been routinely produced and used for study of sectional anatomy (von Hagens et al., 1987; McNiesch and von Hagens, 1988; Cook and Al-Ali, 1997; von Hagens and Whalley, 2000; Latorre et al., 2001; Windisch and Weiglein, 2001). The classic epoxy (E12, Biodur™) method (von Hagens, 1985; von Hagens, 1989; Weber and Henry, 1993) can be extremely challenging to an under-staffed, an emerging or even a well-established laboratory. Certainly, the day on which impregnation is completed is extremely challenging. The pot-life of the polymer reaction-mixture is about forty-eight hours and impregnation takes thirty-six hours. Therefore, when impregnation is complete, there is only a short window of time in which to cast the slices. As well, the reaction- mixture has become extremely viscous which increases the likelihood for bubbles to remain trapped in or around the specimen. Removal of trapped bubbles presents another time issue. Additionally, epoxy yellows with time thus decreasing the optics and the aesthetics of the slice. These challenges prompted us to seek a remedy beyond recruiting more hands.
Fresh tissues of various regions of the body (limb, head, trunk and body cavities) and from various species (bovine, canine, equine) were collected from cadavers, prepared for sectioning and frozen (-70°C). Two to six millimeter slices were sliced on standard carpenter or butcher saws and placed on grids. Liquid nitrogen or ice was used to cool the saw table for production of the 2mm slices. Saw dust was removed by submerging tissue slices in cold acetone and scraping or flushing with a small stream of cool tap water with minimal scraping. Cleaned slices on their grids were submerged in 90+%, -20°C acetone. Two changes of cold 100% acetone were carried out (day 3 and day 6). Fifteen slices were submerged in methylene chloride for seven days. Dehydrated slices on their grids were submerged in one of three epoxy polymer mixtures (Biodur™): #1. 79% E12 polymer, 17% AE10 thinner and 4% AE30 glass separator, #2. 95% E12 and 5% AE30, or #3. 100% El2. The slices were allowed to equilibrate overnight in the polymer. As well, used polymer mixture was reused to impregnate slices six and twelve months after its initial use for impregnation. The submerged specimens, in their container, were placed in the vacuum chamber and vacuum was applied. Pressure was slowly decreased by incrementally closing the air by-pass valve over a 3 to 6 day period. Pressure was monitored with vacuum measuring devices [gauge (initially) and Bennert-type manometer] and by observation of bubble formation and bursting. As a control, some slices were impregnated using the classic E12 method and impregnation polymer-mix (65% El2, 18% El, 14% AE10, 3% AE30) (von Hagens, 1985; von Hagens, 1989; Weber and Henry, 1993).
Impregnation was judged complete when a pressure of 2-3 mm Hg was reached and maintained and bubble formation was greatly reduced. After impregnation was complete (6-10) days, pressure was returned to ambience. The impregnated slices were held in the impregnation polymer at room temperature. At intervals of 1 day, 1 week, 1 month, 6 months and 12 months, slices were removed from the impregnation polymer and cast in flat-chambers. Flat-chambers were made from 2-3mm window glass, appropriate diameter gasket and fold back clamps. The top of the flat-chambers remained open for insertion of the slices and filling with epoxy reaction-mixture. Four casting formulas were used: #1. 76% E12 polymer, 20% El Hardener, 4% AE30 glass separator; #2. 73% E12, 23% El, 4% AE30; #3. 69% E12, 27% El, 4% AE30; #4. 75% E12, 24% El, l%AE30.
Before casting, each slice was briefly drained of excess impregnation polymer. Two-thirds of the slices were inserted into flat-chambers at the prescribed intervals. The other one-third of the slices had either: 1. Surface polymer blotted for 24 hours and then cast with one of the casting formulas, 2. Surface polymer blotted for 24 hours, then hardener painted on the surface and cast, or 3. Surface coated with hardener.
Each flat-chamber containing a slice was filled with a polymer reaction-mixture. The chambers were allowed to sit upright for 1 to 2 hours to encourage bubbles to rise to the surface. As needed, flat-chambers were tilted 20-30° off the vertical plane to aid the rise of bubbles from each side of the flat-chamber. Remaining trapped bubbles were freed using a teasing wire. Some specimens were placed upright in a vacuum chamber for 1 to 2 hours and pressure was lowered to 15cm Hg to aid in bubble removal. After bubbles were removed, the filled flat-chambers were laid 15° off the horizontal plane and allowed to cure overnight. After 24 hours, the flat-chamber was inspected for drifting of the tissue slice. If the slice had drifted, it was realigned in the flat- chamber. As well, blanks were made by filling flat- chambers with the used classic impregnation-mixture or each casting-mixture to evaluate yellowing.
After 3 to 5 days of room temperature curing, most of the flat-chambers and contents were placed upright in an oven of 50-60°C for 3 to 5 days for final curing.
Three flat-chambers filled with the classic E12 impregnation-mix and casting formula #1 were allowed to cure totally at room temperature over a two-week period. After curing, the oven was turned off and allowed to come to ambience prior to removal of the flat-chambers. The flat-chambers were disassembled and slices were removed, inspected for complete curing, wrapped in foil, and their perimeters squared using a band saw. Any slices with damp areas were either: 1. Recast using a thicker gasket to allow polymer reaction-mixture to cover the surface of the slice, Covered with epoxy reaction-mixture and a glass placed on top of the polymer-mix, 3. Damp spots were covered with epoxy reaction-mixture, or 4. Damp spots were painted with hardener. All types of repairs were room temperature and heat cured as in the original casting protocol. After curing, random slices were transected at one week and one and one-half years to inspect the core of the tissue slice.
Impregnation and casting
#1: Dehydrated slices were submerged in methylene chloride for seven days prior to impregnation. Impregnation was via the classic method and polymer-mix (E12, El, AE10, AE30). Slices were cast in formula #1.
#2: Dehydrated slices were submerged in methylene chloride for seven days prior to impregnation. Then into the impregnation polymer-mix (E12, AE10, AE30) without hardener. Slices were cast in formula #1.
#3: Dehydrated slices were submerged in El2, AE10, AE30 for impregnation. Slices were cast in formula #1.
#4: Dehydrated slices were submerged in El2, AE30 for impregnation. Slices were cast in either formula #1 or #2.
#5: Dehydrated slices were submerged in El2, AE30 for impregnation. Slices were cast in formula #3.
#6: Dehydrated slices were submerged in El2 for impregnation. Slices were cast in formula #4.
#7: Dehydrated slices were submerged in previously used El2, AE30 for impregnation. Slices were cast in formula #3.
All manufactured casts cured and were useful (Fig. 1). However, tissue slices which rested on the glass had small areas that remained damp and excoriated if not repaired (Fig. 2). These often were the thicker (6mm) slices. Some slices that had not been blotted but coated with hardener before casting frequently had similar damp areas on the surface of the slices, which excoriated if not repaired. Of the defective manufactured slices: the ones which were recast using a thicker gasket and casting reaction-mixture or whose surface was coated with casting formula whether or not topped with a glass plate cured routinely. An occasional bubble was trapped in glass-topped repaired slices and slight raised areas remained on the surface when polymer without glass was placed on the defect (Fig. 3). All slices whose damp areas were coated with hardener alone did not cure and excoriated if not repaired. However, even these slices, when coated with reaction- mixture and covered with glass, were repairable. Occasional refractive areas (Fig. 4) are seen especially with some of the excoriated areas. The slices that have been completed for 18 months retain a quality similar to that when they were first completed.
Cast tissue slices from all protocols, including those bathed in methylene chloride, began to yellow within the first few days following casting (Fig. 5). However, 2 mm tissue slices that remained in the polymer for six and twelve months before casting showed only a very light yellowing after casting, as well as, six months later. The new polymer reaction-mixture in the perimeter around the recast-manufactured slices did not yellow (Fig. 5). Blank casts of the classic and experimental impregnation-mixtures demonstrated the greatest yellowing. Blank casts of the casting mixtures showed no to only slight yellowing. The blank casts cured only at room temperature showed the least tendency to yellow. By one year post-casting, epoxy had yellowed more.
Bubbles rose easily in the relatively thin polymer- mix. Remaining bubbles were easily teased out using a wire. Flat-chambers placed under vacuum to aid the rise of bubbles developed numerous pinpoint size bubbles (Fig. 5). Of these vacuum induced tiny bubbles, many did not rise to the top but remained distributed throughout the polymer.
Random slices that were transected to inspect the interior of the slice revealed that the epoxy polymer in the core of the tissue slices was not cured. The core of specimens, both one week and one and one-half years post-impregnation that were checked, had uncured polymer.
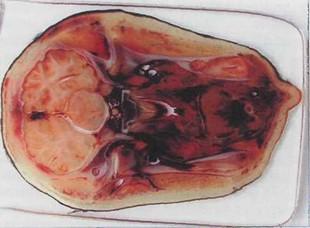 Figure 1. Tissue slice plastinated using a modified E12 method lacking hardener in the impregnation step. |
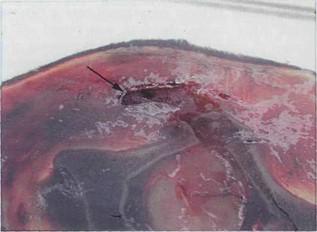 Figure 2. Modified E12 plastinated tissue slice showing surface defect (arrow). |
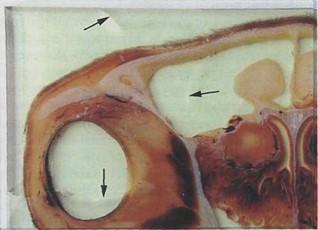 Figure 3. Modified E12 plastinated tissue slice showing raised edges of repaired defect (arrows). |
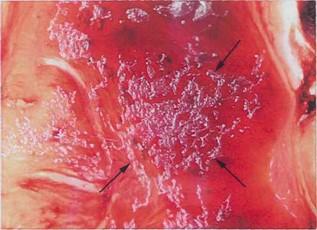 Figure 4. Modified E12 plastinated tissue slice showing |
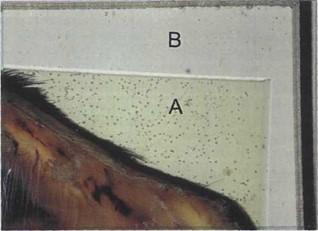 Figure 5. E12 plastinated tissue slice recast after yellowing of original cast material. Original cast material (A), second cast (B). |
|
Epoxy impregnation without hardener extended the casting time for one and one-half years and yielded both high quality and lesser quality manufactured slices.
Lesser quality slices were less likely to occur when using very thin tissue slices or a thicker than usual gasket (9-10mm). This is likely due to the fact that thinner specimens float more uniformly and hence do not settle and remain on the bottom glass. When the specimen settles onto the glass, the lack of polymer reaction-mixture between the tissue slice and the glass yielded a manufactured slice with damp (uncured) areas on its surface. Damp areas were evidenced in all slices, which were not blotted but coated with hardener before casting. Flat-chambers may be turned from side to side every few hours to prevent settling of specimens against the glass.
With very thin tissue slices (2mm), there may be a relationship to residual acetone and the yellowing process. The manufactured slices containing two millimeter tissue slices that remained in the polymer for six months prior to casting yellowed only slightly. However, all thicker slices (3-5mm), including those remaining in the impregnation bath long term, yielded manufactured slices that yellowed in a few days of curing. However, the degree of yellowing was less than with the classic method. To best compare the degree of yellowing, experimental and classic slices should be prepared at the same time. We intend to do this project in the future. Unless epoxy polymer in some way ties up acetone, all acetone should have evaporated from all the long-term impregnated slices. If indeed all the free acetone has evaporated, this suggests that certain tissue components or heat curing may cause the yellowing of the cured slices. Even the methylene chloride specimens yellowed. Some casting formulas that were cast with out tissue slices yellowed slightly, however, some did not yellow. The perimeter of recast-manufactured slices did not yellow and they were both room-temperature and heat cured. This would add credence to a tissue reaction causing the yellowing since the tissue slice is sealed from the recasting polymer-mix. More testing in this area is needed to determine if there is an inherent cause for the yellowing in this first generation polymer or if it is reacting with some tissue component, fixative or heat.
All defective areas were repairable. The repaired slices were not perfect but quite useful. The method of repair that produced the most aesthetic slice was to recast. A second repair method, which also worked almost as well, was to coat with casting-mixture and place a glass on top. The most distracting feature of a defective slice was the small refractive areas found randomly in the cast tissue slices. These refractive areas are trapped air. Air is likely introduced as the thin impregnation-polymer either drains or is blotted from the slices. We believe that it is necessary to have minimal unreacted impregnation epoxy with the tissue slice as it is cast. The raised areas, which resulted from covering defects with polymer and no glass, detract from the aesthetics of the slice. However, the ease of this type repair seems to out weigh the work of recasting or placing a glass cover on top of the coated slice.
AE10 (thinner) is not needed when impregnating without hardener since the impregnation-mix does not thicken due to the fact that no hardener is present. AE10 was used in one impregnation formula to mimic the classic impregnation-mixture as close as possible. Because the impregnated slices did not have the thickened impregnation-mixture surrounding them, the thinner polymer-mix in the flat chambers allowed bubbles to rise freely to the surface. By tilting the filled cast from side to side for a few minutes most remaining bubbles surfaced. Those that did not surface were freed with a teasing wire. Vacuum application greatly increased the number of bubbles. It was not possible to get all of these numerous tiny bubbles to rise. They remained in the manufactured slice. This may indicate some breakdown or evacuation of a component of the casting mixture. The use of vacuum for evacuation of bubbles from epoxy flat-chambers should be used cautiously.
Uncured polymer-mix in the center of the tissue slice was predictable. When preparing epoxy polymer as per von Hagens (1985), it is important to thoroughly mix hardener and polymer to assure that the hardening reaction will proceed. Even one and one-half years after curing, the core of the tissue slices remains uncured. In spite of this, the embedded tissue retains its normal anatomical qualities. These slices produced by a modification of the classic epoxy method have similar optical properties as the slices made via the classic method. Thus these specimens should be useful for anatomical aids to be used in conjunction with medical imaging. This technique is a valuable alternative to the classic method for an understaffed lab. Since the tissue slices can be cast at any time, one person can cast the slices at their leisure. The thinner polymer surrounding the tissue slice allows bubbles to rise freely. The manufactured casts seem to be less yellowed. However, this modified method yields a number of blemished casts that need to be repaired, whereas the classic method produces nearly perfect slices every time which will yellow.
Bickley HC, von Hagens G, Townsend FM. 1981: An improved method for the preservation of teaching specimens. Arch Pathol Lab Med 105:674-676.
Cook P, Al-Ali S. 1997: Submacroscopic interpretation of human sectional anatomy using plastinated El 2 sections. J Int Soc Plastination 12(2): 17-27.
https://doi.org/10.56507/XICY2283
Guhr A, Mueller A, Anton H, von Hagens G. 1987: Complete examination of mastectomy specimens using sheet plastination with epoxy resin. J Int Soc Plastination l(l):23-29.
https://doi.org/10.56507/NXYR1705
Latorre R, Vazquez JM, Gil F, Ramirez G, Lopez- Albors O, Orenes M, Martinez-Gomariz F, Arenciba 2001: Teaching anatomy of the distal equine thoracic limb with plastinated J Int Soc Plastination 16:23-30.
https://doi.org/10.56507/ACRF7155
Lischka M, Prohoda M. 1987: Plastination of whole- body slices with polymerizing emulsion. J Int Soc Plastination 1(1): 17-22.
https://doi.org/10.56507/TJJM6951
McNiesch LM, von Hagens G. 1988: The diagnostic imaging characteristics of plastinated anatomical specimens. J Int Soc Plastination 2(l):24-39.
https://doi.org/10.56507/RMEK8272
von Hagens G. 1979: Impregnation of soft biological specimens with thermosetting resins and elastomers. Anat Rec 194(2):247-255.
https://doi.org/10.1002/ar.1091940206
von Hagens G. 1982: Method for preserving large sections of biological tissue with polymers. US Pat No 4,320,157.
von Hagens G. 1985: Heidelberg Plastination Folder: Collection of all technical leaflets for plastination. D- 6900 Heidelberg, Germany: Anatomisches Institut I, Universitat Heidelberg,
von Hagens G. 1989: Biodur™ Products: Polymers,auxiliaries and equipment for plastination. A catalog and price list. Rathausstrasse 18, Heidelberg, Germany: Biodur, p. 34-35.
von Hagens G, Tiedemann K, Kriz W. 1987: The current potential of plastination. Anat Embryol 175:411-421.
https://doi.org/10.1007/BF00309677
von Hagens G, Whalley A. 2000: Anatomy art: Fascination beneath the surface. D-69126 Heidelberg: Institute for Plastination.
Weber W, Henry RW. 1993: Sheet plastination of body slices - El2 technique, filling method. J Int Soc Plastination 7(1): 16-22.
https://doi.org/10.56507/EZGX2343
Windisch G, Weiglein AH. 2001: Anatomy of synovial sheaths in the talocrural region evaluated by sheet plastination. J Int Soc Plastination 16:19-22.
https://doi.org/10.56507/HVGY3362