Plastination Laboratory, Centre for Anatomy and Cell Biology, Plastination and Topographic Anatomy, The Medical University of Vienna, Wiihringerstr. 1313, A-1090 Wien, Austria.
The E12 method of plastination classically is used to create thin 2-5mm transparent slices. If thinner slices (0.5-1.0mm) are desired, it is necessary to use the ultra-thin slice plastination method. By using this method, the specimen is first plastinated as an epoxy block and then cut into thin slices using a diamond saw. The impregnation temperature and the percent of accelerator (E600) used in the resin-mix are the key elements necessary to obtain proper impregnation of the desired tissue block and contrary to all other plastination methods, high temperature (30 to 60°C) is desired. This paper describes the use of high temperature in the epoxy process to produce ultra-thin (< Imm) epoxy plastinated slices. Only by using high temperature is the resin thin enough to penetrate into the middle of a large specimen.
ultra-thin plastinated slices; E12/E6 impregnation; high temperature
M-C. SORA - Plastination Laboratory, Centre for Anatomy and Cell Biology, Plastination and Topographic Anatomy, The Medical University of Vienna, Wiihringerstr. 1313, A-1090 Wien, Austria. Telephone: 43-1-4277-611-50; Fax: 43-1-4277-611-70 ; E-mail: mircea-constantin.sora@meduniwien.ac.at

![]()


Temperature is usually a crucial factor in plastination . Usually, during dehydration, degreasing or epoxy (El2) impregnation of slices, the temperature does not exceed room temperature values. High temperature, up to 45°C, is only used during curing. "Why is high temperature not used?" High temperature is not used during dehydration and degreasing because high temperature increases shrinkage and during impregnation the E12/E1 impregnation mixture becomes very viscous within hours, preventing complete impregnation . The exception is E12 block impregnation which uses E6 as a hardener and utilizes high temperature (60°C) for the end of impregnation as well as curing.
Classically, thin slices (2-5mm) of the desired specimen are prepared by epoxy plastination. Cold dehydration, degreasing, impregnation and finally curing similar to other types of plastination are used (von Hagens, 1986; Weber and Henry, 1993; Cook and Ali, 1997; Fasel et al., 1988; An and Zhang, 1999; Sora et al., 2002; Sora et al., 2004). However, ultra-thin slice plastination produces epoxy slices with a thickness of 1mm or less (Fritsch and Hegemann, 1991; Seibold et al., 1991; Sittel, 1996; Johnson et al., 2000; Windisch and Weiglein, 2001). A different approach is needed to produce the ultra-thin slices which can not be made by conventional sawing of the frozen specimen on a handsaw. The entire desired specimen block is dehydrated and degreased as a unit and hence impregnated and cured as a block. Finally the cured specimen is sliced into ultra-thin E12 slices using a saw with a special diamond blade. This technique presents the utility of high temperature in processing and creating cured E12 blocks for sawing ultra-thin plastinated slices. A major problem of impregnating bigger tissue blocks is to get the E12 resin-mix into the middle of the block. At room temperature, the E12 resin is liquid but gets thicker when temperature is decreased.
If temperature is increased, the E12 resin alone becomes very fluid. However, increasing the temperature of the E12/E1 reaction-mixture causes the resin-mixture to become too viscous to impregnate tissue. If a different hardener (E6) is used, the marked increase in viscosity is delayed for 4-5 days. Biodur E6 is an anhydride-based hardener of low viscosity which causes no immediate thickening of the resin reaction mixture. This permits impregnation of the tissue block at 30°C to 60°C (von Hagens, 1986).
The standard steps of ultra-thin E12 slice plastination are specimen selection and preparation, cold dehydration, degreasing, impregnation and curing of the tissue block. From this cured block, lmm thick or less slices are made after impregnation and curing (Fritsch and Hegemann, 1991; Seibold et al., 1991; Sittel, 1996; Johnson et al., 2000; Windisch and Weiglein, 2001).
Specimen preparation
The desired specimen is selected and may or may not be fixed with formalin. Fixation is not necessary for production of semi-transparent slices using El2 ultra thin plastination. In general it may be desirable to fix tissue to prevent any potential biohazard risk which may accompany handling and sawing of human or animal tissue. The disadvantage associated with tissue fixation is the marked loss of tissue color. A large specimen block should be cut into the desired sized blocks for impregnation, each with a maximum size of 15cm x 1Ocm x 1Ocm, as well as positioned in proper anatomical position prior to freezing or fixation.
Dehydration and degreasing
Freeze substitution is the standard dehydration procedure for plastination. Shrinkage is minimized when cold acetone is used. The tissue block is placed into a -25°C freezer for two days and then submerged in cold (-25°C) technical quality 100% acetone for dehydration. The ideal acetone to specimen ratio should be 10:1. Length of dehydration will be proportionate to the size of the tissue block. For assurance of thorough dehydration, acetone baths should be monitored and not changed until acetone purity is stable. Check the first acetone bath for purity at two and three weeks. If the acetone percent remains constant, place the specimen into the second cold acetone bath; or if acetone purity has decreased <2%, monitor the purity after one more week. When acetone purity is stable, change the specimen into the second acetone bath. Check acetone purity of the second bath at two and three weeks. If acetone purity remains constant, place the specimen into the third cold acetone bath . Check this third bath for purity at two and three weeks. If the acetone purity is >98%, dehydration is complete. Bring the acetone and tissue block to room temperature . Replace the warm acetone with methylene chloride (MeCl) for degreasing. MeCl is a stronger degreaser than acetone. However, it is a hazardous substance and must be handled and kept in a ventilated hood. Since there is no method to measure the fat concentration of the used MeCl, the color of the bath is monitored for change to yellow . When the color becomes an intense yellow, it is changed for new MeCI. Degreasing should continue for at least two weeks to assure a fat-free block for impregnation. Larger blocks and or blocks with more fat should degrease even longer up to four weeks. To assure adequate degreasing, it is necessary to visually inspect the quality of the specimen. Degreasing is complete when the fat is transparent.
Forced Impregnation
Forced impregnation is the key to plastination . During impregnation, the solvent is extracted from the cellular and interstitial space of the specimen and replaced with the resin impregnation-mix [El 2 (resin)/ E6 (hardener)/ E600 (accelerator)] (von Hagens, 1986). The epoxy resin and hardeners are mixed as follows to prepare the E12 impregnation-mixture: E12 - lOOpbw, E6 - 50pbw, E600 - 0.2pbw. The dehydrated/degreased specimen is removed from the methylene chloride bath and submerged in the El 2 impregnation-mixture [El2 (resin)/ E6 (hardener)/ E600 (accelerator) (100/ 50/ 0.2)]. The reservoir of resin-mix and specimen are placed into the vacuum oven set at +30°C, such as a Heraeus VT 6130 M from: Heraeus Instruments, Kendra Laboratory Products GmbH. Vacuum is not applied until the next morning in order to allow the El2 resin-mix to equilibrate and commence penetration of the specimen. The next day vacuum is applied and stabilized at 40cm Hg pressure at +30°C. Over five days, pressure is reduced 8cm Hg daily, until 2mm Hg is reached . The first four days temperature remains at 30°C. By the fourth day, the resin-mix is becoming more viscous. On the fifth (last) day, temperature is increased to 60°C to make the resin-mix as fluid as possible thus able to penetrate the depths of the specimen (Table 1). It is important to monitor viscosity closely at this time as the E12/E6/E600 mixture becomes thinner at first. However, after several hours, bubbles begin to rise slower and splash intensely as the resin-mix again becomes more viscous. This indicates the onset of polymerization and it is time to stop impregnation.
Curing
When impregnation is completed, the tissue block is removed from the vacuum chamber. A mold is constructed of Styrofoam and lined with polyethylene foil and the tissue block inserted. Fresh resin reaction mixture [E12/ E6/ E600 (100/ 50/ 0.2)] is used to fill the mold and surround the specimen. The mold containing the impregnated specimen and resin-mix is placed in a 65°C oven for four days to harden the resin mix. The tissue/resin block is cooled to room temperature and the mold removed (Figs. 1, 2).
Slicing
A contact point diamond blade saw, Exact 3I 0 CP (Exact Apparatebau GmbH, Norderstedt , Germany) or equivalent is used for cutting the block (Fig. 3). The hardened E 12 block is cut into 1mm or slightly less slices (Figs. 4, 5). Between each slice tissue, the width of the saw blade (0.4 mm), is lost.
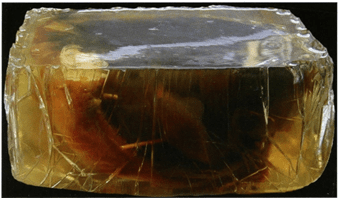 Figure 1: E l 2 impregnated and cured pelvic block . |
 Figure 3: Diamond saw slicing El 2 pelvic tissue block. |
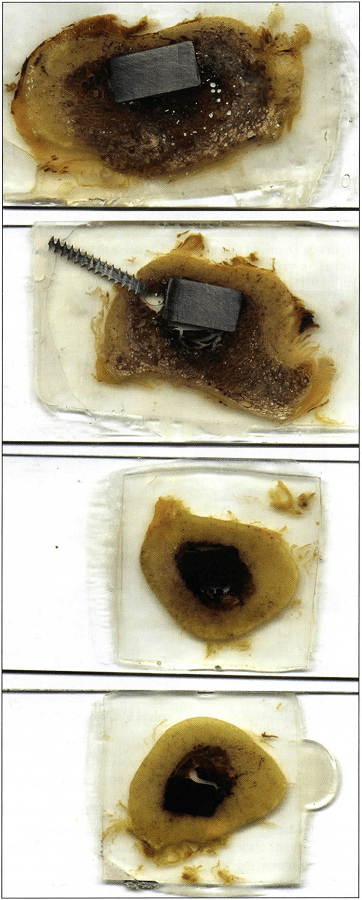 Figure 5: Composite of ultra-thin slices of a bone and its prosthesis. |
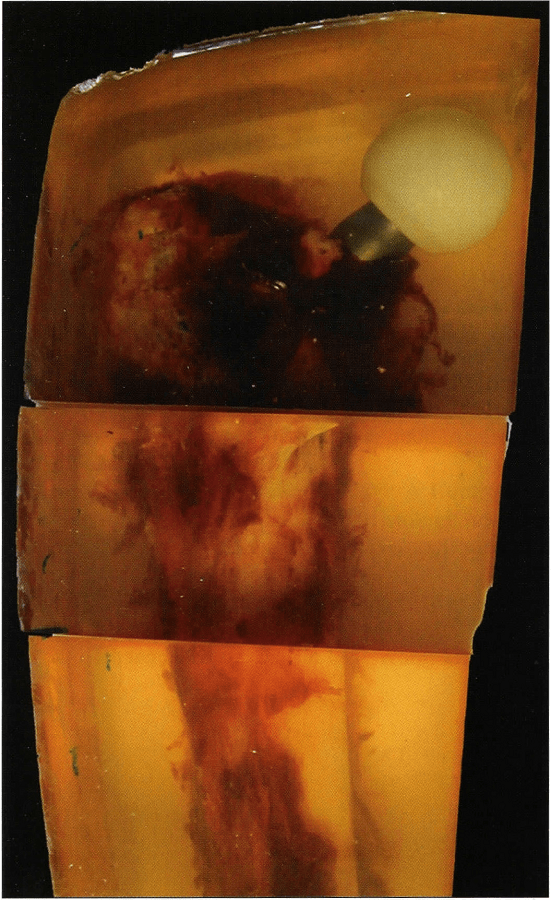 Figure 2: El2 impregnated endoprostetic block. |
 Figure 4: Ultra-thin slice of the pelvis block from figure 1. |
The general protocol for Ultra-thin Epoxy (< 1mm) Slices from the frozen (-25°C) specimen is listed in Table 1.
| Day I | Immerse in #1 bath -25°C acetone >90%. |
| Day 14 | Check and record purity of acetone bath #1 , Immerse in #2 bath, -25°C acetone (100%). |
| Day 28 | Check and record purity of acetone bath #2. Immerse in #3 bath, -25°C acetone (100%). |
| Day 42 | Degrease in MeCl @ Room temperature (Minimum 2 weeks). |
| Day 56 | Immerse in E12 resin-mix (+30°C). |
| Day 57 | Impregnate in E12 resin-mix (+30°C). |
| Day 61 | Impregnate in E12 resin-mix & increase temperature to +60°C. |
| Day 62 | Cure specimen +65°C oven. |
| Day 66 | Remove block and slice when convenient |
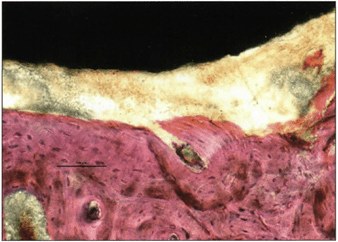
Figure 6: Photomicrograph of bone (40X) from figure 5.
A plastinated specimen is produced and incorporated in an E12/tissue block. This block is hard and semi transparent. Ultra-thin, < 1 mm slices are produced from this block (Figs. 4, 5). These ultra-thin slices have excellent optical qualities and are hard, as well as transparent. Ultra-thin E12 slices provide excellent anatomic detail down to the microscopic level (Fig. 6).
For thorough impregnation , the resin/hardener mixture must be fluid enough to penetrate the specimen. Also the processing time must be of sufficient length to penetrate to the core of the tissue block. Epoxy resin viscosity has an inverse relationship with temperature : At low temperature resin viscosity is high, while at high temperature resin viscosity is low. With impregnation at low temperature, the epoxy resin becomes viscous. Low temperature prolongs processing time. However, since the E12-mixture is reactive, it will become too viscous in two days. Hence this is the rational for the standard E12 method (E12 resin/ E1 hardener-mix). Because of the rapidly increasing viscosity of the reaction-mixture , only thin slices (2-5mrn) may be impregnated.
The ultra-thin epoxy technique produces slices by sawing < 1 mm (ultra-thin) plastinated slices from an E12 impregnated specimen block. To impregnate a large tissue block, a low viscosity reaction-mixture is used and the impregnation time must be increased. The E6 hardener fulfills this need and is augmented by an increase in impregnation temperature. E12/E6 processing time is also controlled by the quantity of accelerator (E600) added to the resin-mix. Both high temperature and an increased quantity of E600 speed up polymerization time and hence processing time is decreased. By adding less E600, impregnation time can be extended a few days. Submerging the tissue block in the reaction-mixture overnight allows the E12/ E6/ E600 resin-mix to equilibrate and begin penetration into the specimen. The methylene chloride which enters the resin-mix lowers the viscosity of the reaction-mixture . The E12/ E6/ E600 mix is quite viscous at room temperature . However, by using a temperature of +30°C, decreases viscosity significantly and viscosity of the reaction-mix remains low for four days. Lower viscosity aids both the extraction of the solvent and influx of the resin-mix . The vacuum drying oven allows simultaneous adjustment of vacuum and temperature . On the fifth (last) day, to counter the increasing viscosity of the resin reaction-mixture , the temperature is increased to 60°C. Viscosity must be monitored closely as it becomes thinner at first. But, after several hours, the resin-mix becomes more viscous and impregnation must stop.
Using the E6/E600 hardener delays polymerization of E12 and allows impregnation of large tissue blocks. Curing time and firmness depend on the quantity of accelerator E600. An accelerator (E600) is needed for the resin hardener-mix to polymerize. However only a small amount of accelerator is used 0.2%. Larger amounts of the accelerator in the E 12/ E6 mix will cause curing of the block too soon. If no E600 is used, polymerization of the block will not occur, even if temperatures of 60°C are maintained for several months (von Hagens, 1986). The plastination folder contains a table listing the reaction and hardening time for a variety of E12/E6/E600 mixtures.
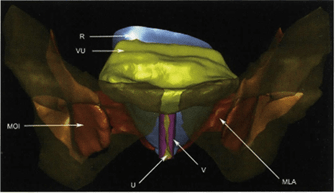
Figure 7: Reconstruction of pelvic organs via ultra-thin E l2 slices. MOI - Musculus obturator intemus, R - Rectum, V - Vagina, VU - Vesica urinaris, MLA - Musculus levator ani.
For histological studies (Fig. 6) and accurate 3D reconstruction (Fig. 7) of plastinated slices, ultra-thin slices (< Imm) are essential (Sha, 2001; Qiuet, 2003). A diamond saw is essential to cut ultra-thin slices from the E12 impregnated tissue block. Histological examination can be performed up to a magnification of 40X. Because of the thickness (>300 microns) of the specimen, higher magnification is not possible (Sora, 2002). The normal methods for staining histological specimens may be used (Gruber, 2001). An important advantage of ultra-thin epoxy slices is that structures remain intact and decalcification of bone is not necessary . Since topography of a region may be studied in a non-collapsed and non-dislocated state, morphological measurements can be performed accurately and easily .
An P-C, Zhang M. 1999: A Technique for Preserving the Subarachnoid Space and its Contents in a Natural State with Different Colours. J Int Soc Plastination 14(1):12-17.
https://doi.org/10.56507/CQUW3856
Cook P. 1996: Plastination as a Clinically Based Teaching Aid at the University of Auckland. J Int Soc Plastination 11(1):22.
https://doi.org/10.1159/000147907
Cook P, Al-Ali S. 1997: Submacroscopic Interpretation of Human Sectional Anatomy Using Plastinated E12 Sections. J Int Soc Plastination 12(2):17-27.
https://doi.org/10.56507/XICY2283
Fasel J, Mohler R, Lehmann B. 1988: A technical note for improvement of the E12 technique. J Int Soc Plastination 2( 1):4-7.
https://doi.org/10.56507/LNBR6798
Fritsch H, Hegemann L. 1991: Simplification of the production of plastination histologic preparations through the use of a grinding machine. [in German with English abstract]. Anat Anz 173(3):161-165.
Gruber H, Brenner E, Schmitt 0, Fritsch H. 2001: The different growth zones of the fetal foot. Ann Anat 183(3):267-273.
https://doi.org/10.1016/S0940-9602(01)80232-6
Johnson G, Zhang M, Barnett R. 2000 : A Comparison between Epoxy Resin Slices and Histology Sections in the Study of Spinal Connective Tissue Structure. J Int Soc Plastination 15(1):10-13.
https://doi.org/10.56507/CXGV7781
Lane A. 1990: Sectional anatomy: Standardized methodology. J Int Soc Plastination 4(1):16-22 .
https://doi.org/10.56507/LYMW2924
Qiu MG, Zhang SX, Liu ZJ, Tan LW, Wang YS, Deng JH, Tang ZS. 2003: Plastination and computerized 3D reconstruction of the temporal bone . Clin · Anat 16(4):300-303 .
https://doi.org/10.1002/ca.10076
Sha Y, Zhang SX, Liu ZJ, Tan LW, Wu XY, Wan YS, Deng JH, Tang ZS. 2001 : Computerized 3D reconstructions of the ligaments of the lateral aspect of ankle and subtalar joints. Surg Radio! Anat 23(2): 111-114.
https://doi.org/10.1007/s00276-001-0111-1
Seibold R, Eitel F, Waldner H, Brunner U, von Hagens 1991: A new application of plastination in bone histology . [In German with English abstract]. UnfallChirurg 94 (12):624-633.
Sittel C, Eckel HE, Sprinzl GM, Stennert E. 1996: Sheet-plastination of the human larynx for serial section histology. [In German with English abstract]. HNO 44 (7):370-375 .
Sora MC, Brugger PC, Strobl B. 2002 : Shrinkage during E12 Plastination. J Int Soc Plastination 17:23- 27.
https://doi.org/10.56507/DIUH4490
Sora MC, Strobl B, Staykov D, Traxler H. 2002: Optic nerve compression analyzed by using plastination . Surg Radiol Anat 24(3-4):205-208 .
https://doi.org/10.1007/s00276-002-0037-2
Sora MC, Strobl B, Staykov D, Forster-Streffleur S. 2004: Evaluation of the ankle syndesmosis: A plastination slices study. Clin Anat 17(6):513-517.
https://doi.org/10.1002/ca.20019
von Hagens G. 1986: Heidelberg Plastination Folder: Collection of technical leaflets for plastination. Biodur Products, Rathausstrasse 18, Heidelberg, 69126, pp 811-12, 9/ 1-14.
Weber W, Henry RW. 1993: Sheet plastination of body slices - E12 technique, filling method. J Int Soc Plastination 7(1):16-22.
https://doi.org/10.56507/EZGX2343
Windisch G, Weiglein AH. 2001 : Anatomy of Synovial Sheaths in the Talocrural Region Evaluated by Sheet Plastination. J Int Soc Plastination 16:19-22.
https://doi.org/10.56507/HVGY3362
Product distribution:
Biodur Products, Drs. Gunther von Hagens and Angelina Whalley, Rathausstrasse 11, 69126 Heidelberg, Germany . www.biodur.de , Ph : (49) 6221 3311-11, Fax: (49) 6221 3311-12.