1 VisDocta Research, Via Panoramica 2B, Tignali (BS) 25080, ITALY, Europe.
2 Department of Comparative Medicine, College of Veterinary Medicine, University of Tennessee, Knoxville, TN, USA.
Since its development over 20 years ago, sheet plastination has become one of the premier methods for preservation of perishable biological human and animal tissue slices. With the advent of modern imaging techniques, the need for interpretative aids is evident. Production of slices using the epoxy technique, has served this purpose well. Because of the importance of this technique which has good optical, preservation and presentation qualities and the success of epoxy in this role, a similar generic product was developed by VisDocta in Italy. This generic resin yields transparent slices which exhibit detailed structures in their normal anatomical position similar to the Biodur™ El 2 method. In addition, yellowing of the cured resin is not a problem.
plastination; epoxy; transparent body slices; VisDocta; VS-EP73; VS-EP70H
T. SHAHAR- VisDocta Research, Via Panoramica 2B, Tignali (BS) 25080, ITALY, Europe Telephone : 39 (3) 65 761 000' Fax: 39 (3) 65 761 900; E-mail: visdocta@tin.it

![]()


The purpose of epoxy sheet plastination is to preserve and present 2-4mm slices of tissue for examination/ study by replacing tissue fluid and some lipid with a curable resin. This protocol describes plastination of sliced body parts via a generic epoxy method. Body slices (2-4mm thick) are produced using a flat-glass chamber. The basic tenants of plastination are followed. All water and most all of the lipid are removed from the tissue and curable epoxy resin-mix replaces them (Weber and Henry, 1993).
Also, as with other methods of plastination , this epoxy technique may be modified and/or some steps may be omitted. However, if this standard protocol of this epoxy technique is followed, the best results are obtainable.
The importance of understanding sectional anatomy of man and animals is underscored by today's modern diagnostic imaging techniques (computed tomography , magnetic resonance imaging, and ultrasound). The epoxy plastination method provides durable semi transparent sectional preparations of excellent visual acuity.
Chemicals used in this "generic" epoxy-plastination process are similar to the ones used in the BiodurTM E12 sheet plastination technique:
The general steps of epoxy plastination are described earlier in this volume. This manuscript highlights the differences with respect to this generic process which occur with impregnation and curing of the plastinated specimens and utilizes similar specimen preparation , dehydration and defatting techniques as any standard plastination technique.
The basic steps of plastination are utilized for each process :
Specimen preparation, dehydration, defatting
Specimen preparation , dehydration, defatting (degreasing) are the same for all plastination methods including the epoxy technique. As well, portions of the forced impregnation and casting/curing steps will refer back to the standard "Biodur™ E12 plastination technique" for more detailed information.
Forced Impregnation
Replacing the volatile solvent (acetone/MeCl) in a biological specimen with a curable resin. For this to occur, the chemicals must meet similar criteria as the chemicals used in the BiodurTM E12 plastination technique.
Impregnation equipment: Similar to the Biodur™ E12 Epoxy Technique - Vacuum pump, Vacuum chamber, Vacuum gauge, Bennert mercury or digital manometer, Needle valves for regulation of pressure, Specimen basket and grids, and cold room.
VisDocta products for epoxy plastination: VS-EP73: Epoxy resin VS-EP70H : Hardener Preparing impregnation-mixture:
Forced impregnation is the unique process in plastination . Solvent is vaporized from the specimen by decreasing pressure and is simultaneously replaced with the resin-mix. To prepare the EP73 impregnation mixture, the resin and hardener are mixed as follows: EP73 - 100 pbw with EP70/H - 14 pbw. Mix the correct volume of reaction-mixture to adequately cover the volume of slices for impregnation. The reaction mixture is placed in the impregnation vat at room temperature. The bundle of dehydrated and degreased, stacked slices, grids and screens are transferred from the degreasing bath into the room temperature impregnation bath. Pre-plan the size of the specimen impregnation reservoir to adequately hold the stack of slices. The plan should include minimizing the amount of space around the slices in the reservoir. This will keep the volume of EP73 resin reaction-mixture needed to fill the reservoir at a minimum .
Make sure that the slices are covered with an adequate volume of resin-mix. As with most epoxy reaction-mixtures, EP73 has a short pot life (8 days at 0°C) which cannot be extended. Careful planning will reduce the amount of resin-mix needed as well as reduce the cost of the slices.
Impregnation regimen : *Similar to the BiodurTM E12 epoxy procedure.
Adjusting the vacuum: (Speed of lowering the pressure) The reservoir containing the slices and the EP73- EP70/H impregnation-mixture is placed in the vacuum chamber in a cold room environment; 2°C is preferred with a maximum of 5°C. The lower temperature prolongs the pot life and allows slower extraction of the solvent. Actual impregnation starts around 20cm/8in Hg when the methylene chloride degreasing solvent reaches its vapor pressure or 8cm/3in Hg for acetone.
Vacuum is applied and pressure is lowered moderately with frequent smaller closures of the air intake valve (lowering of pressure) to initially keep a continual evacuation of the trapped air from the chamber. Smaller more frequent adjustments help avoid rapid boiling of the exiting air (degassing/deaerating). Around 20cm Hg pressure solvent extraction begins and this pressure is usually reached after eight hours of slowly decreasing pressure.
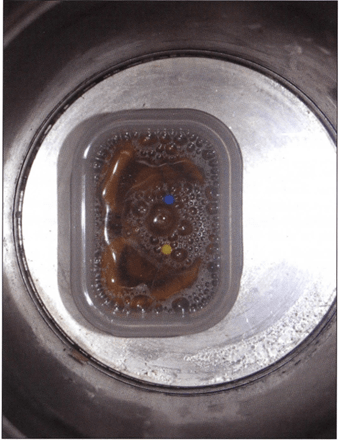
Figure 1. Approximate rate of bubble production for EP73 impregnation.
Once solvent begins to vaporize less frequent closure of the intake valve is necessary to keep the solvent boiling. However, valve closure should be minimal, just enough to keep the solvent boiling slowly. A moderate to slow impregnation speed is desirable over a seven day period. Boiling speed (solvent extraction) will vary with the quantity of solvent in the system and with temperature (Fig. l ). Both increased solvent quantity and increase in temperature will increase boiling rate. Excessively rapid boiling may result in resin over flow and the top slices losing the resin that covered them. If this occurs, adequate resin-mix must be added to cover the slices.
Pressure is continuously reduced slowly down to 1- 2cm Hg over a seven day period with a maximum of eight days. Impregnation is complete when bubble activity stops.
Casting and curing (hardening)
The resin in the slices must be hardened. Casting and curing is similar to the BiodurTM E12 procedure.
The impregnated bundle of slices with the grids and screen are lifted from the EP73 impregnation-mixture and drained. Either of the two standard casting methods may be used to cast and cure the impregnated slices: Flat chamber method (using paired glass plates) or the Sandwich method (stacking the slices between foil). Slices, placed in the flat chambers, use chambers constructed from an appropriate size of glass, fold back clamps and gasket. PVC gasket which will react with MeCl is not recommended. For the flat chamber method: Teflon or polyethylene gasket material are preferred since they have better physical and chemical · resistant properties. Slices cured via the sandwich method use a glass plate at each end of the stack which is covered with heavy Mylar sheets. Mylar sheets then are used between each slice. Mylar sheets are more chemical resistant. Impregnated slices are placed between Mylar sheets similar to the BiodurTM E12 Technique. The following casting-mixture: EP73 - 100 pbw with EP70H - 14 pbw is used.
Deaerating slices: *Variation from the BiodurTM E 12 procedure . After filling, the flat chambers are placed in a vacuum chamber to remove small air bubbles (degas/ deaerate) in the resin. Pressure is reduced gradually to 49cm/19in Hg (600mbr) over a one hour period. Then over the next eight to ten hours, pressure is lowered to 34cm/13in Hg (450mbr). Care must be taken not to decrease pressure too rapidly and boil the air out of the resin too fast.
Curing slices: *Variation from the BiodurMT E 12 proceedure.
To cure the cast slices, the deaerated flat chambers are placed upright and allowed to cure at room temperature provided the temperature is >+ l 8°C for seven days. However, 25°C is best and the maximum temperature for curing. After curing, the epoxy slices may be tempered by placing in a +50°C oven for five days to increase the durability of the manufactured slices. After curing and/or tempering , the glass plates are carefully removed . The slices/sheets are covered with thin foil and are cut to the desired size. The general protocol for production of epoxy slices from frozen specimens using the VisDocta technique is listed in table l.
| Day O | Freeze specimen -75°C. |
| Day 1 | Slice and clean sawdust from slices. |
| Day 2 | Immerse specrmens in #1 -25°C acetone bath (>90%). |
| Day 5 | Immerse in #2 bath, -25°C acetone (100%). Check and record purity of bath #1. |
| Day 8 | Immerse in #3 bath, -25°C acetone (100%) Check and record purity of bath #2. |
| Day 11 | Degrease slices in acetone or MeCl @ Room temperature (RT). |
| Day 18 MeCl
or Day 25 Acet. |
Impregnate in EP73 resin-mix (2°C to 5°C) for 7 days (8 days maximum). |
| Day 25 or 32 | Cast or sandwich slices. Deaerate cast slices. |
| Day 26 or 33 | Cure specimens at 25°C for 7 davs. |
| Day 33 or 40 | Open flat chamber or sandwichs and cover slice with foil (plastic wrap), saw and sand. |
| Day 33 or 40 | Optional! Harden 5 days in +50°C oven. |
| Day 38 or 45 | Open flat chamber or sandwiches and cover slice with foil (plastic wrap), saw and sand. |
The finished EP73 slices are durable and semi transparent and correlate with radiographs and images of other modem imaging techniques (Fig. 2) (Henry et al., 1997). As with the BiodurTM E12 technique, results are dependent upon specific parameters of section thickness and lipid extraction being adhered to. The transparency and color of the plastinated EP73 slices are of the highest quality. The EP73 slices do not yellow with age (Fig. 3). No oven is needed for curing; however an oven may be used for tempering. Hardening, yields better physical characteristics of the final slices: Better scratch resistance and will not soften if heated.
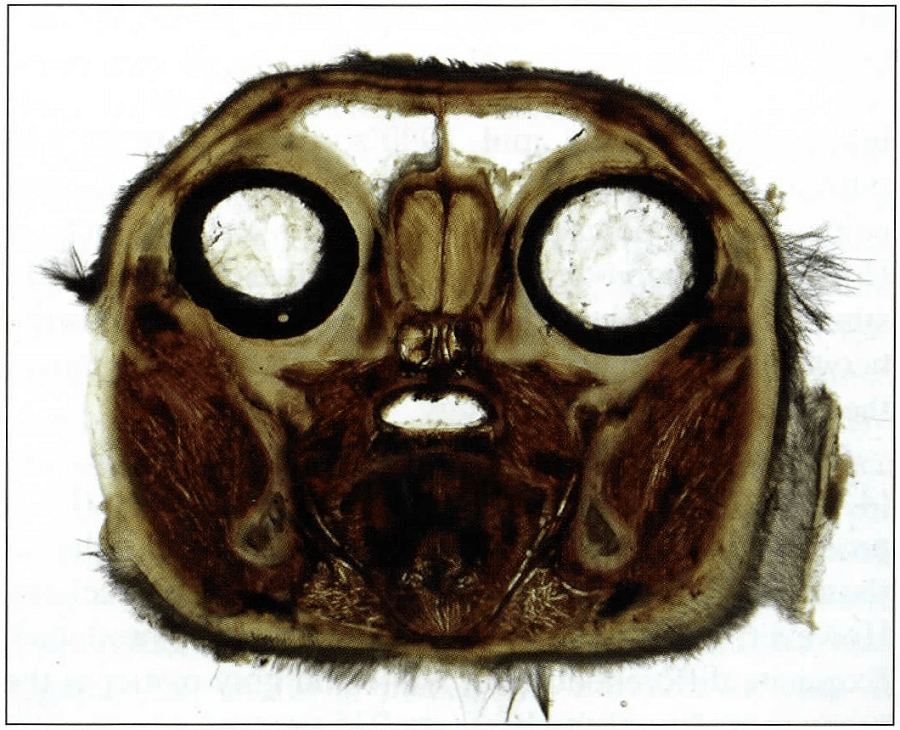 Figure 2. Impregnated, cast and cured transverse section of domestic feline head. |
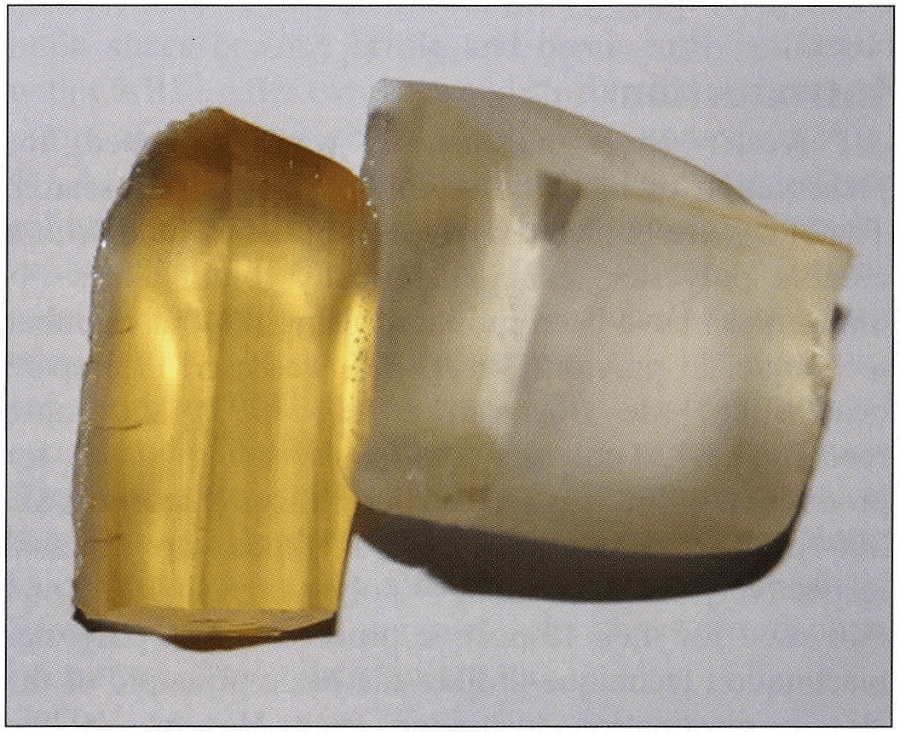 Figure 3. Comparison of cured block of early generation epoxy (left) and cured block of EP73 (right) six years post curing. |
Epoxy sheet plastination maintains the integrity and topography of a region as a unit in a given plane (Cook, 1997; Henry et al, 1997; Windisch and Weiglein, 2001 ; Zoggeler et al., 2002). The slices are storable at room temperature and may be conveniently stacked. The advantage of this newer generation epoxy resin is a decrease in the post-cure yellowing of the resin and hence a more transparent final product for a longer period of time. Yellowing to browning of the epoxy sheet has been a criticism of the E12 sheets (Latorre et al., 2002a; 2002b; Reed and Henry, 2002).
An oven is not necessary for curing. The optimal curing temperature is 25°C. However, ambient temperature must be at least l 8°C with a maximum of 25°C. If curing temperature is lower than 18°C, polymerization will be too slow and the physical and chemical characteristics of the slice may be of a lower quality. However, oven curing/tempering may be used with the VisDocta products. The EP73 technique is comparable with the E12 technique.
Cook P. 1997: Sheet plastination as a clinically based teaching aid at the University of Auckland . Acta Anat 158(1):33-36.
https://doi.org/10.1159/000147907
Henry RW, Antinoff N, Janick L, Orosz S. 1997: E12 technique: An aid to study sinuses of Psittacine birds. Acta Anat 158:54-58.
https://doi.org/10.1159/000147911
Latorre RM, Reed RB, Gil F, L6pez-Albors 0, Ayala MD, Martinez-Gomariz F, Henry RW. 2002a: Epoxy impregnation without hardener: To decrease yellowing , to delay casting and to aid bubble removal. J Int Soc Plastination 17:17-22.
https://doi.org/10.56507/LZKY8224
Latorre RM, Reed RB, Henry RW. 2002b: Epoxy impregnation with no hardener. Abstract presented at The 11th International Conference on Plastination, San Juan, Puerto Rico, July 14-19, 2002. J Int Soc Plastination 17:7.
Reed RB, Henry RW. 2002: Epoxy under vacuum. Abstract presented at The 11th International Conference on Plastination, San Juan, Puerto Rico, July 14-19, 2002. J Int Soc Plastination 17:8-9.
Tsabari S, Pace EC. 2006: Epoxy resin: Old and new generation. J Int Soc Plastination 26:31-32 .
Shahar T, Pace C. 2005: Biological material preservation/Plastination. Chemical substances Epoxy resins. Chapter 4: 106. VisDocta, Tignale, Italy .
Weber W, Henry RW. 1993: Sheet plastination of body slices - E12 technique, filling method. J Int Soc Plastination 7(1):16-22.
https://doi.org/10.56507/EZGX2343
Windisch G, Weiglein AH. 2001: Anatomy of synovial sheaths in the talocural region evaluated by sheet plastination. J Int Soc Plastination 16:19-22.
https://doi.org/10.56507/HVGY3362
Zoggeler E, Probst A, Sora M-C, Konig HE. 2002: Plastinierte korperfeinschnitte als neues hilfsmittel zur darstellung der schnittanatomie am beispiel der bauch- und beckenhohle des hundes. Tierarztl Mschr 89:115-121.
Product distribution:
VisDocta Research Laboratories, Dr. Tsabari Shahar, via Panoramica 2B, 25080 BS Tignale, Italy. visdocta@tin.it , http ://www .visdocta.com/, Ph: 39 (3) 65 761 000, Fax: 39 (3) 65 761 900.