Division of Anatomical Sciences, Office of Medical Education, The University of Michigan, Ann Arbor, Michigan, USA
Painting of neurovascular structures has been used to highlight these structures to facilitate the study of anatomy. Previously at the University of Michigan, neurovascular pathways of plastinates were painted with Tamiya® Acrylic paints using conventional application with a brush. With continued handling over time, significant deterioration of the paint was observed. It was believed that the paint chipped off because the silicone surface did not provide adequate adhesion for the paint. Therefore, this project was designed to test new products and new application methods that might improve survival of the highlighting product when applied to the plastinated neurovascular pathways. Various products (paints, solvents, and base coats) and methods were selected for testing. Of these, acrylic paint applied to the specimen prior to catalyst (CT 32, Dow Corning) and application of ethyl silicate (Silbond-40®) over the paint, provided a strong and durable paint that could withstand vigorous handling.
acrylic; neurovascular; paints; plastination; room-temperature
Ameed Raoof Office of Medical Education, The University of Michigan Medical School, 3767 Med. Sci. II Bldg., Ann Arbor, MI, 48109-5608, USA; Telephone: 734-615-2597; Fax: 734-615 -8191; E-mail: ameedr@med.umich.edu.

![]()


To enhance anatomy education through plastination, a section of the research has been devoted to coloring plastinated neurovascular pathways (von Hagens, 1986; Raoof, et al., 2005). When painting, specimens’ blood vessels and nerves are color-coded to provide improved visual models from which to learn. Thus, students may view and handle three-dimensional specimens, and better distinguish specific anatomical patterns. However, handling of painted specimens by students has become an issue due to damage or chipping of paints.
For some time, Tamiya® Acrylic paints have been used in our laboratory to color specimens using a simple brush application. However, this paint and method did not yield permanent coloration since paints did not adhere firmly to the silicone surface of the plastinated specimen. It was believed that the paint chipped and wore off because the silicone surface did not provide adequate adhesion for the paint. This project was designed to test new coloring materials and new application methods which might improve survival of the highlighting product when applied to the plastinated neurovascular pathways, thus resulting in a durable painted plastinated specimen that could withstand the demands of extensive manipulation without a reduction in aesthetic quality. Various products (paints, solvents, and base coats) and methods were selected for testing. Of these, acrylic paint applied to the specimen prior to catalyst and application of ethyl silicate (Silbond-40®) over the paint, provided a strong and durable paint that could withstand vigorous handling.
Twelve specimens (one pelvis, five hearts, four spleens, two head and neck) were utilized. The specimens were plastinated using the room temperature silicone method. Specimens were dissected and flushed with running water, dehydrated in cold acetone, and impregnated with silicone mixed with 8% cross-linker (CR 22- Dow Corning). Following forced impregnation, specimens were cured using a catalyst (CT 32- Dow Corning) (Raoof, 2001; Raoof et al., 2007).
Six coloring materials (acrylic, enamel and plastic enamel paint; liquid and powder pigment; and dye) were tested (Table 1). Each color product was applied to the plastinated specimen using various solvents/additives (Silbond-40; liquid silicone/cross-linker mix; Silane; Silicone/Silbond-40 mix; Silbond) and applied in various sequences. Selection of the base for the coloring materials was based on adhesion capacity to silicone surfaces and ability to withstand weather and chemical abuse (Mayer, 1991). Silbond-40® is similar to ethyl silicate which is often used in outdoor silicone-based paints. Silane is known for its silicone adhesion (Mayer, 1991). Silicone PR-10® with Crosslinker CR-20® are the components in the plastinates.
Windsor Newton® Acrylic was mixed and/or applied using six methods: 1. Mixed with Silibond-40® and applied; 2. Mixed with Silicone-mix and applied; 3. Mixed with Silane and applied, catalyst (CT 32- Dow Corning) painted on and 4 hours later covered with lacquer; 4. Acrylic paint applied, covered with silbond, and covered with catalyst. Silbond was applied with a paintbrush and left to dry for 2 hours. The catalyst was sprayed after that; 5. Lacquer applied, then paint, Silbond, then catalyst.
To test a paint’s adhesive qualities, a scale was designed to measure bonding ability after various degrees of handling. If paint was dislodged from the specimen by rubbing with fingers, it was recorded as “easily removed”. If it required scratching with fingernails or light scratching with a probe to dislodge the paint from the specimen, it was deemed “moderately hard to remove”. If it was dislodged only by vigorous scratching with a probe, the paint was considered “difficult to remove”. If the paint remained adhered to the specimen following vigorous scratching with a probe, the paint was said to be “resistant to removal”.
Table 1 shows the results of the tested paints that were applied prior to the catalyst application. Twenty five combinations were tried. Only one combination did not come off the specimens after vigorous handling. Four application combinations were easily removed from the plastinated specimens, four were moderately difficult to remove, six were difficult to remove, and ten chemical-coloring agent combinations were insoluble.
| Coloring Materials | Additional Chemicals Used | Method of application |
Results |
| Acrylic
Windsor Newton: ® Cobalt Blue, Light Cadmium Red |
Silbond-40® | Mixed acrylics with Silbond-40®. | Acrylic and Silbond-40® did not mix well.
Difficult to remove |
| Silicone PR-10® with Crosslinker CR-20® | Mixed acrylics with Silicone mixture. | Acrylic and Silicone PR-10® with Crosslinker CR-20® did not mix well.
Difficult to remove |
|
| Silane | The acrylic paint was mixed with Silane®, followed by catalyst, and finally a layer of lacquer. | Acrylic and Silbond-40® did not mix well.
Difficult to remove |
|
| Silicone and Silbond-40® | The acrylic paint was applied followed by the silicone, then the Silbond-40® and finally the catalyst. | Difficult to remove | |
| Silbond-40® | The acrylic paint was applied followed by a layer of Silbond-40®, then the catalyst and finally a layer of lacquer. | Did not come off | |
| Silbond-40® | A layer of lacquer was applied followed by the acrylic paint, then the Silbond-40® and finally the catalyst. | Difficult to remove | |
| Enamel
American Tradition: ® Gloss Bright Yellow |
Silicone PR-10® with Crosslinker CR-20® | Mixed and applied to specimen. | Difficult to remove |
| Silbond-40® | Mixed enamel with Silbond-40®. | Enamel and Silbond-40® did not mix well.
Easily removed |
|
| Silane | The enamel was mixed with Silane®, followed by catalyst, and finally a layer of lacquer. | Moderately difficult to remove | |
| Silbond-40® | A layer of enamel was applied followed by a layer of Silbond-40® | Moderately difficult to remove | |
| Plastic Enamel
American Tradition®: Fire Truck Red |
Silbond-40® | The plastic enamel was mixed with Silbond-40® | Unable to be mixed with Silbond-40® |
| Silicone PR-10® with Crosslinker CR-20® | The plastic enamel was mixed with Silicone PR-10® with Crosslinker CR-20® | Unable to be mixed with Silicone PR-10® with Crosslinker CR-20® | |
| Silane | The plastic enamel was mixed with Silane | Unable to be mixed with Silane | |
| Silbond-40® | A layer of plastic enamel was applied followed by a layer of Silbond-40® | Moderately difficult to remove | |
| Liquid Pigment
Createx Pure Pigment®: Ultramarine Blue, Naphthol Red Light |
Silbond-40® | The liquid pigment was mixed with Silbond-40® | Unable to be mixed with Silbond-40® |
| Silicone PR-10® with Crosslinker CR-20® | The liquid pigment was mixed with Silicone mixture | Unable to be mixed with Silicone mixture | |
| Silane | The liquid pigment was mixed with Silane | Unable to be mixed with Silane | |
| Silbond-40® | A layer of liquid pigment was applied followed by a layer of Silbond-40®) | Unable to be mixed with all the solvents and too runny to adhere well to the specimen | |
| Powder Pigment
Lukas®: Cobalt Blue light, Maimeri: Cadmium Yellow |
Silbond-40® | The powder pigment was mixed with Silbond-40® | Easily removed |
| Silicone PR-10® with Crosslinker CR-20® | Powder pigment was mixed with Silicone mixture | Easily removed | |
| Silane | Liquid pigment was mixed with Silane | Easily removed | |
| Silicone PR-10® with Crosslinker CR-20® and Silbond-40® | A layer of powder pigment mixed with Silicone mixture was applied followed by a layer of Silbond-40® | Moderately difficult to remove | |
| Dye
Jacquard®: 112 Sapphire Blue |
Silbond-40® | The dye was mixed with Silbond-40® | Unable to be mixed with Silbond-40® |
| Silicone PR-10® with Crosslinker CR-20® | The dye was mixed with Silicone mixture | Unable to be mixed with Silicone mixture | |
| Silane | The dye was mixed with Silane | Unable to be mixed with Silane |
Table 1. Comparison of the different application methods of coloring materials and solvents used in this study.
The best results were obtained when the neurovascular pathways were colored with Windsor Newton® acrylics
prior to catalyst and followed by Silbond-40®, catalyst, and a layer of lacquer (Figures 1 & 2).
 Figure 1. A plastinated human head with neurovascular structures colored using acrylic paints (Windsor Newton®: Cobalt Blue, Light Cadmium Red). The acrylic paint was applied followed by a layer of Silbond-40®. Next, the catalyst was applied followed by a layer of lacquer. The combination was hard to scratch off. |
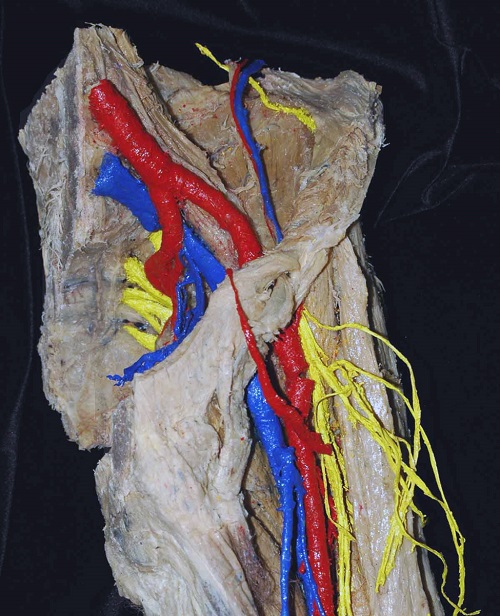 Figure 2. A plastinated human pelvis with colored sacral plexus and vessels using acrylic paints (Windsor Newton®: Cobalt Blue, Light Cadmium Red). The acrylic paint was applied followed by a layer of Silbond-40®. Next, the catalyst was applied followed by a layer of lacquer. The combination was hard to scratch off.
|
In plastinates, neurovascular pathways are best painted by using lacquer as a primer, followed by the application of Windsor Newton® acrylics, Silbond-40®, catalyst, and lastly a layer of lacquer. Figures 3-6 show specimens painted with other paint combinations that did not yield satisfactory results.
 Figure 3. Human spleen painted with enamel (American Tradition®: Gloss Bright Yellow) mixed with Silbond 40 showing that the combination did not mix very well. |
 Figure 4. Human heart coronary vessels painted with plastic enamel (American Tradition® Fire Truck Red) mixed with Silbond-40® (ethyl silicate). The combination did not mix well. |
 Figure 5. Human left common carotid artery and vagus nerve painted with powder pigment (Lukas®: Cobalt Blue light, Maimeri: Cadmium Yellow) mixed with Silane. The combination rubbed off easily. |
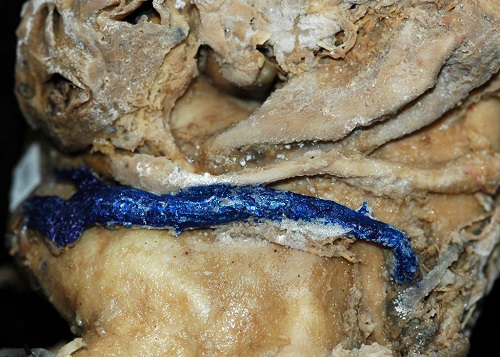 Figure 6. Human heart with the coronary sinus painted with Jacquard®112 Sapphire Blue dye mixed with Silbond 40. The combination did not mix well. |
Windsor Newton® brand acrylic was tested in place of Tamiya® acrylic to determine if the brand of paint was an issue.
The best method for painting plastinated specimens utilizes lacquer as the first layer applied to the specimen’s surface. It had been surmised that the silicone surface would not provide adequate adhesion for the paint. Lacquer acts as a primer for the acrylic paints and works particularly well on vessels and nerves, which are our target tissues, but the process was not as successful in adhering to other tissues of the specimen such as muscles. The process is tedious as it requires much time for the lacquer to dry between coats. An aerosol spray lacquer (Windsor & Newton®) considerably reduces application time as opposed to a brush-on lacquer. Two methods improved the durability of the paint significantly so that the specimens withstood excessive handling without the paint coming off. One method involves applying a base coat of lacquer, which acts as a primer for the paint on the plastinated surface. The second method integrates the painting process with the plastination process. If the paint is applied to the specimen after silicone impregnation and prior to curing, the acrylic paint becomes much more durable than was seen in any of the previous tests. Two methods appeared to improve the durability of the paint significantly so that the specimens can withstand excessive handling without the paint coming off. One method involves applying a base coat of lacquer, which acts as a primer for the paint on the plastinated surface (see the above discussion). The second method integrates the painting process with the plastination process. If the paint is applied to the specimen after silicone impregnation and prior to curing, the acrylic paint becomes much more durable than was seen in any of the previous tests.
This process was tested on all paint combinations. Of the various combinations, two in particular proved to work better than others. The Windsor Newton® acrylics mixed with Silane, and Windsor Newton acrylics that were followed by Silbond-40® proved to be the best methods of acrylic application. Acrylics did not mix well with silicone or Silbond-40®, and made the paint-mix difficult to apply.
Various dyes were also tested in this study. Although they proved more durable in certain cases, they posed other problems that were much harder to overcome. For example, dyes can only be effective when they are applied prior to the curing step. At that point, the specimens are filled with liquid, thus it was difficult to keep the dye on the neurovascular vessels. When applying to liquid-filled specimens, there is a greater chance that the dyes would ooze into surrounding areas. Dyes are watery substances which make them much harder to control when applying by brush, and any mistakes that are made with dyes could be potentially permanent. Acrylics, by comparison, are much thicker than dyes and can be used to accentuate the finest detail on a specimen. Also, from an aesthetic perspective, dyes are much darker as their brightness greatly depends upon the color of the specimen.
Our results also showed that the powder pigments and silicone-base combinations did not make an adequate paint. They did not peel or chip like the previous acrylics, but rather they were very powdery and rubbed off slowly when they were handled. However, according to “The Artist’s Handbook,” (Mayer, 1991) silicone-based paints were known to take as much as four to twelve weeks to reach their full effectiveness. Likewise, the silicone-based paints may take several weeks before they reach their full durability. Results regarding the durability of the silicone paint combinations over a longer time period are still pending. Lacquer was also applied on top of the powder pigment mixtures to prevent the pigments from rubbing off. This method, though an improvement from the powdered pigments alone, still rubbed off and showed to be an ineffective method for an efficient paint job.
We conclude that the aesthetic and, hopefully, educational value of specimens can be augmented by this method of acrylic paint application. The method is relatively easy to follow and uses affordable materials
Mayer R. 1991: Silicon Esters. In: The Artist's Handbook of Materials and Techniques. Toronto: Penguin Books Canada Ltd. p 385-392.
Raoof A. 2001: Using a Room-Temperature Plastination Technique in Assessing Prenatal Changes in the Human Spinal Cord. J Int Soc Plastination. 16: 5-8.
https://doi.org/10.56507/UIHR4575
Raoof A, Baumann C, Falk K, Hendon N, Liu L, Marchese A, Marchese L, Mediratta R, Mirafzali N, Munch J, Parres C, Wells M, Zhao H. 2005: Expanding the Role of Plastination in Anatomy. Proceedings of the 8th International Interim Conference for Plastination. Ohrid, Macedonia. 25-26.
Raoof A, Henry RW, Reed RB. 2007: Silicone Plastination of Biological Tissues: Room-temperature Technique DowTM/Corcoran Technique and Products J Int Soc Plastination. 22:21-25.
https://doi.org/10.56507/AWAC9285
von Hagens G. 1986: Heidelberg plastination folder: Collection of technical leaflets for plastination. Biodur products, Rathausstrasse 18, Heidelberg, 69126, p16-33.