Department of Animal Science College of Veterinary Medicine The University of Tennessee Knoxville, Tennessee 37901-1071, USA
Heart, lung, or heart and lung preparations make impressive teaching specimens, for studying both anatomy and pathology (1,2,3). However, it is frustrating if your specimen does not turn out as beautiful as you desire. All steps of preparation are important but collection, dilation, color injection, and curing may be the crucial steps. Regardless of the outcome, most if not all, plastinated specimens are superior to air or freeze dried, formalin-stored or paraffin-embedded specimens, and artificial models.
Following is an outline of the procedure for preparing plastinated heart, lung, or integral heart-lung specimens:
1) Collection of specimen.
2) Removal of blood from specimen.
3) Dilation using hydrostatic pressure.
4) Separation of heart from lung and ligature of pulmonary vessels.
5) Color injection of coronary vessels.
6) Fixation using hydrostatic pressure.
7) Dehydration (freeze substitution).
8) Impregnation with S 10.
9) Sculpturing heart. Inflate lungs with air.
10) Gas cure (S 6).
Lungs; Silicone; Plastination; S10
Robert W. Henry Department of Animal Science College of Veterinary Medicine The University of Tennessee Knoxville, Tennessee 37901-1071, USA

![]()


Heart, lung, or heart and lung preparations make impressive teaching specimens, for studying both anatomy and pathology (1,2,3). However, it is frustrating if your specimen does not turn out as beautiful as you desire. All steps of preparation are important but collection, dilation, color injection, and curing may be the crucial steps. Regardless of the outcome, most if not all, plastinated specimens are superior to air or freeze dried, formalin-stored or paraffin-embedded specimens, and artificial models.
Following is an outline of the procedure for preparing plastinated heart, lung, or integral heart-lung specimens:
1) Collection of specimen.
2) Removal of blood from specimen.
3) Dilation using hydrostatic pressure.
4) Separation of heart from lung and ligature of pulmonary vessels.
5) Color injection of coronary vessels.
6) Fixation using hydrostatic pressure.
7) Dehydration (freeze substitution).
8) Impregnation with S 10.
9) Sculpturing heart. Inflate lungs with air.
10) Gas cure (S 6).
COLLECTION
Caution must be used when exposing the heart and lungs so that the serosa or parenchyma of the heart and lungs is not damaged. It is beneficial to start by freeing and reflecting the trachea caudally to the cranial thoracic aperture (inlet). Continue reflection into the thoracic cavity and transect the brachiocephalic trunk, subclavian or carotid arteries, and cranial vena cava near the inlet (as far away from the heart as possible). The trachea serves as a means to grasp the viscera (heart and lungs) without damaging it. As the trachea is pulled caudally, the vena azygos and descending aorta are transected and finally the sternopericardial ligament and caudal vena cava. After removal from the thoracic cavity, the pericardial sac is dissected free, leaving a one centimeter stump attached to the base of the heart. This stump is left to prevent damage to the atria and pulmonary vessels. It may be removed after fixation or curing.
REMOVAL OF BLOOD
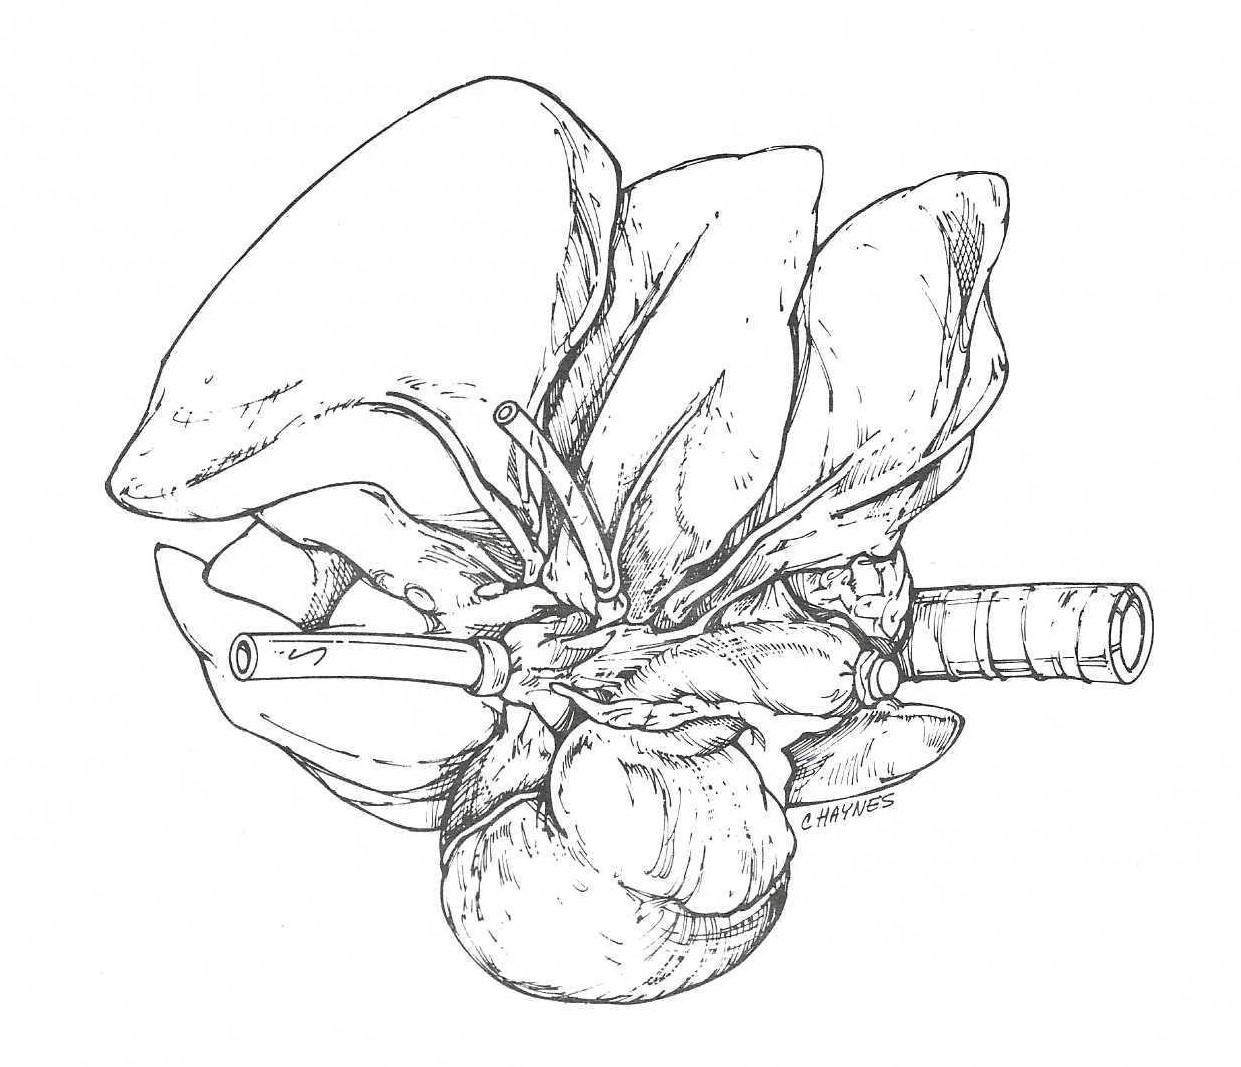
Figure 1. Ventral view of the right canine lung. Pulmonary vein is cannulated with small tubing and caudal vena cava with large tubing. Cranial vena cava is closed with a cork stopper.
The caudal vena cava and a pulmonary vein are cannulated. A ten centimeter piece of tygon (polyethylene) tubing (diameter suitable to fill the lumen of the vessel) is placed into the caudal vena cava and ligated it in place. An incision is made in a pulmonary vein, and a tube is placed through the incision toward the left atrium and ligated (Fig 1).
Tap water under moderate pressure is used to flush blood from the heart and lungs. One to two hours is usually sufficient. At 15-30 minute intervals, the aorta and cranial vena cava are gently occluded to increase intraorgan pressure and hence achieve better flushing. The organ is flushed until the heart is free of clots, begins to blanche, and the lungs are white. A water tank placed at least 20 centimeters above the organs may be used for a pressure controlled source of water.
DILATION
The heart is dilated to increase chamber size. A systolic or contracted chamber does not allow visualization of the internal anatomy. Therefore, it is desirable to dilate and mimic the diastolic state. To accomplish good dilation, all cut vessels (descending aorta, cranial vena cava, azygos vein, brachiocephalic trunk, left subclavian artery) must either be ligated or preferably closed using a cork stopper (4). The stopper (larger end first) is placed into the vessel and secured by a ligature around the vessel midway on the cork. This prevents it from being pushed out by the increasing pressure in the heart. The stoppers must be prebleached to prevent staining of the vessels by the dark resins in cork. Stoppers are bleached in 5% hydrogen peroxide solution for one week, removed and allowed to dry. This is then repeated for one additional week.
The sealed heart is connected, via the two previously placed cannulas, to a water reservoir. Keeping the reservoir in a walk-in cooler and hence using cold water(5°C) may retard autolysis. Depending on the thickness of the heart chambers and the amount of autolysis present, the height of the reservoir above the heart may be varied from 10-40 centimeters to regulate pressure. Generally the heart is dilated at room temperature (20°C). Occasionally we choose to dilate the heart in a cool environment (5°C). Usually the atria and right ventricle dilate within 12 hours. To get complete dilation including the left ventricle, cat and dog hearts require 1-2 days at room temperature. Horse, cow, and pig hearts may take 2-3 days.
To get maximal dilation it may be necessary to separate the heart from the lungs or place a cork in the trachea. Carefully separate the pulmonary arteries and veins (one to each lobe) from the lung parenchyma and ligate or cork. Continue dilation until the left ventricle expands.
COLOR INJECTION
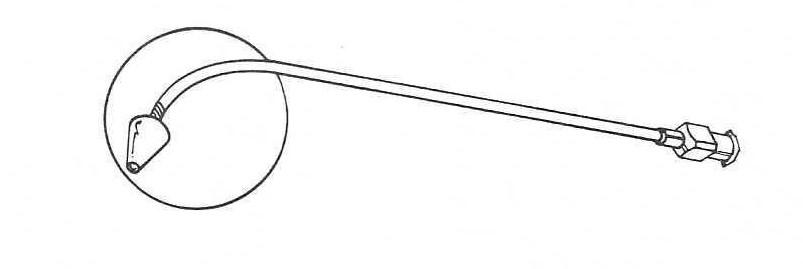
Figure 2. Special cannula for color injection.
Once the heart is dilated, red and blue colors (Biodur E 20) may be added via the coronary arteries and sinus respectively. The cork stoppers and cannulas are removed from the aorta and venae cavae. A cannula (4) is directed through the descending aorta or brachiocephalic trunk into the ostium of a coronary artery. A specially designed cannula (Fig 2) makes the injection easier. A ligature may be placed around the artery to hold the cannula in place and to prevent leakage of color around the cannula, or it may be held in place by firm digital pressure. We prefer the later. E 20 (an epoxy resin) plus E 2 (hardener) are thoroughly mixed in a ratio of 6.5 ml to 3 ml in a 12 ml syringe. One ml of acetone may be added to this mix (making it less viscous) to assure greater filling of the capillary bed. Attach the syringe to the cannula and use constant, firm digital pressure for proper filling of the arteries and capillary bed. 20 ml of mix is needed to fill the average dog heart (12 ml - left coronary and 8 ml - right coronary). After injection is completed, the cannula is removed, and the artery is ligated or clamped with a small curved hemostat.
The coronary sinus is cannulated using an appropriate size tube or cannula, which is introduced through a vena cava. No acetone is added to the blue mix (6.5:3). The venule side of the capillary bed has less resistance. Hence it is easy to overfill and get a blue heart. Usually 10 ml is enough to fill the great cardiac vein. Gentle massaging, rather than increased pressure, is used to work the color the length of the vein. The middle cardiac vein may be cannulated and filled separately. However, blue color may be massaged around the apex through anastomoses with the great cardiac vein. The middle cardiac vein will need to be ligated or clamped off with a hemostat after filling, as the coronary sinus or its cannula must be. The epoxy mix hardens in 30 minutes. After injection of the colored polymer mix, the heart chambers are flushed with water and possibly acetone to remove any E 20 leakage.
FIXATION
The corks and cannulas are replaced and the heart submerged in fixative. A reservoir of cool fixative (10-20%), placed a few centimeters above the heart, is used to fill and again hydrostatically re-dilate the heart before the polymer sets up. Thus the heart is fixed in a dilated state. Small (thinner walled) hearts need to fix only 4-5 days, but may be stored in fixative for longer periods. Larger hearts should be fixed for appropriately longer periods.
The lungs whether attached to or separated from the heart are dilated by filling with 10% fixative via the trachea. The trachea is closed by inserting a cork into the trachea (larger end first) and ligating it in place. The lungs are placed in 10% fixative and covered with a towel or weighted to assure total submersion.
DEHYDRATION
The cork stoppers are removed and the cannulas opened. The fixative is flushed from the specimens using tap water flowing up from the bottom of the container for two to three days. The preferred dehydration method is freeze substitution (5) which minimizes shrinkage. The specimens are submerged in -258 C acetone. At least three changes are used to assure 99% dehydration.
IMPREGNATION
After dehydration, the heart is placed from the acetone into the polymer mix(S 10 + S 3). Complete impregnation is preferred for heart preparations without lungs attached. We prefer to use incomplete impregnation 10 + S 3 + 5- 10% xylene) for lung specimens whether separated from or left attached to the heart. Incomplete impregnation of specimens decreases the time required to manicure the specimen during the curing period, and the lung is spongy and more life like.
After impregnation and removal from the cold polymer (S 10 mix), the heart and lungs are allowed to warm to room temperature. The excess polymer is again allowed to drain from the organs.
SCULPTURING OF THE HEART
Cutting windows in the heart to view the internal anatomy can be done at various times (just prior to or after impregnation or after curing). We prefer to sculpture the heart after impregnation. Make the windows to best demonstrate the desired area or structure you wish to highlight. Windows can be enlarged after curing. Windows made before curing allow for manicuring of the chambers, which is nearly impossible without windows.
GAS CURE
In preparation for the polymerization, the specimens need to be prepared in the following manner: The major vessels of the heart may either have stoppers replaced in them to maintain the contour of the vessels (4) or we prefer to roll lint free paper towels (Teri Wipers, Stock # 34770, Kimberly-Clark Corp, Roswell, GA 30076, USA) into rods and insert the rolled towel into the vessels. This maintains the contour of the vessel and aids in manicuring by absorbing excess polymer. The opened chambers are packed with paper towels to maintain contour and absorb excess polymer. These towels need to be changed every three to six hours.
A gentle flow of air is used to evacuate excess polymer from the pulmonary alveoli and dilate the airways. Both the lung and heart, after the above preparation, are placed in a closed chamber containing gas curing agent (S 6). It is desirable to continue inflating the lung while in the gas cure. Using an aquarium pump, to increase the amount of volatilized gas cure available in the chamber, will decrease the time a specimen needs to be exposed to gas cure. Removal of excess polymer by wiping and changing toweling is critical 14-24 hours after the onset of exposure to gas cure. It may be beneficial to begin gas cure just before leaving for the day. The next morning is the appropriate and necessary time to manicure specimens. Manicuring should be done three or four times during this day. By evening if the surface of specimens is still seeping, the specimens may be placed in a plastic bag and in a freezer overnight. Gas cure may be continued the next day. Usually the surface ,of specimens is cured and weeping of polymer ceases after 24-36 hours of exposure to gas cure.
1. Bickley, HC ; von Hagens, G ; Townsend, FM. An improved method for the preservation of teaching specimens.Arch Path Lab Med 105:674-676, 1981.
2. von Hagens, G ; Tiedemann, K ; Kriz, The current potential of plastination. Anat Embryol 175(4) 411-421, 1987.
https://doi.org/10.1007/BF00309677
3. Henry, R W. Plastination - Technique for preserving perishable biological teaching specimens. Anat Histol Embryol 15(2) 172, 1986.
4. Tiedemann, K ; von Hagens, The Technique of heart plastination. Anat Rec 204:295-299, 1982.
https://doi.org/10.1002/ar.1092040315
5. von Hagens, G. Heidelberg plastination folder 1985. Anatomisches Institut, Universitaet Heidelberg (locally published collection of technical literature).