Department of Anatomy and Structural Biology, University of Otago, Dunedin, New Zealand
The Biodur polymer P40 is a UV light cured polyester which is used for the production of thin brain slices. P40 may also be used for the production of transparent, plastinated, body slices. It was found that in the case of brains, thorough and even fixation is absolutely critical to the final quality of the slices and in particular to prevent the occurrence of orange discoloration of the tissue. Brains were suspended in 5% formalin at +5°C over a period of 9-11 weeks with frequent changes of fixative. During this time, when the brains were firm enough, they were sliced to allow better penetration for the fixative. After fixation 3 slices were processed at a time. The slices were flushed in running water, dehydrated in -25°C acetone then immersed in P40 polymer at -25°C. Impregnation was undertaken in a vacuum chamber at room temperature. The P40 bath within the chamber was surrounded with ice packs to prevent the polymer waning too quickly while acetone was being evacuated. Following impregnation, the slices were cast individually in flat, glass chambers and then cured under UVA lights. After the sheets were removed from the chambers they were trimmed, and the edges sanded and polished.
Note from the Editor
Vacuum and Pressure can sometime be quite difficult to grasp and it is always important to be very explicit. When Mr Barnett talks about "pressure" in his paper, he always refer to the residual pressure in the impregnation chamber, as indicated by the Bennert Manometer that most of us have in our plastination laboratories. Often we have seen plastinators talking about the "pressure" in the chamber, the "vacuum" applied to the chamber and even the "negative pressure".
To avoid confusion, the authors should always express the "residual pressure in the impregnation chamber" while describing the impregnation process in their publications.
Polymer P40, Brain, Neuroanatomy teaching
Russell J. Barnett, Depart- ment of Anatomy and Structural Biology, University of Otago, P.O. Box 913, Dunedin, New Zealand. Telephone: 479 7360/Fax: 479 7254 Email: russell.barnett@stonebow.otago.ac.nz

![]()


The P40 method of plastination is a follow up to the P35 technique, used for the production of thin (4, 6 or 8 mm), opaque slices of brain tissue. Brain slices produced with these two techniques possess excellent instructional potential, giving distinctive differentiation of white and gray matter and beautifully highlighting blood-filled vessels.
In the first few months of experimentation with the P40 technique there was considerable frustration. Orange spots continued to appear in the cortex of the brain slices and this was, at first, thought to be due to overheating of the glass chambers during the UV light curing process. After the introduction of a thermostatic control system and a fan to maintain the temperature in the chambers below the specified +35°C the orange spots still occurred. It was decided that there was no over-heating problem and that the problem could be due to active peroxidase in the tissue reacting with the catalyst in the polymer. Knowing that peroxidase can be largely inactivated by fixatives, a protocol for the fixation of coronal and horizontal human brain slices to be plastinated with P40 was established. Fixation of sagittal slices will be discussed in further publications.
Fixation of Coronal Slices
A fresh human brain was suspended by the basilar artery in 5% neutral buffered formalin (NBF) at +5°C. After 1 week the fixative was changed to fresh 5% NBF, still at +5°C. The brain was sliced in half, in the coronal plane, after 2 weeks to allow penetration of fixative into the centre, and was immersed in fresh 5% NBF at +5°C. After an- other 2 weeks the brain was sliced on a bacon slicer into 5mm slices and stacked on filter paper in 10% NBF at room temperature. The fixative was changed to fresh 10% NBF after another 2 weeks. Three slices from this brain were plastinated 2 weeks later. Total duration of fixation was 9 weeks.
Fixation of Horizontal Slices
It is not practical to slice the brain in half during the fixation procedure as for coronal sections. The superior as- pects of the 2 hemispheres would become separated and make further slicing somewhat difficult. For this reason, the brain was suspended in 5% NBF at +5°C and the fixative changed after 1 week ( fresh 5% NBF at +5°C ). After 2 further weeks a sliver was cut from the top of the brain in the horizontal plane to allow penetration of the fixative. The brain was placed back into fresh 5% NBF at +5°C. Four weeks later four 5mm slices were cut from the top of the brain until pink, unfixed tissue, showed in the centre. The slices were stacked on filter paper in fresh 5% NBF at room temperature. The remainder of the brain was placed back into fresh 5% NBF at +5°C, and remained in fixative for another month. Eleven weeks after the commencement of fixation, the rest of the brain was sliced and placed into fresh 5% NBF at room temperature.
Flushing
After fixation, slices were further processed, 3 at a time. They were washed in tap water for 24 hours, then placed into a grid basket and into distilled water at +5°C overnight.
Dehydration
The basket of slices was placed into the first acetone bath (not less than 98% pure) at -25°C for 24 hours. The basket was moved around gently in the acetone for the first 5 minutes to free gas bubbles and hasten freezing thus avoiding ice crystal formation. The grid basket was turned 2 or 3 times a day, to release trapped gas bubbles. This step is essential to avoid the risk of white spots on the finished slices. The basket was placed into a second acetone bath at -25°C (99-100% purity) for 24 hours. One high grade acetone bath may be sufficient over 2 days, so long as the last bath stabilizes at no less than 99% pure acetone.
Immersion
The grid basket was placed into the immersion bath of P40 at -25°C for 3 days, with the basket raised slightly on one side.
Impregnation
The immersion bath was taken straight from the freezer and placed into a vacuum chamber, on the bench, at room temperature (Cook and Barnett, 1996). Ice packs were packed around the immersion bath, within the chamber, to keep the temperature low. Impregnation was undertaken for 24 hours and the rate of evacuation was determined by the gentle rising of strings of small bubbles to the surface of the polymer. Most of the acetone was evacuated from the slices by the time the ice packs had thawed. Impregnation is complete when bubbles cease to rise when the pressure is at 10mm Hg (room temp.). If impregnation is carried out at - 25°C, the pressure must be brought down to at least 5mm Hg, but not less than l-2mm Hg. To prevent extraction of monomeric styrene from the impregnation bath, the pressure should not be brought lower than 10mm Hg (room temp.) or l-2mm Hg (-25°C) (von Hagens, 1994).
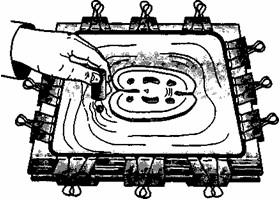
Figure 1. Magnet and ball bearing used to position the brain slice.
Casting
Each slice was cast in an individual flat chamber consisting of 2 standard quality glass plates 270 x 220 x 2 mm. Silicone tubing (9 mm) was sandwiched between the 2 glass plates to provide a gasket, and when clamped the gap be- tween the plates compressed down to 8 mm. The flat chambers were placed on an oblique angle. A mylar sheet used for overhead projections was cut in half and placed halfway into the top of the chamber. The brain slices were slipped into the top of the chambers using the mylar as support slides. One 6 mm ball bearing was also placed into each chamber. The chambers were placed upright and filled with the remainder of the polymer from the immersion bath. Fresh P40 can also be used for filling the chambers. Immersion P40 will give a slightly cloudy appearance to the cast but is tolerable if only a small number of slices (3) are processed at a time. A greater number will lead to more contamination of the impregnation P40 with lipids. In this case it is advised that fresh P40 is used for casting. Air bubbles were removed with the aid of a wire and the tops of the chambers sealed. The chambers were then topped up and bubbles removed with a syringe inserted between a glass plate and the silicone gasket. The chambers were then placed in a horizontal position and a magnet used to roll the ball bearing around, to position the slices in the centre of the chambers (figure 1). After the slices were positioned, the ball bearing was rolled away to the side and left against the gasket.
Curing
The chambers were laid flat between U.V. Lights. Two 40 watt 350 blacklight UV tubes were placed 200 mm above the chambers and another 2 tubes 160 mm below the chambers. The tubes were 110 mm apart. The temperature rose during the first hour of jellation. A fan blowing across both surfaces of the chambers was switched on when the surface of the chambers reached +27°C, approximately 30 minutes after commencement of polymerization. After 48 hours the lights were switched off and the clamps and gaskets re- moved. The edges of the casts, between the glass plates, were mopped to remove the sticky resin inhibited by the silicone gaskets. The resin-glass border was scored with a scalpel to allow easy release of the glass plates (this must not be omitted otherwise damage to the glass plates and cast may occur). The glass plates were removed and masking tape was applied to the circumference of the cast to seal the sticky edge until it was trimmed off.
Finishing
The casts were sawed into rectangles, corners rounded with a grinder, and edges then sanded and polished.
Compared to the P35 technique the advantages of the P40 technique are:
The disadvantages of the P40 technique are:
Brains that have been fixed in conventional 10% formalin have proved excellent for both the S10 and the P35 techniques. By contrast, slices taken from these brains and processed with P40 are far from satisfactory, displaying orange spots in the cortex of the brain. It is suspected that the orange spots are due to the presence of active peroxidase in the tissue, which reacts with the catalyst in the P40 polymer. The peroxidase can be largely inactivated by fixatives, and for this reason, very thorough and even fixation is vital for success with the P40 technique.
The brain slices were impregnated at room temperature due to the convenience of having a second vacuum chamber and pump, in the lab. The use of this second chamber avoided any interruption of our silicone plastination program, performed in the vacuum chamber at -25°C, while experimenting with the P40 technique.
Compared to the P35 method, the P40 technique offers comparable results but has the advantage that it is less ex- pensive. The P40 plastinated brain slices yield very fine anatomical detail and are an excellent aid for use in teaching and research (figure 2).
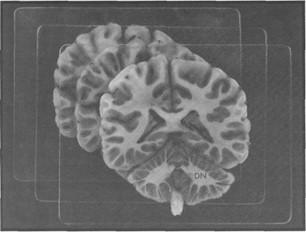 Figure 2a. P40 plastinated coronal slices of cerebrum and cerebellum: Blood vessels within the ventricles and cerebral cortex show in good contrast. Fine detail, such as the form of the dentate nucleus (DN) within the cerebellum, is well resolved. |
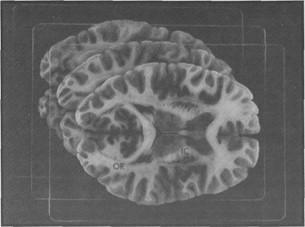 Figure 2b. P40 plastinated horizontal slices of cerebrum: Note the internal differentiation of the thalamus (T) showing its component nuclei and the excellent definition of the surrounding internal capsule (1C). The optic radiation (OR) is also well defined. |
Cook P, Barnett R: Practical applications in plastination. Instructional videotape, Departments of Anatomy, University of Auckland and University of Otago, New Zealand, 1996.
von Hagens G: Plastination of brain slices according to the P40 procedure. A step-by-step description, pp. 1-23, 1994. https://doi.org/10.56507/OWYV2878
Weber W, Henry RW: Sheet plastination of the brain - P35 technique, filling method. J Int Soc Plastination 6 (1): 29-33,1992. https://doi.org/10.56507/KWGD3312
Weiglein AH: Preparing and using S10 and P35 brain slices. J Int Soc Plastination 10 (1): 22-25,1996.
https://doi.org/10.56507/IXGV4189