Departments of Anatomy1 and Pathology2, Medical College of Ohio, C.S. 10008, Toledo, Ohio 43699 U.S.A.
In general, heart specimens for anatomic study are dissected to visualize the coronary arteries and/or myocardium. To study the cardiac valves, the dissection is performed in a way that permits Visualization of the valves and their relationship to each other and adjacent structures. In either case, it is difficult to make permanent specimens, free of fixatives for safe handling, that remain open for visualization of the valves.
The objective of this manuscript is to present a technique for preparation of the heart which maximizes Visualization of the cardiac valves and adjacent structures and is suitable for plastination.
Plastination; Silicone; S10; Heart Valves
Carlos A. C. Baptista Departments of Anatomy, Medical College of Ohio, C.S. 10008, Toledo, Ohio 43699 U.S.A.
![]()


In general, heart specimens for anatomic study are dissected to visualize the coronary arteries and/or myocardium. To study the cardiac valves, the dissection is performed in a way that permits Visualization of the valves and their relationship to each other and adjacent structures. In either case, it is difficult to make permanent specimens, free of fixatives for safe handling, that remain open for visualization of the valves.
The objective of this manuscript is to present a technique for preparation of the heart which maximizes Visualization of the cardiac valves and adjacent structures and is suitable for plastination.
In general, the heart selected for this purpose should be free of cardiac disease and/or injury. The heart should be removed from the thoracic cavity with care and it is preferable to cut the great vessels, including the superior and inferior vena cava, some distance from the heart.
To remove residual blood from the chambers and coronary vessels, the heart should be rinsed with tap water overnight and then, massaged gently, particularly in the area of the coronary groove. This will remove blood inside the coronary arteries and veins.
Valve Preparation
Preparation of the Atrioventricular Valves

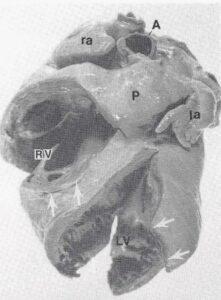
Figure 1. Photograph of plastinated adult human heart showing: Right ventricle (RV), Pulmonary trunk (P), Left ventricle (LV), Aorta (A), Left auricle (la), Right auricle (ra), Initial 1 cm incision sites (between arrows).
To prepare the right atrioventricular (tricuspid) valve, a 1 cm incision (Fig. 1) was made in the right ventricle, above the trabecula septomarginalis, near the anterior papillary muscle. Using small forceps, small pieces of moist cotton were placed between the ventricular (rugose) surface of the right atrioventricular valve and the ventricular wall. This fixed the valve in its ascending position. The partial closing of the cusps was best observed through the ostium of the superior vena cava. The entire right ventricle, from apex to valvular plane, was filled with larger pieces of moist cotton to mimic diastole, but excessive distension was avoided.
The left atrioventricular (mitral) valve was prepared in a similar manner through a 1 cm incision in the apex of the left ventricle. The positioning of this valve was best observed through an incision in the left atrium. As with the right, the left ventricle was completely filled with larger pieces of moist cotton to simulate diastole.
Preparation of the Semilunar Valves
Before closing the valve of the pulmonary trunk, the outflow tract of the right ventricle was filled with cotton through the ventricular incision and pulmonary trunk. Then, using forceps and small pieces of moist cotton, the sinus of each valvula was filled and the cotton molded until the valves were completely closed (Fig. 2). The pulmonary trunk was filled with cotton and distended it to its normal, circular shape. The aortic valve, its sinuses, and the aorta were prepared in a similar fashion (Fig. 3).
Fixation
Once the valves were prepared, the heart was fixed in Klotz solution according to the method described by Rodrigues (1973) which preserves the specimen's natural color.
In brief, the heart is fixed in Klotz I solution for 5-10 days depending on the size of the specimen. Klotz I solution consists of the following: Sodium Chloride, 90 g; Sodium Bicarbonate, 50 g; Chloral Hydrate, 400 g; Formaldehyde 37%, 300 ml; and Distilled Water 10,000 ml. After initial fixation, the specimen was washed in tap water for a minimum of 12 hours and then placed in Klotz II solution (Sodium Chloride, 90 g; Sodium Bicarbonate, 50 g; Chloral Hydrate, 200 g; Formaldehyde 37%, 100 ml; and Distilled Water, 10,000 ml).
The specimen may be left in Klotz II solution for an indefinite period of time prior to plastination.
Plastination
Dehydration
Before commencing the dehydration process, all cotton was removed from the specimen. To facilitate removal of the cotton, it may be necessary to enlarge the previously made incisions.
Freeze substitution, at -25°C, was the preferred method of dehydration with the volume of cold acetone to tissue being 5:1. The specimen was dehydrated for 5 weeks using two changes of acetone at two week intervals.
Impregnation
After dehydration, the heart was placed in the silicone resin (Biodur S10 + S3) in the vacuum chamber at - 25°C. The first day the vacuum was maintained at 10" (inches) Hg. On day three, the vacuum was increased to 20" Hg. The impregnation time varied with the size of the specimen (20-30 days). When the vacuum was near 0 mm Hg and no acetone bubbles were seen on the surface of the polymer, the vacuum was turned off. The specimen was removed from the vacuum chamber and allowed to drain at room temperature.
Gas Cure
The excess resin was drained from the specimen by rotating the heart several times. After the heart was drained, it was placed in a closed container with the gas cure agent (S 6) for 4 - 6 days.

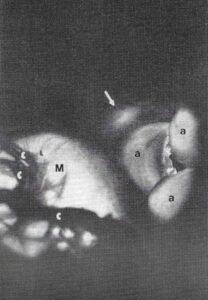
Figure 4. Close up photograph of the area identified by dashed line in Figure 3. Transillumination reveals the relationship of the membranous septum (arrow) with the non-coronary cusp of the aortic valve (a). Mitral valve (M), Chordae tendineae (c).
The advantage of plastinated specimens for teaching anatomy and pathology is well known (von Hagens, 1979a, b; Bickley, 1980; Bickley et al., 1981; Tiedemann, 1982; von Hagens, 1985; Oostrom, 1987). However, the technique is even more advantageous when applied to special preparations like the one described in this manuscript. One difficulty when working with the heart, is that the valves are flattened against the ventricular wall and are hence hard to view in fixed preparations. With plastination, the valves can be positioned to maintain their proper position in the hardened state (Figs. 1, 3).
With the valves in their closed position, as described above, one can better observe their insertion into their respective rings, the insertion of the chordae tendineae, and the position of the papillary muscles. In addition, the separation of the pulmonary and tricuspid valves by the supraventricular crest and the relationship between the cusps of the aortic and mitral valves are easily observed.
Finally, using trans-illumination, the membranous septum and its relationship with the non-coronary cusp of the aortic valve can be demonstrated (Fig. 4). Plastination offers a host of opportunities for demonstrating pathology.
Bickley HC: Preservation of gross tissue specimens by plastination. Bull Pathol Educ 6:5-7, 1980.
Bickley HC, G von Hagens, FM Townsend: An improved method for preservation of teaching specimens. Arch Pathol Lab Med 105:674-76, 1981.
Oostrom K: Plastination of the heart. J Int Soc Plastination 1(2):12-19, 1987.
https://doi.org/10.56507/YWZL8112
Rodrigues H: Tecnicas Anatomicas. Juiz de Fora, Minas Gerais, Ministerio da Educagao e cultura, Brazil, 1973.
Tiedemann K, G von Hagens: The technique of heart plastination. Anat Rec 204:295-299, 1982.
https://doi.org/10.1002/ar.1092040315
von Hagens G: Impregnation of soft biological specimens with thermo- setting resins and elastomers. Anat Rec 194:247-256, 1979a. https://doi.org/10.1002/ar.1091940206
von Hagens G: Emulsifying resins for plastination. Der Praparator 25:43-50, 1979b.
von Hagens G: Heidelberg Plastination Folder: Collection of all technical leaflets for plastination, English ed. Anatomisches Institut 1, Universitat Heidelberg, 1985.