Department of Anatomy 2, Anatomical Institute, Vienna University, Vienna, Austria.
This study intends to present a new aspect in plastination with P40, not only in processing brain slices, but also in plastination of three dimensional structures. We decided to make this attempt with nervous tissus and choose to plastinate human brachial plexuses. Two plexuses were removed from a fixed body, from the dissection room. After dehydration, they were immersed and impregnated with P40. The main problem in curing P40 is that it should be done under UV-light and in a closed, airless chamber, otherwise the surface of the plastinated specimen remains sticky. Curing was therefore performed by using UV-light and simultaneously keeping the specimens under vacuum.
Brachial plexus, P40
Dr Mircea Constantin Sora, Department of Anatomy 2, Anatomical Institute, Vienna Univer- sity, Währingerstr. 137 3, A-1090 Wien, Austria, Tel: 43 1 40480 225 / Fax.: 43 1 40480 416, Email: mircea-constantin.sora@univie.ac.at

![]()


The P40 technique is used for brain slices plastination and shows a very good differentiation between the gray and white matter (von Hagens, 1994; Barnett, 1997). While work- ing with P40 we considered using it for plastination of three dimensional structures. As P40 has proved hitself successful with brain slices, we considered that a nervous structure would fit the purpose of this experiment best, so we decided to plastinate brachial plexuses. Nerve plexuses have been plastinated before with P35 (Weiglein and Bahadori, 1996) but these specimens were prepared between glass and did not have the three dimensional aspect that we were looking for. It is also well known that brains and nerves can be plastinated by using S10 (Resch, 1989; Riepertinger, 1989; Haffajee, 1996) however color is often not preserved and at the end nerves will sometimes appear gray or brown. With the P40 a better color preservation may be achieved.
Fixation and Dissection
Each plexus was dissected starting at the proximal ends and colored cords were attached to the roots as they were isolated. After dissecting the axilla, the plexus was removed, and immersed in 5 % formalin for one week at room temperature.
Rinsing in running water
The specimens were rinsed overnight in tap water be- fore the dehydration process. They were then precooled at+5°C in order to avoid the formation of ice crystals (von Hagens, 1985) when placed in cold acetone.
Dehydration
Dehydration was performed by the freeze-substitution method in acetone at -25°C. Each specimen was immersed in a container with 3 liters of acetone. The acetone was changed every 3 days. Two changes were necessary and the final concentration remained at 98.8% after one week.
Impregnation
The brachial plexuses were obtained from a fixed cadaver, from the dissection room. The cadaver has been fixed with a solution containing 5% formalin; 3% phenol and 92% water by means of injection via the femoral artery. Dissections were performed as follows: we removed the clavicle.
Dehydration being completed, the brachial plexuses were impregnated with BIODUR P40 (Biodur, Rathausstrasse 18, 69126 Heidelberg, Germany). The resin was first precooled in the same freezer which had been used for the dehydration of the specimens at -25°C to avoid shrinkage. The plexuses were then placed in P40 (the resin level should be 2 cm above the specimen) and the container placed in a refrigerator at +5°C overnight. Next morning, the container was brought at room temperature and impregnation started immediately. Forced impregnation began with an adjustment of the pressure in the chamber at 180 mmHg (240 mbar). During the whole day the vacuum was adjusted down to a pressure of 10 mmHg (13 mbar). Vacuum increase depended on the formation of impregnation bubbles. At room temperature the impregnation took approximately 10 hours.
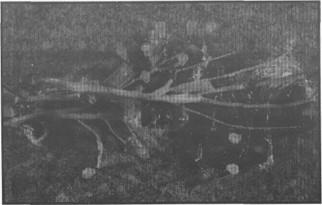
Figure 1. Brachial plexus disposed on a cork plate for the first stage of curing.
Curing
Some special arrangements had to be made for curing. First the impregnated plexuses were removed from the P40 and drained for 10 minutes laid flat on a mesh. The next step was to rearrange and expand each branch of the plexuses to their natural shape. In order to obtain a three dimensional form of the plexus, each specimen was first placed on a cork plate covered with polyethylene foil. At this time the plexus was soft, so that the spinal roots, at the proximal end of the specimen, were put in the right position using stainless steel nails (root C-5 at the top, then C-6, C-7, C-8, and at the bot- tom T-l). The trunks of the plexus were separated by using foam pieces also covered with polyethylene foil. The same procedure was used for the separation of the divisions, cords and branches of the plexus. At it's distal end, the main branches were kept in position by using stainless steel nails. Other small branches were pinned in the right position with needles (figure 1).
After this procedure was finished, the whole cork plate, including the specimen, was placed in a vacuum chamber. Next it was necessary to create maximum vacuum (the ideal pressure inside the chamber should be 1 mmHg). Polyester resin will not cure and the surface ot the specimen will re- main sticky if air remains in the vacuum chamber (Kirk Othmer, 1996). An UV-light unit (200 kW) was placed in front of the vacuum chamber (figure 2). The distance be- tween the specimen, in the vacuum chamber, and the UV-light was 40 cm.
After 15 minutes, the plexus was removed from the vacuum chamber. The cork-foil plate was removed and the plexus suspended with a wire inside the vacuum chamber. Resin drops found on the surface of the specimen were easily removed with a scalpel. The specimen was put back in the vacuum chamber and curing under vacuum and UV-light continued. After one more hour, the surface of the specimen was cured enough to permit the foam pieces and the needles to be removed (figure 3). Complete curing took about 5 hours. In the first two hours the vacuum chamber was opened every half an hour and the specimen turned around, so it would cure from all sides. Every time the vacuum chamber was opened, the specimen was smeared with P40. After two hours the vacuum chamber remained closed until the specimen was completely cured.
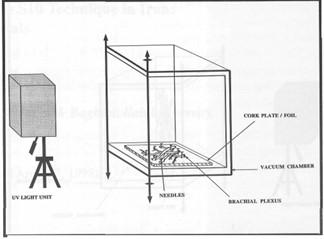 Figure 2. Brachial plexus on cork plate placed inside the vacuum chamber, facing the UV-light unit for the first stage of curing. |
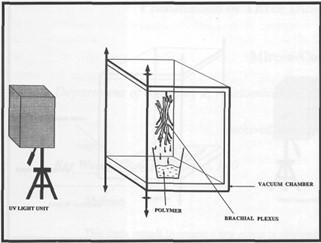 Figure 3. Brachial plexus suspended inside the vacuum chamber for the final stage of curing. |
Specimens prepared with this method retain their natural three dimensional aspect with a very good color preservation (figure 4)
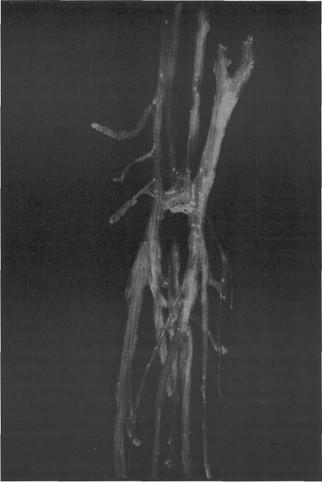
Figure 4. Three dimensional brachial plexus prepared with the P40 polymer.
We know that the polymerization of polyesters happens in two phases: first a gel phase and after that the hardening phase (Arpe et al, 1992). Our experiences with P40 samples in vacuum exposed to UV-light showed that the polymer be- comes a gel after 15 minutes.
Plastinating a brachial plexus with P40 has advantages but also disadvantages. As an advantage the processing time is short. The immersion and impregnation time with P40 takes only one day, while by the S10 method the impregnation time takes up to three weeks. An other advantage is that the cost of the material is reduced because P40 is cheaper than S10 (1 kg of Biodur P40 cost 35 DM while 1 kg of Biodur S10 cost 67 DM). Color preservation is also better by using P40.
Disadvantages occur in the curing stage where one must have a good vacuum pump to reduce the pressure down to 1 mmHg. Another disadvantage is that you must supervise the curing very carefully, in order to open the vacuum chamber and turn the specimen around. As a disadvantage you may consider that the P40 plastinated plexus will be solid but fragile in comparison with the S10 method that produces flexible specimens.
This study tries to find some new applications in the field of plastination by using P40. This method may seem a little complicated but is certainly worth mentioning. We are actually developing this method for the plastination of dissected brains, in order to get a better differentiation between gray and white matter. Results will be presented later in an other paper.
Arpe H-J, Schulz G, Elvers B ed.: Ullmann's Encyclopedia of Industrial Chemistry. 5th Ed., Weinheim, VCH publishers, vol 21, pp 217-225, 1992.
Barnett RJ: Plastination of Coronal and Horizontal Brain Slices using the P40 Technique. J Int Soc Plastination 12(1): 33-36, 1997 https://doi.org/10.56507/YJVS5787
Haffajee MR: Brain preparation to show fibre tracts and nuclei. J Int Soc Plastination 10 (1): 6-7, 1996.
https://doi.org/10.56507/LDTQ2301
Kirk-Othmer: Encyclopedia of chemical technology. 4th Ed., New York, Wiley, vol 19, pp 654-677, 1996.
Resch KDM: Plastinated specimens for demonstration of microsurgical approaches to the base of the cranium. J Int Soc Plastination 3 (1): 29-33, 1989. https://doi.org/10.56507/FUGF5217
Riepertinger A: Plastination of the brain with attached spinal cord. J Int Soc Plastination 3 (1): 22-28, 1989.
https://doi.org/10.56507/JGJS6881
von Hagens G: Heidelberger Plastinationshefter. Anatomisches Institut I, Universitat Heidelberg, D-6900 Heidelberg, Germany, 1985.
von Hagens G: Plastination of brain slices according to the P40 procedure. A step-by-step description: 6, 1994.
Weiglein A, Bahadori K: Nerve plexuses demonstrated by the P-35 technique. J Int Soc Plastination 10 (1): 4-5, 1996. https://doi.org/10.56507/UYCK9598