1-Cell biology-Anatomy, College of Veterinary Medicine, Iowa State University, Ames, IA.
2-Anatomishces Institute, Medical Universitat Graz, Graz, Austria, Europe.
3-Anatomia y Embryologia, Facultad de Veterinaria, Universidad de Murcia, Murcia, Espania, Europe.
4-Department of Comparative Medicine, College of Veterinary Medicine, University of Tennessee, 2407 River Drive, Knoxville, TN, 37996-4543, USA.
Plastination has become the gold standard for preservation of perishable biological tissue. Plastination is used in various anatomical, clinical and biological methodologies. The BiodurTM polyester technique produces 4-8mm translucent slices which display sectional anatomy within its normal anatomical relationships. These slices are superb aids to study and understand modem diagnostic images of computed tomography , magnetic resonance and ultra sound. Historically, brain tissue has been sliced and utilized for this technique.
plastination; polyester method; body slices; polyester resin; P35
A. WEIGLEIN - Anatomishces Institute, Medical Universitat Graz, Graz, Austria, Europe. Telephone: (865) 974 - 5822; E-mail : andreas.weiglein@meduni-graz .at

![]()


Polyester sheet plastination was developed for preservation of brain tissue for teaching and research. The slices are prepared by replacing tissue fluid with a curable polyester resin. Historically , brain slices (4- 8mm thick) have been produced using the flat chamber technique. In previous years, P35 was used to prepare head slices (de Boer-van et al., 1993) and more recently, P40 polyester resin is being used for production of brain as well as body slices (Latorre et al., 2004). The P35 and P40 methods are named respectively for the Biodur™ polyester resins P35 and P40 used for their respective processes. The polyester plastination technique utilizes the basic principle of the classic plastination technique (von Hagens, 1979a; 1986; von Hagens et al., 1987. All water and a small portion of the lipid are removed from the slices and replaced with the curable polyester resin.
The Biodur™ P35 resin was developed in the late 1980's and after more than two decades, P35 still remains the gold standard for production of premier
brain slices. In the mid 1990's, the P40 resin was introduced as a more user friendly method. A new comer to the polyester methodology and products is Hoffen P45 polyester resin. All of these resins utilize similar methodology with impregnation and casting between glass plates being the common theme among the polyester resin technology.
Classically, the P35-procedure produces opaque, thin (4, 6 or 8mm) brain slices while Epoxy resin (E12) produces semitransparent slices because much of the fat tissue is cleared with methylene chloride or acetone. However, thinner slices may be prepared and produced. Exquisite differentiation of white and gray matter is the premier quality of the Biodur™ P35 process.
The steps in polyester plastination are classic: specimen preparation, cold acetone dehydration, impregnation and finally curing (von Hagens, 1979b; 1986; Weber, 1992; Weber and Henry, 1992; Weiglein, 1996). However, an additional step of casting in a glass mold (flat-chamber) is added. Each step must be carried out properly to assure a high quality plastinated slice. Chemicals used in polyester-plastination include:
The Biodur™ products for polyester plastination are:
The basic steps of plastination include: Specimen preparation , Dehydration, Impregnation and Curing.
The fresh brain specimen is harvested and fixed using 10% formalin, with no other additives, for three to six weeks (Riepertinger, 1988). As with most fixation methods, perfusion is the ideal method to achieve the best fixation. Fixation is necessary to yield the brain firm enough for slicing on a "deli"/meat slicer, as well as, to decrease any potential biohazard risk that could be associated with routine handling or slicing of tissue (Smith and Holladay, 2001). Specimens that have been fixed using formalin which contained other chemical additives should be used cautiously as the additives may cause adverse reactions with the resin.
Specimen preparation equipment:
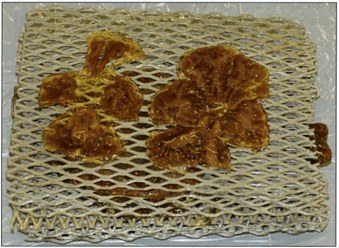
Figure 1. Human brain slices embedded in gelatin - P35 technique.
To aid orientation of the brain and to assure true transverse, horizontal or coronal slices and to keep the various pieces of the slice together as a single unit, the brain may be embedded in 20% gelatin and then sliced (Fig. 1) (Weber and Henry, 1992).
Slicing: A proposed plane of section of the brain is determined and the brain is cut into two portions with a brain (large) knife. One piece is placed into cold water and the other on the deli/meat slicer. Slices are prepared with the slicer at a determined thickness (Fig. 2). Slice thicknesses of 4, 6 or 8mm may be preferred since standard gasket sizes for these thicknesses are conveniently available from Biodur™. A produced slice is placed on a filter paper and then onto a metal or plastic (acetone resistant) grid (Fig. 1). The grids with their slices are stacked and submerged in a water bath. The stacked grids with their slices should be tied together in bundles or placed into a basket for ease of transfer from one acetone bath to another and subsequently into the resin-immersion baths and impregnation bath (Fig. 3).
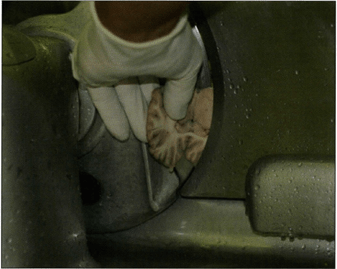
Figure 2. Preparing 2mm brain slices with a deli slicer for dehydration, impregnation , casting and curing for plastination via the P35 technique .
Flushing & Precooling: The basket of slices is placed in cool running tap water overnight to rinse the formalin from the slices. Flushing may be extended for two days. After flushing, the slices are placed in fresh tap water and cooled to 4°C.
The recommended dehydration procedure for plastination is freeze substitution in -25°C acetone (von Hagens, 1986; Tiedemann and Ivic-Matijas, 1988; Brown et al., 2002). Shrinkage is minimal when cold acetone is used. Ethanol dehydration promotes excess shrinkage of most tissue and especially brain tissue. Therefore, it should not be used for processing brain tissue.
Dehydration equipment:
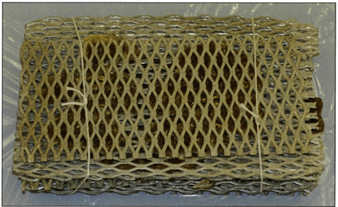
Figure 3. Human brain slices embedded in gelatin, positioned on grids, bundled, and tied for transfer into acetone and resin mix.
For all plastination techniques , acetone is ideal and serves both as the dehydration agent and intermediary solvent because acetone readily mixes with the resins used during plastination. It also has a high vapor pressure which allows maximal extraction from the brain slices. The stack of brain slices in the basket or bundle is removed briefly from the water and the excess water is allowed to drip off. The drained slices are submerged in the first cold (-25°C) acetone bath. Only this first acetone bath may be less than 100% purity (>90%). An estimate of acetone volume for one human brain is 25 L. The slices should be tilted a few degrees as they enter the acetone bath and agitated after submersion to remove trapped air bubbles. After 2 days, the basket of slices is moved to the second cold acetone (100%) bath of a similar volume. Caution: Dehydrated brain slices become brittle and break easily - Handle with CARE! After two days and stirring the acetone, the purity of acetone is checked with an acetonometer (Fig. 4). Acetone temperature must match the temperature calibration of the acetonometer. Most acetonometers are calibrated at +20°C, +l 5°C or -10°C. Therefore acetone must be warmed or cooled to match the calibrated temperature before measuring . If the acetone concentration is more than 98%, dehydration is considered complete. If more than 2% water remains, a third cold dehydration bath must be used to complete dehydration.
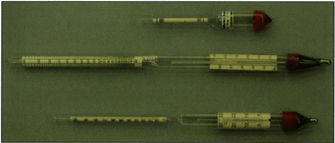
Figure 4. Assortment of acetonometers for checking acetone purity .
Degreasing of brain slices is not done. Degreasing would cause excess shrinkage of the slices. When dehydration is complete, the slices are ready to be immersed into the resin-mixture.
Immersion into resin-reaction mixture: The dehydrated brain slices will be transferred into an immersion bath in preparation for impregnation .
Day 1: An immersion-mixture of resin and catalyst is prepared. The ratio of resin (P35) to catalyst (A9) is 100:2 (P35- 100 pbw:A9- 2 pbw). These components must be mixed thoroughly . The P35 process may be carried out in the deep freezer (-15°C), the refrigerator (+4°C) or at room temperature. The P35/A9 immersion-mixture (bath #1) is precooled to the chosen impregnation temperature. The basket or bundle of brain slices and grids are submerged into this precooled P35/A9 impregnation-mixture for one day. Caution: Immersion and impregnation baths must be kept in the dark to prevent the reaction-mixture from hardening (*UVA light is a catalyst). Note: This first immersion bath must be discarded after this use.
Day 2: Immersion bath #2 of P35:A9 (100:2), mixed as bath #1, is prepared and mixed thoroughly. The slices are transferred from immersion bath 1 into bath 2. This second immersion bath may be used as the 1st immersion bath for the next group of slices.
Day 3: The slices are transferred into the well-mixed impregnation reaction-mixture which also has the same ratio of P35:A9 (100:2) as the two previous immersion baths. Allow the slices to equilibrate in the resin-mix and then forced impregnation is ready to begin. Impregnation may be carried out at either room temperature or in the cold.
Impregnation equipment:
Preparing the impregnation-mixture: The polyester impregnation bath is prepared by mixing Biodur™ P35 resin with A9 catalyst (100:2).
Forced Impregnation of brain slices: Prior to submersion of the slices into the fresh Biodur™ P35/A9 mixture (100:2), the vacuum pump is turned on and allowed to warm to working temperature for a few minutes. Once the pump has warmed, the slices in the impregnation-mixture are placed in the vacuum chamber at the desired temperature (room temperature or cold) and vacuum is applied. The vacuum chamber must be kept darkened. As the pressure is lowered, the acetone (because of its high vapor pressure) vaporizes/boils out of the slices leaving a tissue void into which the polyester resin-mix enters. Frequent regulation of the rate of evacuation is necessary to keep the impregnation boiling rate proper (rapid boil). Resin level must be observed and more reaction-mixture is added if the level drops and exposes the top slices. Pressure is slowly decreased to 10-12mm Hg at room temperature of l-2mm Hg in the cold over a 24 to 30 hour period. Because the resin contains styrene, the listed lower limits of pressure, must be observed to prevent the extraction of styrene (von Hagens et al., 1987). When bubble production decreases considerably, impregnation is nearly complete, even though bubbling may not completely stop. Note: This impregnation-bath may be used as the 2nd immersion-bath for the next group of slices. After impregnation is complete, the chamber is returned to atmospheric pressure and the box containing the slices is removed and kept in a dark environment.
UVA light serves as the catalyst for this Biodur™ polyester resin. The impregnated slices are placed between two glass plates to produce a smooth surface for the specimen.
Curing equipment:
Preparing Glass/Casting Chambers for brain slices:
Figure 5. A prepared and taped double glass plate set ready to accept impregnated slice.
Each casting (flat) chamber is prepared from four appropriate sized pieces of glass. Two pieces are of safety (tempered) glass (3-5mm for strength) and two of float [window (2mm/ 1/16in for flexibility)]. Glass size of 35cm x 45cm is appropriate for human brain slices. Silicone gasket and fold-back (folder) clamps complete the necessities. The gasket length needs to be similar to the length of the perimeter of the glass. Both the top outer and the outer bottom glass of the chamber are to be the sheets of safety (tempered) glass. They are each lined with one inner sheet of float (window) glass. The intended top end of each pair of glasses is joined and sealed using masking tape (Fig. 5). This stabilizes the paired glasses and prevents resin from getting between them. The bottom end is secured with two smaller fold back clamps. One set of glass plates will be placed on an assembly stand (block of Styrofoam or box) with the float glass facing up. The float glass is now ready to accept an impregnated brain slice.

Figure 6. Impregnated human brain slice positioned on the float glass of the bottom set of taped, double glass plates ready for gasket placement.
The slices in their impregnation-mix are removed from the vacuum chamber. An individual slice with its grid is removed from the resin and allowed to drain briefly . The slice is placed on the float glass of the double glass plate unit that is resting on the assembly stand (Fig. 6) A silicone gasket (6mm for a 4mm slice) is placed 2cm from the bottom edge and its length is divided 2/3 to 1/3 from center of the bottom of the glass (Figs. 7, 8). This will allow the longer end to pass across the top of the glass and finally close the entire unit. Later the ends of the gasket will continue up the sides lying on the float glass 2cm from the edge in preparation to seal the casting chamber. Place a 6mm. spacer at the top. Next the second set of plates is placed on top of the slice, spacer and gasket with the float glass facing toward the specimen, thus forming the top of the chamber (Fig. 9). Remove the small fold back clamps. The gasket between the top and bottom is compressed by large fold-back clamps that are placed over the bottom and both sides of the chamber. Carefully align the clamping edge over the gasket to assure the best seal possible. The top end remains open with the excess gasket hanging out on each side. The clamps secure and seal the two sets of double glass plates with the gasket on three sides so that the flat chamber can be handled as one unit. Next, fold the bottom clamp handles onto the glass and stand the flat chamber containing the slice vertically on its bottom end with the open top directed upward (Fig. 10). The flat (casting) chamber containing the specimen is filled with the fresh well-mixed P3S/A9 mixture (100:2). For filling the standard size chamber (3S x 4S cm), 700 ml of the resin-mixture is needed. A flat funnel, made by cutting off the comer of a plastic sleeve or flat plastic bag, is used to fill the chamber with a fresh mixture of P3S/A9 (100:2) (Fig. 11). Air bubbles are poured into the chamber as the resin is introduced. Allow bubbles to rise to the surface. A small wooden wedge inserted into the opened top, to spread the glass, will aid trapped bubbles to rise to the surface.
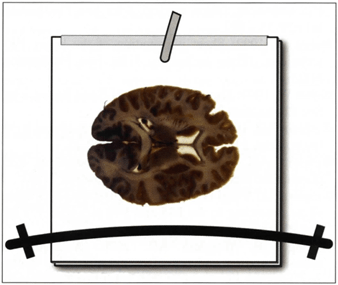
Figure 7. Slice, gasket and spacer on double plate set.
Some bubbles will cling to the surface of the slice and must be encouraged to rise. A 1 mm wire may be used to tease or encourage a bubble to the surface. Leaning the chamber slowly from side to side will encourage trapped bubbles to rise. Check both sides of the flat chamber for bubbles . Use the wire to center the slice in the chamber. Remove the wedge and close the top of the chamber with the remaining length of the gasket and fold-back clamps (Fig. 12).
Light Curing: After casting, the double glass chambers are exposed to UVA-light to initiate curing (Figs. 13- 1S). Exposure time is 4S minutes depending on the wattage and the distance of the UVA lamps. Typically four 40W UVA lights (tubes) are used. Two are placed above and two below at a distance of 35 cm from the flat chamber. Now it is necessary to fold the handles of the fold-back clamps away from the glass to avoid marking the curing resin. During light exposure, it is necessary to cool the chambers on both sides either by ventilator (fan) or by blowing compressed air over both sides of the double glass chamber (Figs. 13-15). Caution: Cooling is important because the UVA-light commences an exothermic reaction that will harm the specimens if they are not cooled. To prevent cracking of the P3S slices and glass during light curing it is also recommended to use low watt UVA-lamps (40 watt). Heat Curing: Following light curing, the double glass chambers are placed in a in a well-ventilated 40°C oven for 4-S days. The clamp handles can be
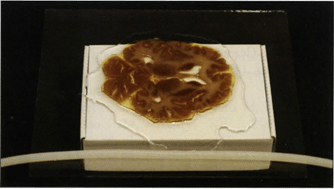
Figure 8. P35 impregnated slice on the float plate.
folded over the glass to save space in the oven. Heat finishes the curing of the resin into the depths of the specimen slice. At the end of day 4, tum off the oven. On day S, the slices are removed from the oven to finish cooling. During cooling, cracking sounds may be heard as the cured resin separates from the glass. After cooling, the chamber is dismantled . The clamps, gasket, and paired glass plates from the top side are removed and then the remaining bottom plate set is removed. Occasionally , the float glass does not release by itself. To aid release of the glass plate from the slice, the tip of a scalpel blade may be used to score the length of the cured resin at the junction with the glass on one or more sides. After release, remove the plates and wrap the slice in light weight foil to prevent any uncured resin and debris from contacting the surface of the slice.
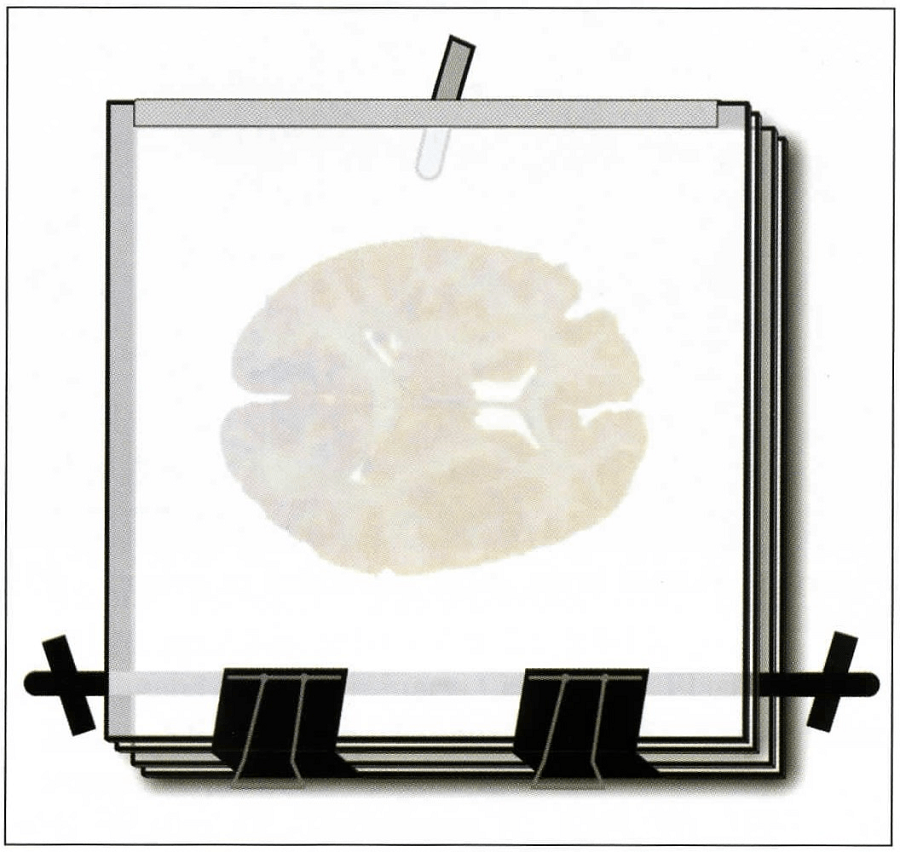 Figure 9. Top double glass plate in position over slice, gasket and spacer. Bottom clamps in place. |
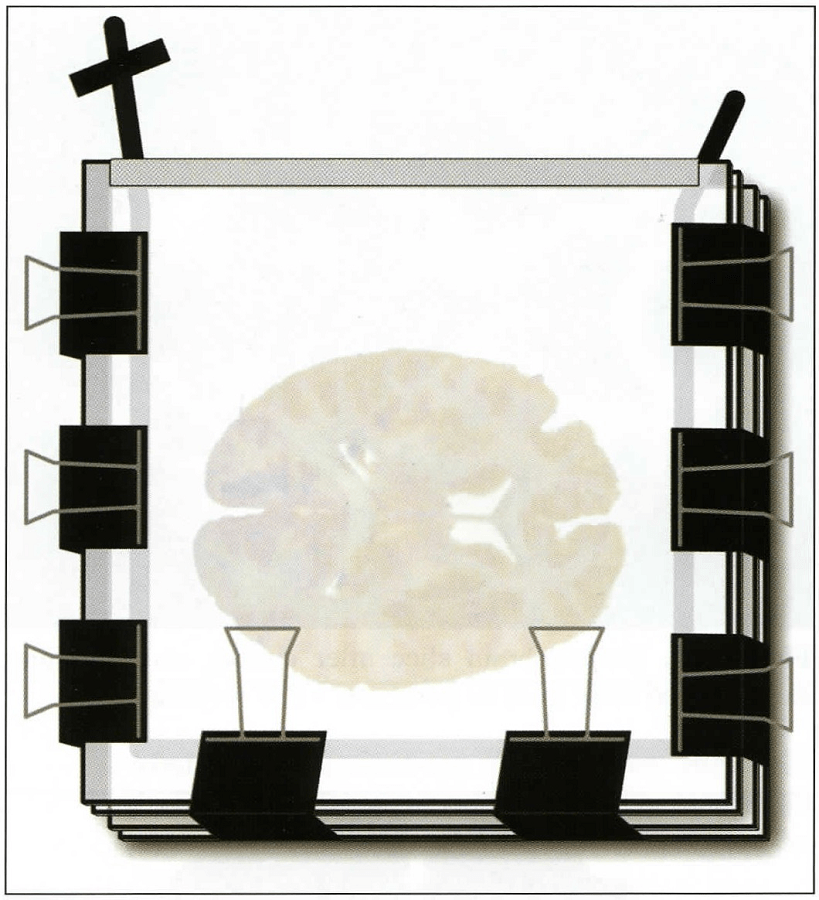 Figure 10. Flat chamber assembled, containing an impregnated slice, ready to be filled with resin-mix |
 Figure 11. Filling a double glass chamber with P35 resin-mix. |
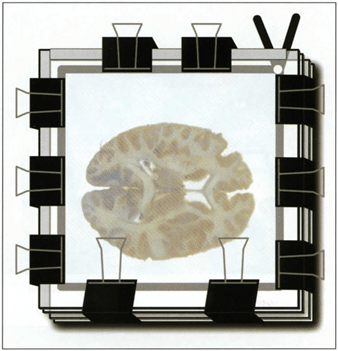 Figure 12. Closure of top gasket after filling with P35 . |
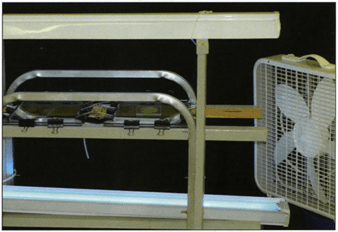 Figure 13. Exposing impregnated slice in flat chamber to UVA light with ventilator (fan). |
 Figure 14. Compressed air cooled, curing rack. |
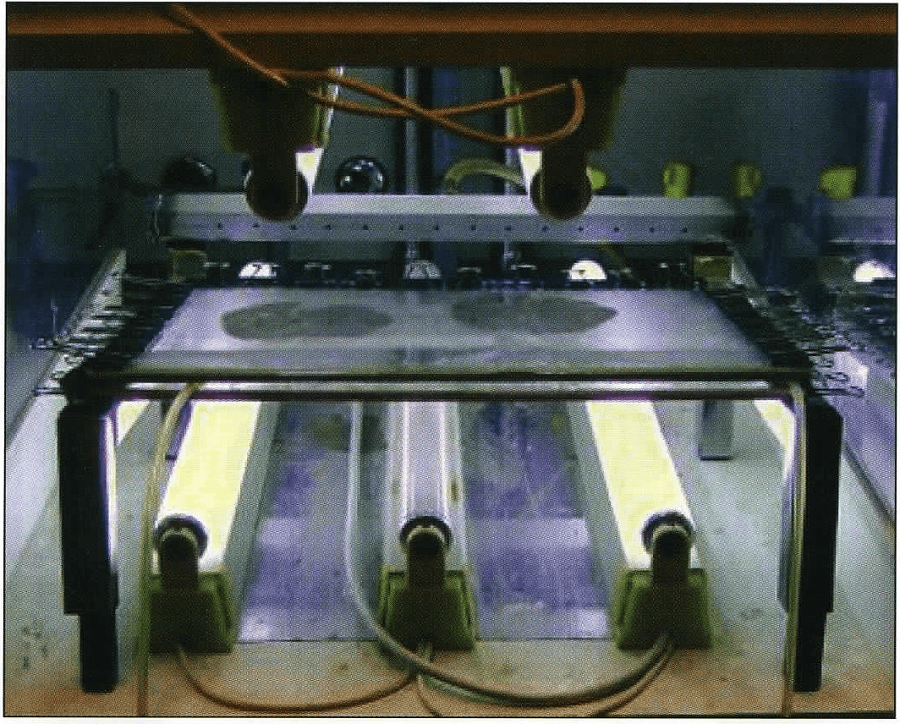 Figure 15. UVA light exposure rack with compressed air cooling apparatus. |
| Day 1 | Slice, flush and cool slices |
| Day 2 | Immerse into first cold (-2S0C) acetone bath (>90%). 1:10 specimen: acetone ratio recommended . |
| Day 4 | Immerse into second cold (-2S 0 C) acetone bath (100%). Check purity of bath #1. |
| Day 6 | 1st Immersion into +s0 c or room temperature P3S/A9 resin-mixture . |
| Day 7 | 2nd Immersion into +s0c or room temperature P3S/A9 resin-mixture . |
| Day 8 | Impregnate lll fresh +s0c or room temperature P3S/A9 resin-mix . |
| Day 9 | Cast and UVA light cure at room temperature for 4S minutes. |
| Day 10 | Heat cure in 40°C (1OS°F) oven. |
| Day 14 | Open flat chamber, cover slice with foil, saw and sand. |
Finishing :
After curing, release and wrapping is complete, the excess cured resin is trimmed to the desired size and shape on a band saw. The edges may be smoothed using a belt sander or sanding paper/cloth. The gasket and glass can be cleaned in a dishwasher or using hot water and an enzymatic detergent.
The finished P3S sections are durable, opaque, easy to orient, and may be correlated with radiographic, CT and MR images (Figs. 16-18). In many cases, orientation of nerve fibers can be observed. Blood vessels, substantia nigra and many nuclear structures may be seen. These slices are of the highest aesthetic value because of the smooth surface finish, clarity of the resin and enhanced contrast of white and gray matter. There is no odor associated the finished slices.
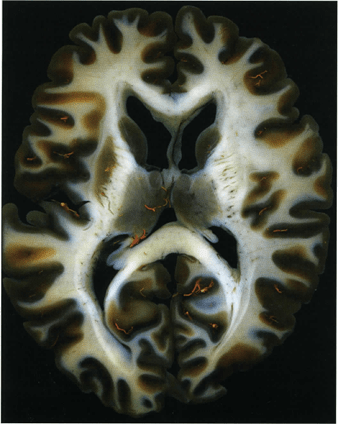 Figure 16. Human brain slice - P35 technique . |
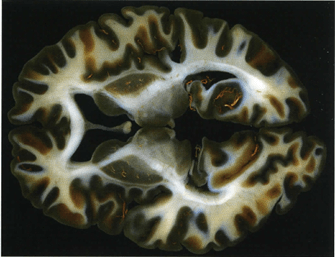 Figure 17. Human brain slice after cutting and trimming excess cured resin from its perimeter - P35 technique. |
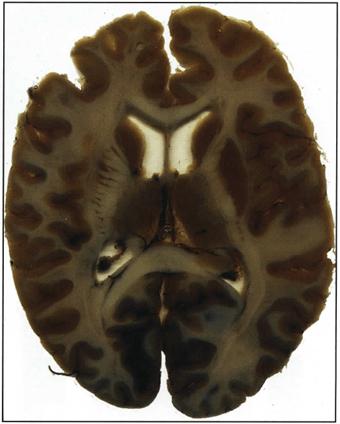 Figure 18. Human brain slice - P35 technique. |
Flat chambers are set upright and filled with the polyester resin mixture (P35/A9). Hence, the plastinated slices are incorporated into the sheets of the plastination resin as the resin cures and are not merely embedded. Yet the cover of resin is thin enough to avoid refractive distortion that is proprietary to wet specimen mounts. The glass yields a mirror smooth finish to each side of the slice. The specimens show marked delineation of white and gray matter and are durable. Using this technique, slices of the brain are more detailed, more durable and easier to handle than those produced with other techniques. The sheets containing the slices are cured initially using ultraviolet light from UVA lamps and finished in a 40°C oven.
Production of these superb slices is very labor intense and seems to be an expensive methodology. As well, three aliquots of resin are necessary due to the short working time of the immersion and impregnation mixtures . This necessitates that a large quantity of resin mix will be discarded unless it is planned to run concurrently several appropriate size lots of slices. Even with excellent planning it is difficult to fit these plans into the week's schedule. Likely it will involve a portion of the weekend and the next week. However, much of the equipment is found in an active plastination laboratory. Therefore, there is usually not a large capital outlay for equipment for production of polyester slices.
P35 resin is more viscous than P40 resin which makes it more difficult for bubbles to rise and be extracted. Clear glass is needed to visualize bubbles and aid extraction, as well as allow UVA light penetrate to commence resin curing. Window glass is not sturdy enough to prevent bowing of glass from the weight of resin and the slice. Therefore, hardened glass must be used to support the unit and prevent bowing and assure a flat slice. Tempered glass often is too firm to release from the cured resin. Therefore, the window glass must be placed next to the resin/slice to accommodate the shrinking resin as it cures.
Technically light cure could be bypassed. However, heat cure alone reduces the resin 's viscosity and would allow the specimen to move in the chamber. Meanwhile, light cure solidifies the resin surrounding the slice and fixes its location within the resin pool. The excess resin surrounding the cured slice allows a series of slices to be uniformly trimmed to the same dimension for enhanced presentation. Or this surrounding area may be used for labeling. The main advantage of the P35 sheet plastination method is the superb clarity of nervous tissue and the enhanced differentiation of white and gray matter.
Brown MA, Reed RB, Henry RW. 2002: Effects of dehydration mediums and temperature on total dehydration time and tissue shrinkage. J Int Soc Plastination 17:28-33.
https://doi.org/10.56507/XNQM4606
Cook P. 1997: Sheet plastination as a clinically based teaching aid at the University of Auckland. Acta Anat 158(1):33-36.
https://doi.org/10.1159/000147907
de Boer-van RT, Cornelissin CJ, ten Donkelaar HJ. 1993: Sheet plastination of the human head. J Int Soc Plastination 6(1):20-24.
https://doi.org/10.56507/PLZK5739
Entius CAC, Kuiper JW, Koops W, Gast A. 1993: A new positioning technique for comparing sectional anatomy of the shoulder with sectional diagnostic modalities: Magnetic Resonance Imaging (MRI), Computed Tomography (CT) and Ultrasound (US). J Int Soc Plastination 7:23-26 .
https://doi.org/10.56507/MIIH4716
Latorre R, Arencibia A, Gil F, Rivero M, Ramirez G, Vaquez-Auton JM, Henry RW. 2004: Sheet Plastination with Polyester: An Alternative for All Tissues. J Int Soc Plastination 19:33-39.
https://doi.org/10.56507/OFGF7088
Riepertinger , Alfred. 1988: Fixation of the human brain for plastination: Special considerations. J Int Soc Plastination 2(1):8-12.
https://doi.org/10.56507/XMBX2600
Smith BJ, Holladay SD. 2001 : Risk factors associated with plastination: II. Infectious agent considerations. J Int Soc Plastination 16:14-18.
https://doi.org/10.56507/GFGP6952
Tiedemann K, D Ivic-Matijas. 1988: Dehydration of macroscopic specimens by freeze substitution m acetone. J Int Soc Plastination 2(2):2-12.
https://doi.org/10.56507/SCLL2742
von Hagens G. 1979a: Impregnation of soft biological specimens with thermosetting resins and elastomers. Anat Rec 194(2):247-25, 1979.
https://doi.org/10.1002/ar.1091940206
von Hagens G. 1979b: Emulsifying resins for plastination . Der Praparator 25(2) :43-50.
von Hagens G. 1986: Heidelberg Plastination Folder: Collection of technical leaflets for plastination. Biodur Products, Rathausstrasse 18, Heidelberg, 69126. pp 2:1-6, 3:1-13, 4:1-20, 5:1-17.
von Hagens G: Preliminary Leaflet for Plastination of Brain Slices with Biodur™ P 35. Unpublished computer printout: August 1990.
von Hagens G, Tiedemann K, Kriz W. 1987: The current potential of plastination. Anat Embryo! 175(4):411-421.
https://doi.org/10.1007/BF00309677
Weber W, Henry RW: Sheet plastination of the brain - P35 technique, filling method . J Int Soc Plastination 6(1):29-33, 1992.
https://doi.org/10.56507/KWGD3312
Weber W. 1992: Sheet plastination of the brain, P35 technique, filling technique . J Int Soc Plastination 6(1):6-7.
https://doi.org/10.56507/KWGD3312
Weber W. 1994: Sheet Plastination of Brain Slices. J Int Soc Plastination 8(1):23.
https://doi.org/10.56507/OWYV2878
Weiglein AH. 1996: Preparing and using S-10 and P-35 brain slices. J Int Soc Plastination 10:22-25.
https://doi.org/10.56507/IXGV4189
Weiglein AH. 2006: Principles of polyester P35 plastination technique. Abstract presented at The 13th International Conference on Plastination - Vienna, Austria, July 2 to 7, 2006. J Int Soc Plastination 21:30.
Weiglein AH, Feigl G. 1998: Sheet plastination of brain slices according to the P35 and P40 procedures. Abstract presented at The 9th International Conference on Plastination, Trois-Rivieres, Quebec, Canada, July 5-10, 1998. J Int Soc Plastination 13(2):30.
Weninger B, Weiglein AH. 2006: A study of osseointegration and nerve regeneration after dental implantology by means of P35. Abstract presented at The 13th International Conference on Plastination - Vienna, Austria, July 2 to 7, 2006. J Int Soc Plastination 21:31.
Product distribution:
Biodur Products, Drs. Gunther von Hagens and Angelina Whalley , Rathausstrasse 11, 69126 Heidelberg, Germany. www .biodur.de , Ph: (49) 6221 3311-11, Fax: (49) 6221 3311-12.