1-Department of Comparative Medicine, College of Veterinary Medicine, University of Tennessee, Knoxville, TN, USA.
2-Anatomia y Embryologia, Facultad de Veterinaria, Universidad de Murcia, Murcia, Espafiia, Europe.
Plastination has become the gold standard for preservation of biological tissues. Plastination supports many disciplines: anatomy, art, biology, clinics and medicine. The Biodur™ P40 technique produces 2-3mm translucent brain slices which display vivid sectional anatomy. These unique slices are excellent teaching aids especially when used with modem diagnostic images: Computed tomography, Magnetic resonance and Ultrasound. The P40 technique was developed as a less complex method for presentation of brain slices.
plastination; polyester method; brain slices; polyester resin; P40; A4
R. W. Henry - Department of Comparative Medicine, College of Veterinary Medicine, University of Tennessee, Knoxville, TN, USA. Telephone: (865) 974 - 5822; Fax: (865) 974 - 5640; E-mail: rhenry@utk.edu

![]()


Polyester impregnated slices of brain tissue, cast in glass-flat chambers, have been used in teaching and research (Barnett, 1997, Henry and Weiglein, 1999, Sora et al., 1999; Weiglein and Feigl, 2001, Latorre et al., 2002). In the late 1980's, the Biodur™ P35 resin was developed for production of 4-8mm slices of brains (van Hagens, 1990). Biodur™ P35 brain slices remain the gold standard for brain slice production even today. The P40 resin was introduced in the mid 1990's as a less complicated process (van Hagens, 1994). The P40 technique accommodates production of thinner slices. White/gray differentiation with P40 is less exquisite than white and gray matter differentiation of brain slices produced by the P35 process. Polyester plastination utilizes the basic principles of the classic plastination techniques (van Hagens, 1979; 1986; van Hagens et al., 1987). The central premise of plastination is removal of tissue fluid and its replacement with a curable polyester resin. Prepared dual manuscripts define the production of P40 brain slices as well as P40 body slices.
Chemicals used in polyester-plastination include:
The BiodurTM products for polyester plastination are:
The basic steps of plastination include specimen preparation, dehydration, impregnation and curing.
Specimen preparation
Note for production of Biodur™ P40 brain slices, the basic steps of specimen preparation, slicing and dehydration are similar to the Biodur™ P35 Technique. Please refer to specimen preparation section of "The P35 Technique" for a more detailed description.
A brain specimen is harvested and fixed for six weeks using 10% formalin or a long term-fixed brain may be used (Riepertinger, 1988). A well-fixed firm brain is desirable for slicing on a meat slicer, as well as, to diminish biohazard risk associated with routine handling or slicing of biological tissue (Smith and Holladay, 2001). Specimens that have been embalmed with chemicals other than formalin should be avoided.
Well-fixed brains are divided and sliced on a deli/meat slicer with its thickness set for 2-3mm slices (Fig. 1).
Specimen preparation equipment:
Slicing: Determine the plane of section of the brain. Divide the brain into two portions. Place one piece in a cold water bath and the other on the meat slicer. Slices are prepared at a determined thickness (2-3mm) (Figs. 2, 3).
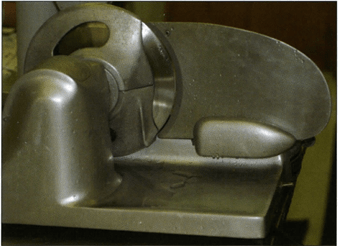 Figure 1. Deli/meat slicer. |
 Figure 2. Slicing 2.5mm brain slices. |
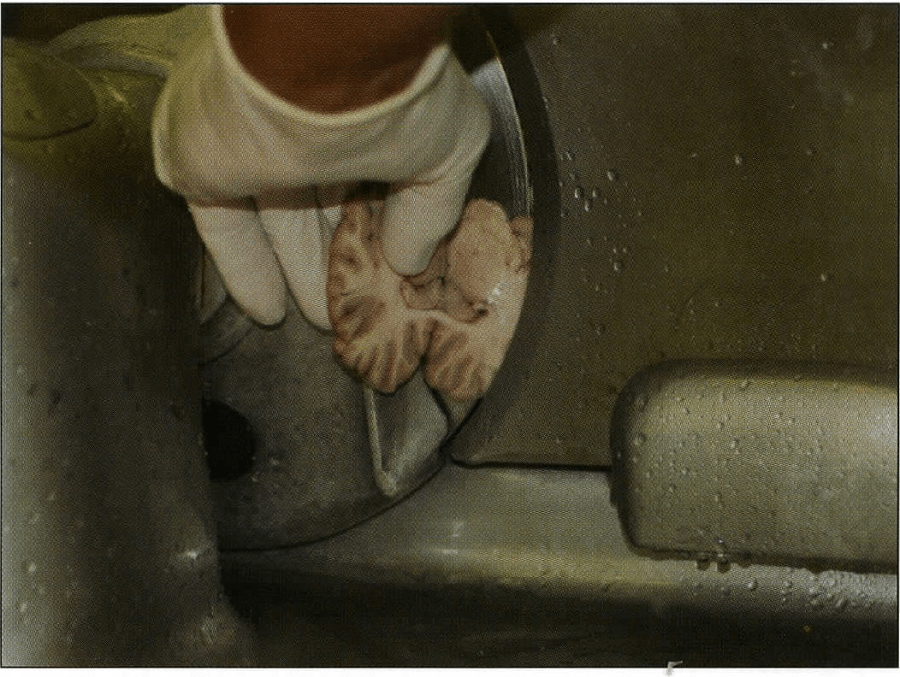 Figure 3. Slicing 2.5mm brain slices. |
The slices are inspected, cleaned if necessary with running water and placed on an acetone resistant grid (metal or plastic). The slices on their grids are stacked and submerged in a water bath. It is beneficial to tie the stacked grids with their brain slices together in a bundle or place into a specimen basket for ease of transfer into the acetone bath or into the resin-impregnation bath.
Flushing & Precooling: The bundle of slices is placed in cool running tap water for one or two days to rinse debris and formalin from the slices. After flushing, the bundle of slices remains in water and cooled to +4°C over night.
Specimen dehydration
Freeze substitution in -25°C acetone is the recommended procedure for dehydration of all plastinated specimens (von Hagens, 1986; Tiedemann and Ivic-Matijas, 1988; Brown et al., 2002). Dehydration using the classic ethanol method promotes excess shrinkage of most tissues and especially brain tissue. Never use alcohol to dehydrate brains for plastination . Freeze substitution produces negligible shrinkage. It is established that for all plastination techniques , acetone is the best dehydrating agent but also is a good intermediary solvent for impregnation . As well, acetone readily mixes with the resins used during plastination and has a high vapor pressure that aids its extraction from the brain slices.
Dehydration equipment:
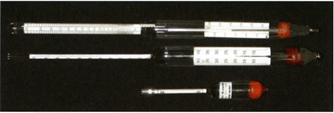
Figure 4. Acetonometers with various temperature requirements.
The bundle of grids and brain slices is raised from the water to allow the excess water to drip off. After draining, the slices are placed into the first cold acetone bath (-25°C). Only this first acetone bath may be less than 100% purity but >90%. Entering the acetone bath, the bundle of slices is tilted to allow trapped air bubbles to float to the surface. In two days, the slices are submerged in the second cold acetone bath of a similar volume but of 100% purity . Use caution, dehydrated brain slices are brittle and easy to break. Check the purity of bath #2 after two days. Acetone purity is checked using an acetonometer in an aliquot of well- mixed acetone. Acetonometers are temperature specific (Fig. 4). Most are calibrated at + 15°C, +20°C, or -10°C. The acetone temperature must match the temperature calibration of the acetonometer. This means that the acetone must be cooled or warmed to the calibrated temperature before measuring and recording purity. If the acetone concentration is more than 98%, dehydration is considered complete . A third acetone bath is used if more than 2% water remains. Degreasing of brain slices is not done because excess shrinkage of the slices would result. With the completion of dehydration, the bundle of slices is ready to be immersed into the impregnation/resin-mixture .
Specimen impregnation
Impregnation equipment:
Preparing the impregnation-mixture : The polyester impregnation bath can be P40 resin with no additives or a Combination of P40 resin plus 1-2% A4 (activator).
**Resin must be kept in dark.
Immersion of brain slices into P40 resin: The dehydrated brain slices are transferred into and submerged in a room temperature or +5°C impregnation bath of P40 resin. This resin must be kept darkened as UVA light serves as the catalyst for this polyester. This polyester impregnation bath can be of P40 resin alone or a Combination of P40 resin plus 1-2% A4 (activator). It is okay to commence impregnation at this time. However, consider letting the slices sit in the P40 resin overnight. This allows the slices, acetone and resin to equilibrate before commencing forced impregnation. It is necessary to keep the vacuum chamber covered from light. Impregnation may be carried out at room temperature or in the cold (+5°C).
Forced Impregnation of brain slices: After submersion of the slices into the P40 resin, the vacuum pump is turned on and allowed to warm to working temperature for a few minutes. Once the pump has warmed, the slices in the impregnation-mixture are placed in the vacuum chamber at the desired temperature (room temperature or cold) and vacuum is applied. The vacuum chamber is kept dark. As the pressure is lowered, trapped air is evacuated first. Many small bubbles can be seen rising to the resin surface. The rate of evacuation (lowering of pressure) is regulated frequently to keep the pressure decreasing to reach the vapor pressure of the solvent which is temperature dependent: Acetone 22cm/10in Hg or MeCl 43cm/ 17in Hg @ 25°C; Acetone 8cm/3in Hg or MeCl 18cm/4in Hg @ 5°C. After the air has been evacuated and when the vapor pressure of acetone is reached, the acetone (because of its high vapor pressure) vaporizes/boils out of the slices leaving a tissue void into which the polyester resin or resin-mix enters (Henry, 2005a; 2005b). As the solvent exits from the brain slices, a tissue void remains within the brain, into which the polyester resin enters. The vaporized solvent is pumped out through the pump exhaust. Pressure is continuously decreased, by incrementally closing the needle valves, to 5cm Hg for room temperature and 2cm Hg for cold impregnation by the end of the first day of impregnation. The vacuum pump remains working overnight. More resin is be added if necessary to keep the slices submerged. Concluding the 30 hour period, the next day pressure is incrementally decreased to 1cm Hg at room temperature or l -2mm Hg in the cold room. When the low pressure level is reached and maintained for a few hours and bubble formation has slowed, impregnation is complete. Because the resin contains styrene, these lower limits of pressure, must be observed to prevent the extraction of styrene (von Hagens et al., 1987).
After impregnation is complete, the reservoir is returned to atmospheric pressure. The box containing the slices and the P40 impregnation bath maybe removed and kept in a dark environment.
Curing or hardening the resin
UVA light serves as the catalyst for this polyester resin. The impregnated slices are placed between two glass plates to obtain a smooth surface and a thicker more durable specimen.
Curing equipment:
Preparing Glass/Casting Chambers for brain slices: There are two methodologies for constructing casting chambers: a. Building the chamber around a slice and b. Building the chamber for later insertion of slice into the chamber. Insertion of the slice after construction of the glass chamber is recommended only for slices that do not have multiple parts. Each casting (flat) chamber is prepared from two same, appropriate sized pieces of window (2mm or l/16in) glass, silicone gasket and large fold-back (folder) clamps. Gasket length is to be similar to the length of the perimeter of the glass. Both top and bottom walls of the chamber each consist of one sheet of window (float) glass. To prepare to accept a slice, one glass plate is placed on an assembly stand (block of Styrofoam or box) and construction begins as follows:
a. Building flat chamber around a brain slice: One slice on its grid is removed from the resin and excess resin is allowed to drain briefly before placing the brain slice onto the center of the glass which is setting on the assembly stand (Fig. 5). A silicone gasket (5mm for a 3mm slice) is placed 2cm from the bottom edge of the glass (Fig. 6) and its length is divided 2/3 to 1/3 from the center point of the This will allow enough length to pass across the top of the glass and close the top of the flat chamber at the top comer. Later the ends of the gasket will continue up the sides lying 2cm from the edge in preparation to seal the casting chamber. A 5cm spacer, made of gasket, is placed near the top of the glass (Fig. 6). The spacer will support the top edge of the top glass. The top glass plate is placed over the brain slice, spacer and gasket (Fig. 7). Fold-back clamps are placed along the perimeter of the bottom glass over laying the gasket. Care is taken to align the clamping edge of the clamp over the gasket which will assure the best seal possible. Both ends of the gasket are turned (90° angle) toward the top and positioned 2cm from the glass edge. Clamps are positioned directly over the gasket (Fig. 8). The spacer is removed and the top end of the flat chamber remains open with the excess gasket hanging from each side. The clamps secure and seal the glass plates with the gasket. Next, fold the bottom clamp handles onto the glass and stand the flat/glass chamber, containing the slice, vertically with the open top directed upward (Fig. 6). The flat (casting) chamber containing the specimen is filled with the fresh well mixed P40 resin or P40/A4 (100:1-2) resin/activator mixture. A flat funnel is used to fill the chamber with P40 (Fig. 9). Air bubbles are poured into the chamber and must be allowed to rise to the resin surface. Some bubbles will attach to the surface of the slice and must be encouraged to rise. A small wooden wedge inserted in the opened top will spread the glass and aid bubble removal. A 1mm wire may be used to tease or encourage a bubble to float to the resin surface. Tipping the chamber from side to side will encourage trapped bubbles to rise. Check both sides for bubbles. Use the wire to center the slice in the chamber. Close the top of the chamber with the remaining longer length of the gasket and fold back clamps (Fig. 10). Make sure the resin level totally fills the chamber. Remove any air bubbles lying against the top gasket. Air interferes with the curing of the P40 resin. At the top comer of the chamber, seal the junction of the bent ends of the gasket with Biodur™ gasket seal (HS 80).
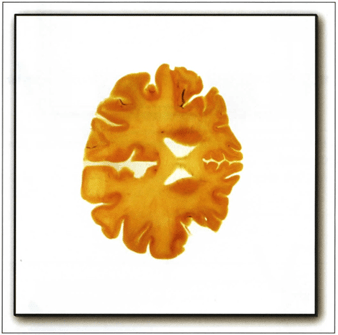 Figure 5. Building flat chamber around the slice. Brain slice centered on bottom glass plate. |
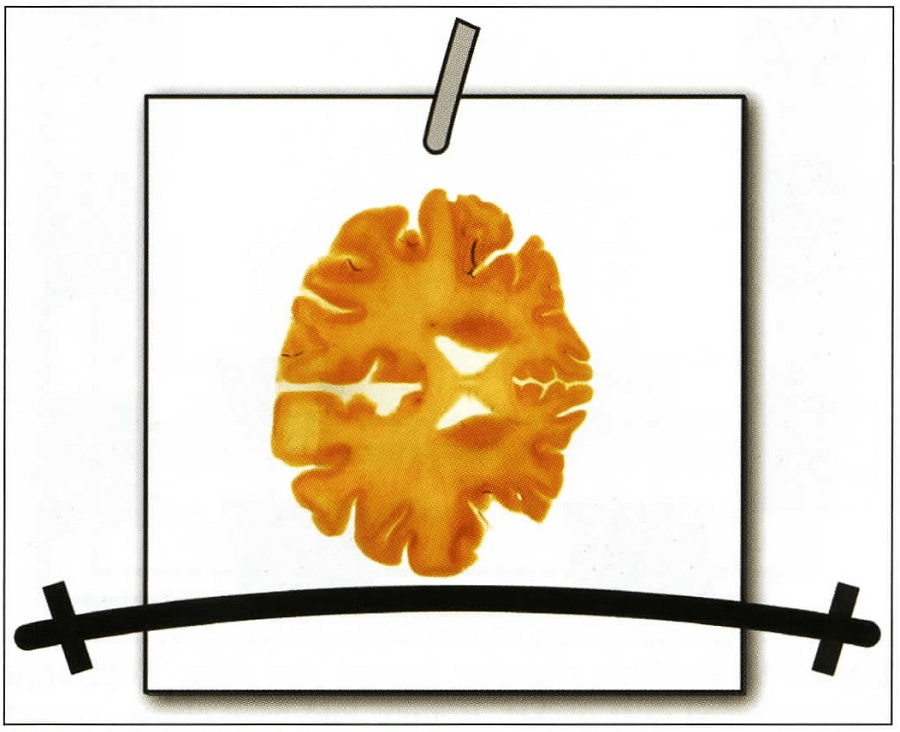 Figure 6. Building casting-chamber around the slice: 2mm glass, slice, spacer and gasket. |
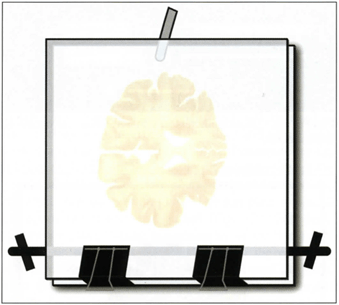 Figure 7. Building chamber around the slice: Top glass positioned. |
 Figure 8. Building chamber around the slice: Fold back clamps placed over gasket. Bottom fold back clamps turned onto the glass. |
 Figure 9. A flat funnel is used to fill chamber with P40. |
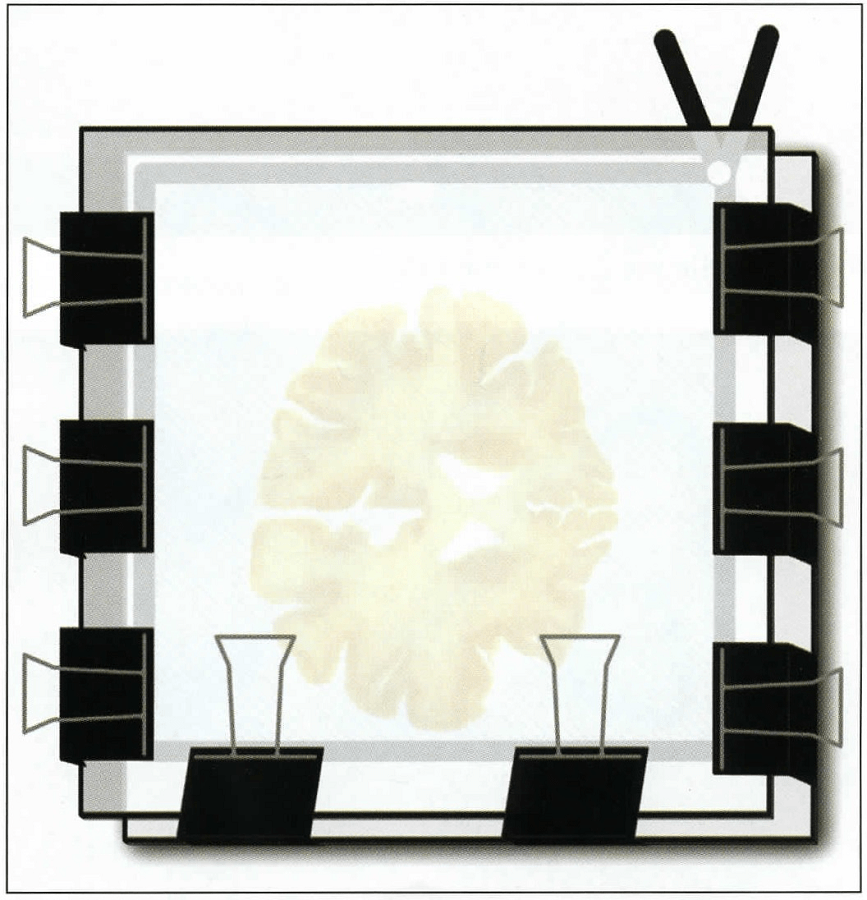 Figure 10. Building chamber around the slice: Close and seal top gasket. |
b. Build chamber for later insertion of a brain slice: Position a glass on the assembly stand. An appropriate sized silicone gasket is placed 2cm from the bottom edge and its length is divided 2/3 to 1/3 at the midpoint of the glass (Fig. 11). The longer end will be used to close the top after insertion of the slice and filling with resin. Later the ends of the gasket will continue up the sides lying 2cm from the edge in preparation to seal the casting chamber. A spacer placed near the top of the glass will support the top glass. The top plate is placed on top of the spacer and gasket (Fig. 12). Fold-back clamps are placed along the perimeter of the bottom of the glasses over-lying the gasket. Align the clamping edge over the gasket to assure the best seal possible . Both ends of the gasket are turned (at a 90° angle) toward the top and positioned 2cm from the edge of the glass. Clamps are positioned directly over the gasket. Remove the spacer and the top is to remain open with the excess gasket hanging to each side. The positioned clamps secure and seal the glass plates with the gasket along the bottom and the sides. Next, fold the bottom clamp handles onto the glass and stand the flat/glass chamber vertically with the open top directed upward (Fig. 13). A brain slice is inserted through the top opening and the flat (casting) chamber now containing the specimen is filled with the fresh well-mixed P40 resin or the P40/A4 (lOO:I-2) mix (Fig. 9). Allow air bubbles to rise to the resin surface in the chamber. Trapped bubbles must be encouraged to rise to the top by using a small wooden wedge inserted in the opened top and a 1 mm wire, along with tipping the chamber from side to side. After bubble removal, close the top of the chamber with the remaining longer length of the gasket and fold back clamps making sure to release any bubbles trapped against the top gasket. Seal the junction of the bent ends of the gasket with Biodur™ gasket seal (HS 80) (Fig. I4). Inspect for large air bubbles trapped along the upper gasket. Remove bubble by insertion of an 18 ga (1.2mm) hypodermic needle or 1 mm wire between the glass and the gasket (Fig. I4).
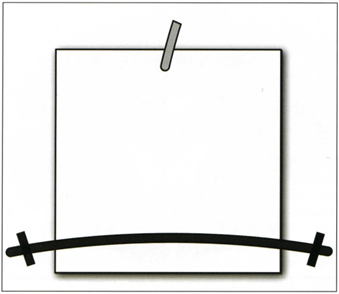 Figure 11. Building the casting-chamber for later insertion of the slice: 2mm glass, spacer and gasket. |
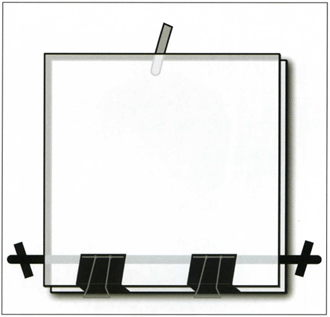 Figure 12. Building chamber for later insertion of the slice: Positioning top glass. |
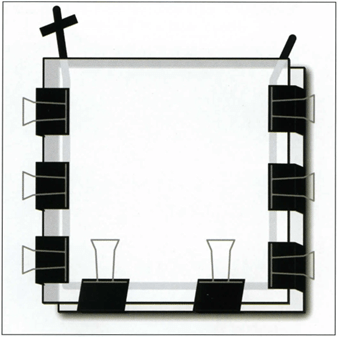 Figure 13. Bottom fold back clamps turned onto the glass. Chamber ready to receive the brain slice. |
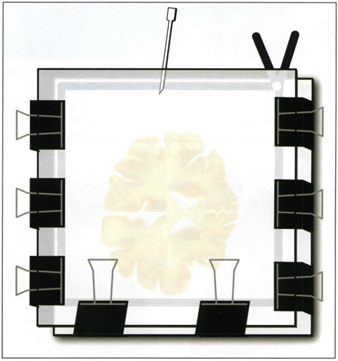 Figure 14. Air bubble removal with hypodermic needle. |
Tip 1: Insert one or two 3mm ball bearings into the chamber before closing the top. The bearings will be pushed by a magnet to centrally position and align the brain slice to your specification. This mechanism is also helpful if the slice moves while you transport the slice and position it between the UVA lights. After the slice is centered, park the ball bearings in one comer of the chamber. They will be removed when the excess cured resin is cut from the slice.
Time saver: Once the art of casting is understood, the top gasket does not need to be closed and sealed. If the resin level is 2-3cm below the top of the glass and yet adequately covering the slice, the chamber with its bottom and sides sealed and containing the slice and surrounding P40, may be laid at a 15° angle from the horizontal between the UVA light (catalyst) source and curing will proceed. Along the open edge, a 0.5mm thickness of resin will not cure. However, it will be cut off during regular trimming of the slice.
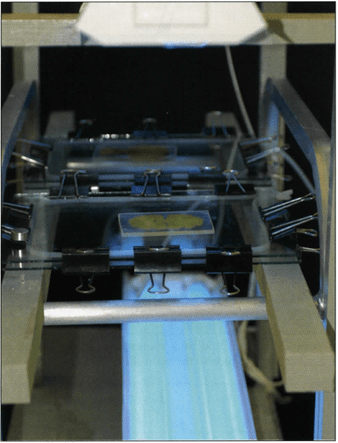
Figure 15. UVA light rack for holding flat chambers and curing cast slices using UVA light as the catalyst.
Light Curing: After casting, to initiate and finalize curing, the sealed glass chambers, filled with resin, slice centered and fold back clamp handles turned off of the glass, are exposed to UVA-light (Fig. 15). A minimum of one hour is recommended for curing, depending on the wattage and distance of the UVA lamps. Typically four - 40 watt UVA light bulbs (tubes) are used. Two lights are placed above and two below the glass chamber at a distance of 35 cm from the flat chamber. During light exposure, it is necessary to cool the chambers on both sides either by a ventilator (fan) or blowing compressed air over both sides of the glass chamber. Caution: Cooling is important because the catalyst (UVA-light) commences an exothermic reaction that will harm the specimen if not cooled and too much heat is built up. To prevent cracking of the glass and/or damage to the slice from excess heat during light curing, monitor the glass surface temperature and shut off the UVA-lamps if the glass temperature rises to 30°C. Continue constant cooling even when light is off and slice is cool.
Tip 2. Cooling can be enhanced by curing in a walk in cold room (3°C) or out of doors when the ambient temperature is less than room temperature Ventilators are still recommended to move the heat of the exothermic reaction away from the glass.
Tip 3. Use natural daylight out of doors (shadow is recommended) as an effective way to cure the cast slices. It is not necessary to close or seal the top, provided the chamber is laid at an appropriate angle from horizontal to prevent leakage. The chamber must be turned every 15 minutes to assure uniform exposure to the catalyst (UV light of the sun, but in the shade). Also for best aesthetics, the position of the slice may shift and need to be centered using the ball bearing and magnet or wire. Ventilation is recommended to remove the heat from the glass. The casting chamber may be allowed to set up vertically . However, the slice tends to sink and rest on the bottom gasket. Hence no resin margin is available when trimming the slices for final display.
| Day 1 | Slice, rinse and cool slices |
| Day 2 | Immerse in first cold (-25°C) acetone bath (>90%) acetone. 1:10 specimen:acetone ratio. |
| Day 4 | Immerse in second cold acetone bath (100%), Check purity of bath #1. |
| Day 6a | Check purity of bath #2. If <98% -Immerse into P40 or P40+A4-mix . |
| Day 6b | Check purity of bath #2. If >98%, Immerse into third cold acetone bath (100%). |
| Day 7 | Impregnate with the chosen P40 bath. |
| Day 9 | Cast and UVA light cure (bulbs or indirect natural light) |
| Day 10 | Open flat chamber, cover slice with foil, saw and sand. |
If A4 activator is used in the impregnation-mix, the slices also need to be kept in the dark and cool. They need to be cast in a few days after impregnation. Specimens impregnated only in P40 resin may be stored a long time in the dark before casting.
Finishing:
After curing or during cooling, cracking sounds may be heard as the cured resin releases from the glass. After assurance of curing, the chamber is dismantled. The clamps and gasket are removed and then the casting chamber glass. Occasionally, the glass does not release by itself. To aid release of the glass, the tip of a scalpel blade is scored along the length of the junction of the glass with the resin on one or more sides. After release, remove the plates and wrap the specimen in light weight foil (plastic wrap) to prevent any uncured resin and debris from contacting and/or smearing on the surface of the slice.
After curing, release and wrapping is complete, the excess cured resin is trimmed on a band saw. The edges may be smoothed using a belt sander or sanding paper/ cloth. The gasket and glass can be cleaned in a dishwasher and/or with hot water and an enzymatic detergent.
The finished P40 sections are durable, semi transparent, easy to orient, and correlate nicely with radiographs, CT and MR images (Figs. 16-18). They are tremendous teaching aids. White-gray matter differentiation as well as optical quality is good.
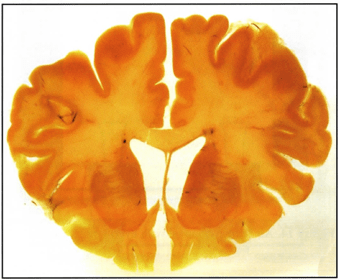 Figure 16. Cured equine brain slice plastinated using the P40 technique . |
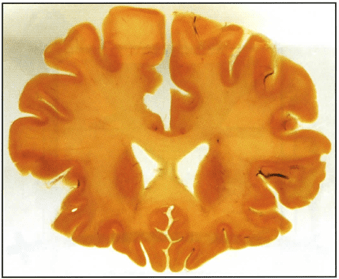 Figure 17. Cured P40 plastinated equine brain slice. |
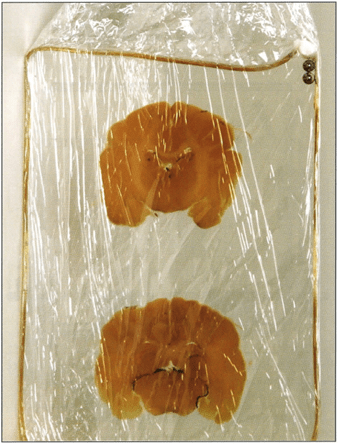 Figure 18. Cured P40 brain slices wrapped in foil. Note position of ball bearings in comer of the cast slice. |
The brain slice in the sealed flat chamber and after laid horizontal between the UVA lights does not migrate. It will stay centered in the resin. Non-sealed flat-chambers which are cured upright or at an angle allow specimens to move/sink and special attention must be given at the appropriate time (before curing) to keep the slices centered in the resin . Using P40 resin or P40 mixed with A4 has been equally successful at producing desirable specimens. The step of addition of A4 was noted and recommended a few years after release of the P40 resin for slice production because of potential problems with curing, possibly caused from inadequate fixation (Henry, 1998). If brain tissue is well-fixed and impregnation is complete, the use of A4 may not be necessary. The advantage of not using A4 is the indefinite pot-life of the P40 impregnation bath if kept cool and in the dark. Without A4 additive, the same impregnation bath has been used for over five years. As well, without the additive, impregnated slices may be stored for years before casting (when timing is more convenient or if slices are needed for demonstration).
The impregnated brain slice is surrounded by polyester resin or mixture (P40/A4) while it is curing. Hence, the plastinated slices are incorporated into a single cured sheet of the resin. They are not merely embedded in the resin . The specimens show good delineation of white and gray matter and are durable, as well as demonstrate good anatomical detail for comparison with images of modem imaging modalities (Latorre et al., 2002). Using this technique, slices of the brain are more detailed, more durable and easier to handle than those produced by other techniques.
One main advantage of the P40 sheet plastination method is the decreased volume of resin used: Two thirds less, because there is no separate immersion bath as with the P35 technique. As well, the P40 impregnation bath may be reused many times. Also, the process is not complicated and less equipment and time are needed to run the P40 technique. In addition to brain slices, body slices may be produced using this basic technique (Latorre et al., 2004). P40 slices are excellent teaching aids for teaching sectional anatomy (Latorre et al., 2001; Henry , 2005c).
Barnett RJ. 1997: Plastination of coronal and horizontal brain slices using the P40 technique. J Int Soc Plastination 12(1):33-36.
https://doi.org/10.56507/YJVS5787
Brown MA, Reed RB, Henry RW. 2002: Effects of dehydration mediums and temperature on total dehydration time and tissue shrinkage. J Int Soc Plastination 17:28-33 .
https://doi.org/10.56507/XNQM4606
Henry RW. 1998: Update on polyester plastination (P40)! Where have all the "orange spots" gone? Abstract presented at The 9th International Conference on Plastination, Trois-Rivieres, Quebec, Canada, July 5-10, 1998. J Int Soc Plastination 13(2):30.
Henry RW. 2005a: Vacuum and vacuum monitoring during silicone plastination. Abstract presented at The 8th Interim Conference on Plastination- Lake Ohrid, Macedonia, July 5-11, 2005. J Int Soc Plastination 20:37.
Henry RW. 2005b: Silicone impregnation and curing. Abstract presented at The 8th Interim Conference on Plastination- Lake Ohrid, Macedonia, July 5-11, 2005. J Int Soc Plastination 20:36-37.
Henry RW. 2005c: Teaching with plastinated specimens in veterinary medicine. Abstract presented at The 8th Interim Conference on Plastination- Lake Ohrid, Macedonia, July 5-11, 2005 J Int Soc Plastination 20 :38- 39.
Henry RW, Nel PPC. 1993: Forced impregnation for the Standard S10 method. J Int Soc Plastination 7(1):27-31.
https://doi.org/10.56507/WUXP9436
Henry RW, Weiglein A. 1999: Sheet plastination of brain slices - P40 procedure . Abstract presented at The 6th Interim Conference on Plastination, Rochester, New York, USA, July 11-16, 1999. J Int Soc Plastination 14(2):32.
Latorre R, Vaquez JM, Gil F, Ramirez G, L6pez-Albors 0, Orenes M, Martinez-Gomariz F, Arencibia A. 2001: Teaching anatomy of the distal equine thoracic limb with plastinated slices. J Int Soc Plastination 16:23-30.
https://doi.org/10.56507/ACRF7155
Latorre R, Vaquez JM, Gil F, Ramirez G, L6pez-Albors 0, Ayala M, Arencibia A. 2002 : Anatomy of the equine tarsus: A study by MRI and macroscopic plastinated sections (S 10 and P40). Abstract presented at The 11th International Conference on Plastination, San Juan, Puerto Rico, July 14-19, 2002. J Int Soc Plastination 17:6.
Latorre R, Arencibia A, Gil F, Rivero M, Ramirez G, Vaquez-Auton JM, Henry RW. 2004 : Sheet Plastination with Polyester: An Alternative for All Tissues. J Int Soc Plastination 19:33-39.
https://doi.org/10.56507/OFGF7088
Riepertinger , Alfred. 1988: Fixation of the human brain for plastination: Special considerations. J Int Soc Plastination 2(1):8-12.
https://doi.org/10.56507/XMBX2600
Smith BJ , Holladay SD. 2001: Risk factors associated with plastination: II. Infectious agent considerations . J Int Soc Plastination 16:14-18.
https://doi.org/10.56507/GFGP6952
Sora MC, Brugger P, Traxler H. 1999: P40 plastination of human brain slices: Comparison between different immersion and impregnation techniques . J Int Soc Plastination 14(1) 22-24 .
https://doi.org/10.56507/XLSJ5724
Tiedemann K, D Ivic-Matijas. 1988: Dehydration of macroscopic specimens by freeze substitution m acetone. J Int Soc Plastination 2(2):2-12.
https://doi.org/10.56507/SCLL2742
von Hagens G. 1979: Impregnation of soft biological specimens with thermosetting resins and elastomers. Anat Rec 194(2):247-255.
https://doi.org/10.1002/ar.1091940206
von Hagens G. 1986: Heidelberg Plastination Folder: Collection of technical leaflets for plastination. Biodur Products, Rathausstrasse 18, Heidelberg , 69126. pp 2:1-6, 3:1-13, 4:1-20 , 5:1-17.
von Hagens G. 1990: Preliminary Leaflet for Plastination of Brain Slices with Biodur™ P 35. Unpublished Computer Printout: August.
von Hagens G. 1994: Plastination of brain slices according to the P40 procedure. A step-by-step description . 23 pages.
https://doi.org/10.56507/OWYV2878
von Hagens G, Tiedemann K, Kriz W. 1987: The current potential of plastination. Anat Embryol 175(4):411-421.
https://doi.org/10.1007/BF00309677
Weiglein AH, Feigl G. 1998: Sheet plastination of brain slices according to the P35 and P40 procedures. Abstract presented at The 9th International Conference on Plastination, Trois-Rivieres, Quebec, Canada, July 5-10, 1998. J Int Soc Plastination 13(2):30.
Product distribution:
Biodur Products, Drs. Gunther von Hagens and Angelina Whalley , Rathausstrasse 11, 69126 Heidelberg, Germany. www.biodur.de , Ph: (49) 6221 3311-11, Fax: (49) 6221 3311-12.