Department of Basic Science & Craniofacial Biology, New York University College of Dentistry, New York, NY 10010-4086, USA
Continual heavy use of plastinated prosections in the anatomy laboratory increases the risk of damage to specimens and diminishes their educational value over time. The plastinated anatomical teaching collection at New York University College of Dentistry was procured in 2005 for the gross anatomy course. The utility of our collection is dependent upon periodic maintenance and restoration of structures, which have been damaged due to prolonged handling. Four plastinated prosections with damaged or misplaced structures were chosen to demonstrate tissue-specific restorative techniques for artery, nerve and muscle. This article describes restorative procedures involving the use of household silicone adhesive followed by integrating pre-cured, S10/S3-impregnated fascia and muscle to recover anatomical appearances. Detached muscle was slow-cured before it was reattached with silicone and exposed to S6 hardener curing fluid by injection. Photographs were taken of plastinates during and after the repair process to document damage and restoration. Results show that each procedure restored the normal anatomical appearance of all damaged structures. While silicone adhesive works well to mend broken structures, the integration of pre-cured, impregnated fascia and muscle helped to strengthen damaged structures and conceal the damage. Periodic examination and maintenance of wear and tear on plastinated prosections will allow them to resume their previous anatomical appearance, and extend their usefulness and educational value.
anatomy; dental education; fascia; plastinated prosections; repair; restoration
Joshua H. Johnson, MSc., Department of Basic Science and Craniofacial Biology, New York University College of Dentistry, 345 East 24th Street, 902S, New York, New York 10010-4086, (212) 992-7191 (lab); (646) 341-1016 (mobile), Email: jj65@nyu.edu

![]()


Plastination, developed by Dr. Gunther von Hagens, preserves biological tissues in curable polymers (von Hagens, 1987). Plastinates have transformed the study of anatomy in the laboratory because of their dry, odorless, and non-toxic qualities. In 2005, human plastinated prosections were purchased from von Hagens Plastination and are used in the dental curriculum of the Department of Basic Science and Craniofacial Biology, New York University College of Dentistry (NYU Dentistry) (Baker, et al. 2013). All plastinated materials came from cadavers donated to The Body Donation Program of the Institute of Plastination in Heidelberg, Germany. Our plastinates were produced at the Gubener Plastinate GmbH (Plastinarium) using the BiodurTM S10/cold temperature plastination technique, considered to be the gold standard for plastination for over 35 years (de Jong & Henry, 2007). Our plastinates exhibit a high degree of anatomical specificity and are handled by 380 new students and faculty members each year.
The extensive use of plastinated prosections in the classroom increases the risk of damage from wear and tear and will, if neglected, accumulate over time. Significant damage diminishes the educational utility and potential useful shelf life of plastinated materials. While plastination technology renders anatomical structures durable, no material is indestructible. Neurovascular structures are damaged most often, but muscle and bone are also susceptible to damage. The utility of our teaching collection for the department’s anatomy course is therefore dependent upon the proper maintenance and effective restoration of plastinated prosections. Minor damage from wear and tear, such as torn arteries, can be repaired with the use of a common silicone adhesive (Raoof, 2014). However, even when mended this way, such structures often leave visible traces of previous damage and repair, which can compromise aesthetic integrity and, potentially, anatomical clarity. Damage that is more serious may be provisionally mended with silicone, but the original integrity of the damaged tissue may not be restored with the use of silicone adhesive alone. Fast-acting cyanoacrylates (e.g. super-glue) should be avoided when mending plastinated structures. Due to the brittleness of these adhesives, structures mended with cyanoacrylates become susceptible to fracturing and splintering, and will further degrade plastinated tissue. We have seen this occur to structures of older specimens repaired this way in our collection.
While silicone adhesive alone can resolve most minor damage, it often fails to restore the original appearance of larger structures, as it leaves behind evidence of damage and repair. This paper describes tissue-specific restorative methods, where plastinated muscle and neurovascular structures were reconnected with silicone adhesive, and whose anatomical appearances were recovered by integrating pre-cured, S10/S3 polymer mix-impregnated fascia and/or muscle onto the damaged surface. Completely detached muscle was also fully replaced with pre-cured, S10/S3 polymer-impregnated muscle tissue, which was then cured. The purpose of this paper is to provide a guide for other departments that have purchased S10 plastinated prosections for their medical and dental curricula, or that plastinate their own organs and cadaveric body parts for student use according to the S10/cold temperature technique.
Specimens
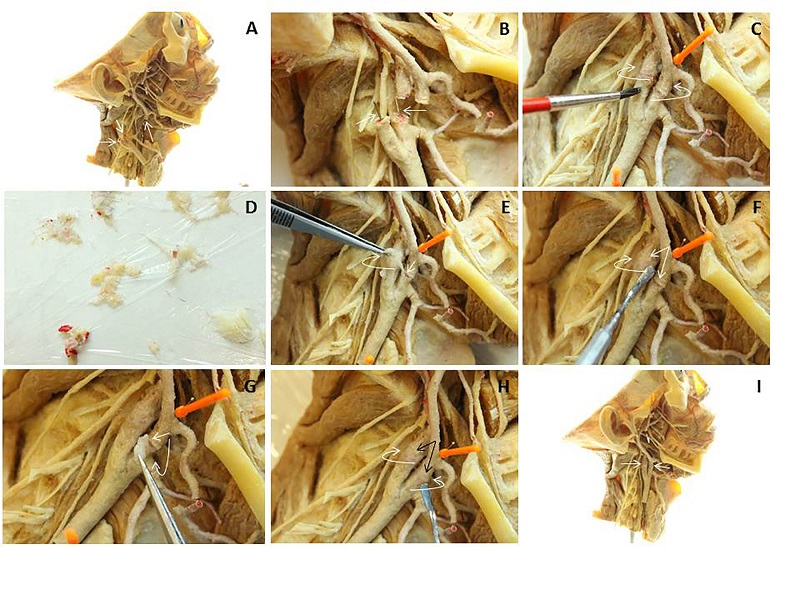
Figure 1: A. Deep prosection of head and neck with severed carotid arteries. B. Insect pin inside lumen of arteries (arrows). C. Silicone adhesive spread around repair margin (arrows). D. S10/S3-impregnated pre-cured fascia ready for application over repair sites (arrows) (E, F, G) and blended around the arterial wall with silicone (H).
Four plastinated prosections with damaged or misplaced structures were chosen to demonstrate tissue-specific restorative
techniques for artery, nerve and muscle: two bisected heads: a. deep, and b. superficial prosections of head and neck (Figs. 1-2a); one deep prosection of the infratemporal fossa showing a wrongly positioned auriculotemporal nerve (Fig. 3), and one deep prosection of the back region showing the infraspinous fossa with a detached infraspinatus muscle (Fig. 4a).
Restoration materials
A self-curing silicone adhesive (GE Silicone II* Household Glue) was used to mend and re-position detached structures. Pre-cured, S10/S3-impregnated fascia and/or muscle were integrated into the restoration area to strengthen damaged structures, replace detached muscle, and restore anatomical appearances. Impregnated repair tissues (fascia and muscle) were provided by the Plastinarium in Guben, Germany. Biodur® S6 hardener was used as a cross-linking agent to cure the S10/S3 impregnation mix.
Restoration equipment
Various operative instruments commonly used in dentistry were used for the application of silicone adhesive and restorative tissues during the restoration process. These instruments include dental Woodsons, surgical curettes, scalpels, forceps, and bone cutters. Other implements include insect pins of various sizes, plastic wrap, 1 ml and 24 ml syringes, and a small paintbrush.
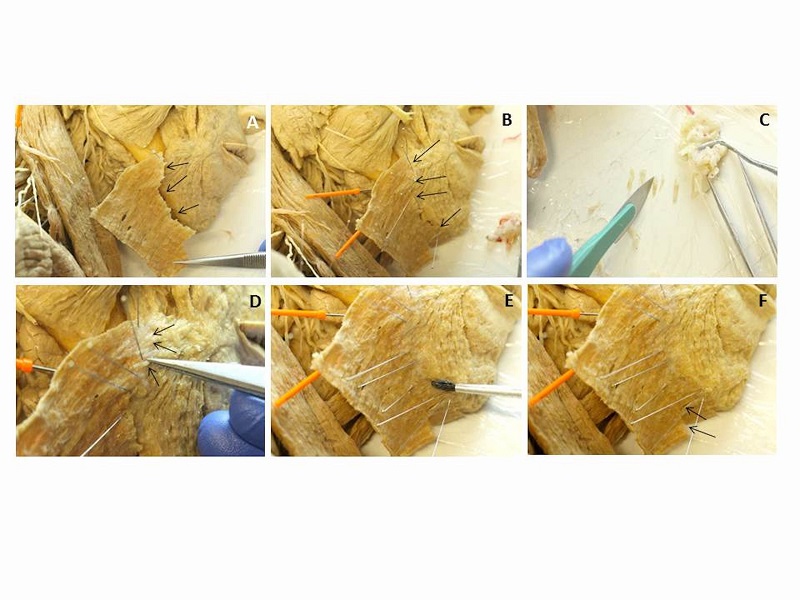
Figure 2a: A. Superficial prosection of head and neck, with detached platysma. B. Muscle realigned to mandible with insect pins and reattached with silicone adhesive. C. S10/S3-impregnated pre-cured fascia strips. D. Pre-cured fascia applied along repair margin. E. Fascia blended with silicone. F. Ruptured muscle beneath mental eminence repaired in Figure 2b.
Procedures
Most broken structures were re-connected with silicone adhesive at room temperature and blended with pre-cured, S10/S3-impregnated fascia. Structures were anatomically positioned with insect needles to facilitate the application of all restoration materials. Insect pins were removed after the silicone adhesive had cured for 12 hours. Pre-cured tissues were subsequently cured by injection with Biodur® S6 Hardener. All plastinated prosections were photographed before, during, and after the repair process, to document the damage, each stage of the restoration procedure, and the results.
Insect pins were cut to size with bone cutters and placed within the lumina of both the internal and external carotid arteries to support reattachment. Insect pins were also inserted around the vessels to position them in their anatomical position. Silicone adhesive was applied to the broken ends of the vessels with a small paintbrush. The vessels were then reattached with the internal support of the insect pins. Pre-cured fascia was applied over the repair site, and unfurled and contoured around each vessel using the flat end of a Woodson. This was repeated until the fascia was fully blended around the arterial wall, and then ‘painted’ over with a light coating of silicone adhesive in order to camouflage the damage and restore the anatomical appearance.
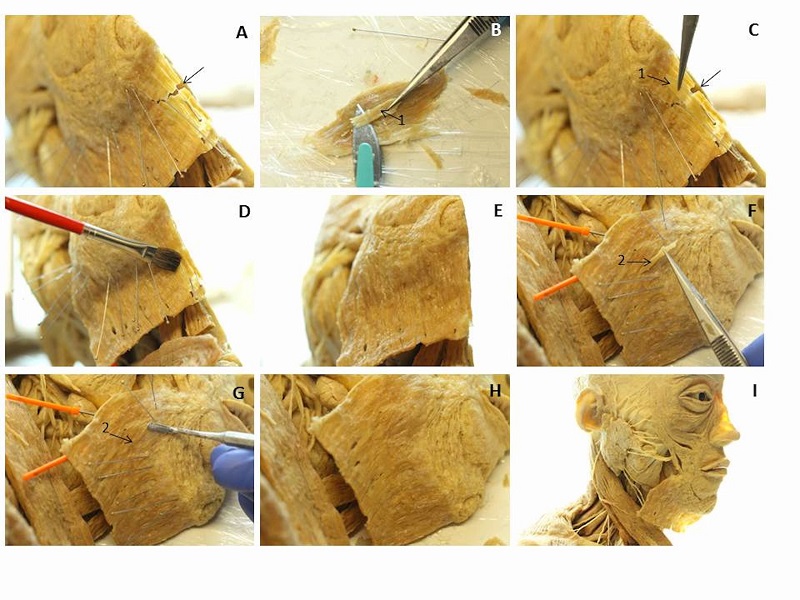
Figure 2b: A. Platysma ruptured inferior to mental eminence. B. S10/S3-impregnated pre-cured muscle (1) cut from separate tissue. C. Restorative muscle (1) positioned over rupture site and blended into tissue with silicone adhesive (D, E). F. Additional strips of pre-cured muscle (2) applied along repair margin and blended with silicone (G) to restore anatomical appearance (H-I).
The platysma was first realigned along the inferior border of the body of the mandible with insect pins, and then reattached with silicone adhesive. A portion of pre-cured, S10/S3-impregnated fascia was then flattened over a hard surface lined with cellophane wrap, and cut into small strips with a scalpel. Using forceps, the strips were then applied perpendicularly along the repair margin between the reattached platysma and the inferior border of the mandible. The strips of fascia were contoured into the grooves of the muscle with a Woodson in order to blend and integrate the fascia into the muscle, and restore normal anatomical appearance. Silicone adhesive was then applied over the repair site to further seal the fascia, and camouflage the damage.
A fractured area of the reattached platysma was repaired by integrating S10/S3-impregnated, pre-cured muscle, which was cut separately into strips with a scalpel. The strips of muscle were dipped into silicone adhesive, positioned over the fracture, and gently integrated into the host muscle until the fracture was covered. Additional strips of pre-cured muscle were applied perpendicularly in between the reattached platysma and the inferior border of the mandible, and then blended with silicone. This was repeated several times in order to reintegrate and reinforce the platysma onto the mandible. Light coats of silicone adhesive were also applied over the reattachment site to self-cure and add more protection over the integrated tissues.
The auriculotemporal nerve normally emerges from behind the condylar process of the mandible. In this prosection, the auriculotemporal nerve emerged anterior to the condylar process. This was corrected by repositioning the nerve to emerge posterior to the condylar process. The trunk of the nerve had been broken from its two branches, which were left in place just anterior to the auricle. Using an insect needle, the trunk of the auriculotemporal nerve was repositioned behind the condylar neck. In this position, the trunk was reattached to its two branches using silicone adhesive applied with the flat end of a Woodson, and repositioned with forceps and insect needles.
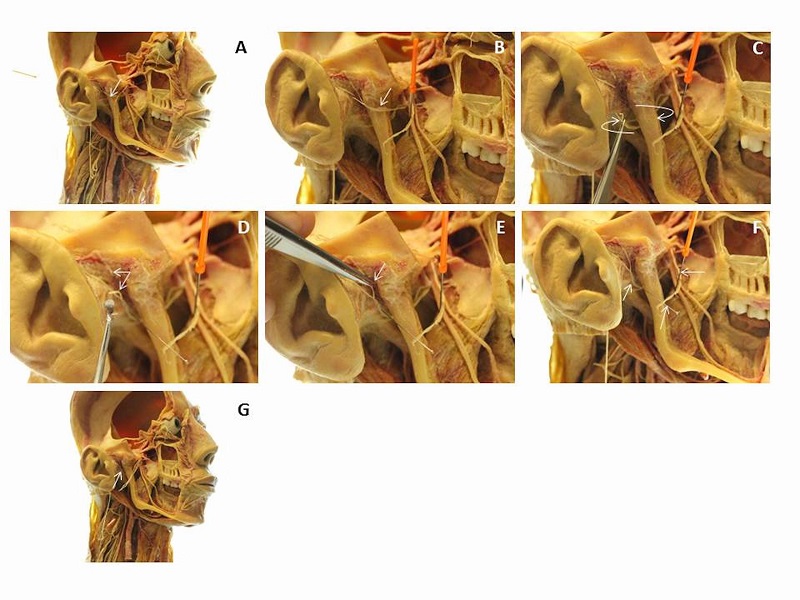
Figure 3: A. Deep prosection of the infratemporal fossa showing a displaced auriculotemporal nerve. B. Auriculotemporal nerve emerges anterior to condylar process. C. Trunk of nerve removed with forceps and moved posterior to condylar process. D-E. Nerve is repositioned with insect needle and reattached to branches with silicone adhesive. F. After silicone has cured, insect needles are removed. G. Auriculotemporal nerve emerges posterior to condylar process.
In this prosection the detached infraspinatus muscle was replaced with restorative skeletal muscle impregnated with S10/S3, of similar color, and cut to similar size. Using large insect pins, the replacement muscle was secured to the scapula, and positioned to reflect from the infraspinous fossa. The muscle was then attached with silicone adhesive applied through a 24 ml syringe along the length of the attachment margin, and spread with a small paintbrush. Small strips of pre-cured, S10/S3-impregnated muscle were additionally cut with a scalpel and inserted perpendicularly along the attachment margin with forceps, to further integrate the new muscle into the infraspinous fossa and restore anatomical appearance.
Small strips of pre-cured, S10/S3-impregnated fascia were applied along the length of the reattachment margin, and contoured to the muscle with a Woodson. This process was repeated as needed to restore anatomical appearances along the margin of repair, and to fully integrate the reattached muscle to the scapula. Using a syringe, 0.5 ml of S6 Hardener was then injected into the muscle and applied onto the surface as a curing agent. The surrounding area was finally covered with plastic wrap to contain the vapor from the S6 solution, and left to cure overnight.
The anatomical appearance of the damaged structures improved remarkably after each of the restoration procedures. The silicone adhesive was compatible with S10 plastinated tissues and self-cured in 12 hrs. In the deep prosection of the head and neck, both the internal and external carotid arteries were easily repaired with silicone adhesive, while reinforced by pins placed inside the lumen (Fig. 1: B-C). Tears on the tunica externa of both arteries were still visible after they were mended with the silicone adhesive (Fig. 1: C). After reattachment of the arteries, the impregnated fascia applied around the tears blended easily into the tunica externa. This camouflaged all traces of previous damage to the structures. After the silicone adhesive had cured, the fascia provided additional protection and reinforcement to the repaired areas, in addition to helping to recover the original anatomical appearance of the internal and external carotid arteries (Fig. 1: D-H).
The detached platysma from the superficial prosection of the head and neck was positioned to the inferior border of the body of the mandible with insect pins, which facilitated its reattachment with silicone adhesive (Fig. 2a: B). The strips of pre-cured, S10/S3-impregnated fascia blended easily into the muscle and restored the anatomical appearance of the muscle’s insertion into the lower part of the body of the mandible (Fig. 2a: D-E), and beneath its attachment to the mental eminence (Fig. 2b: B-E). Strips of spare, pre-cured muscle were also added along the inferior border of the body of the mandible where the platysma was reattached, and blended into the tissue (Fig. 2b: F-G). This helped to integrate and strengthen reattachment of the platysma to the inferior margin of the mandible.
In the deep prosection of the infratemporal fossa, the auriculotemporal nerve was incorrectly positioned anterior to the condylar process of the mandible (Fig. 3: B). After the trunk of the nerve had been torn away from its two branches, the insect pins allowed the nerve to be repositioned posterior to the condylar process (Fig. 3: C). This repositioning facilitated its reattachment to its two branches with silicone adhesive (Fig. 3: D-F). No further application of uncured fascia was necessary after this step, and the insect pins were removed after the silicone adhesive had cured. The auriculotemporal nerve and its branches were stable, and the usual course of the nerve was clearly demonstrated (Fig. 3: G).
The pre-cured, S10/S3-impregnated muscle selected as a replacement for the detached infraspinatus muscle from the deep prosection of the back was successfully secured onto the scapula with silicone adhesive and insect pins (Fig. 4a: A-F). The subsequent application of pre-cured strips of muscle at the site of reattachment closed any spaces between the replacement tissue and the infraspinous fossa (Fig. 4a: H-I). Pre-cured, S10/S3-impregnated fascia applied along the margin of reattachment blended and contoured easily into the muscle grooves (Fig. 4b). The S6 Hardener reacted with the impregnated S10/S3 silicone-mix and caused the newly-attached muscle to become hardened, dry, and odorless, without leaving behind any surface precipitate. The new muscle was left in a stable and permanent position, reflected from the infraspinous fossa (Fig. 4c: E-F).
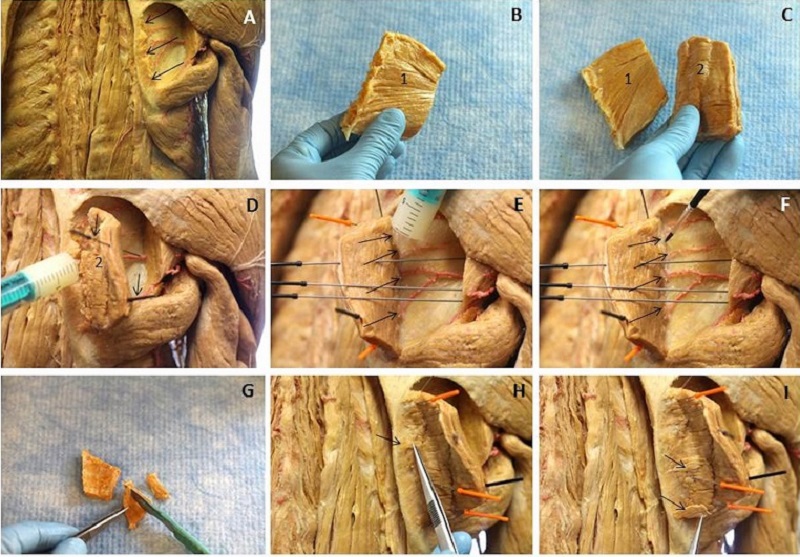 Figure 4a: A. Deep prosection of back region showing infraspinous fossa with detached infraspinatus muscle. B. Detached infraspinatus muscle (1). C. Similar pre-cured skeletal muscle (2) cut to size and shape to replace detached muscle (1). D. New muscle (2) secured to scapula with insect needles, attached with silicone adhesive, and reflected from infraspinous fossa. E. Silicone applied with 24 ml syringe along length of attachment margin. F. Silicone spread along repair margin with paintbrush. G. Strips of pre-cured muscle placed along attachment margin to restore anatomical appearance (H-I). |
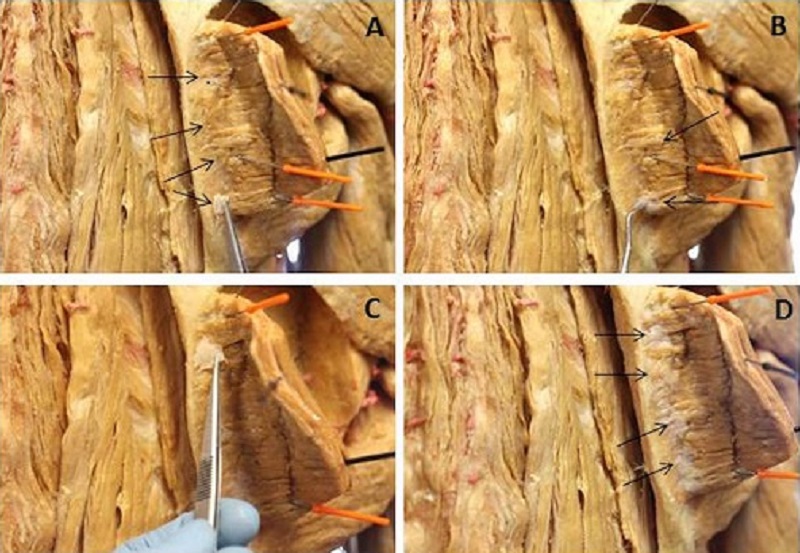 Figure 4b: A, C. Strips of pre-cured fascia are applied along the attachment margin of the infraspinatus muscle. B, D. Fascia is blended with contours of the muscle. |
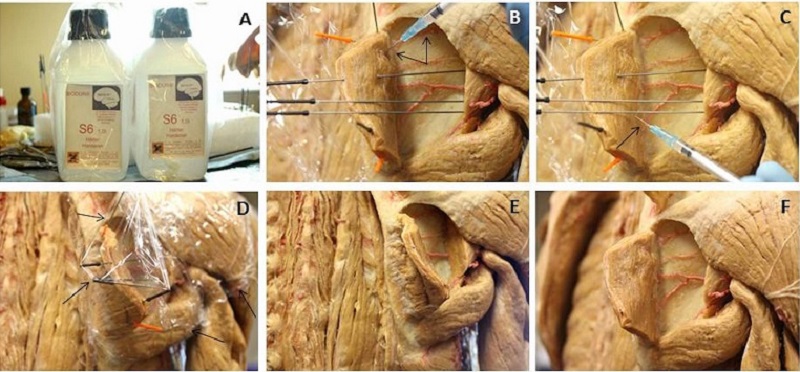 Figure 4c: A. The attached infraspinatus muscle is cured with S6 Hardener. B, C. S6 Hardener applied to surface and injected into pre-cured muscle with 1 ml syringe. D. Attached muscle is covered with plastic wrap to trap S6 vapor. E, F. Plastic wrap and insect needles are removed. |
The plastinated prosections used in this study are part of an extensive anatomical teaching collection at NYU Dentistry, and have been used in the classroom since 2005. Periodic repair and restoration to the collection has become incumbent in order to extend the utility and shelf life of the collection over time. The intention of this paper is to illustrate this necessity for other departments using plastinated prosections, and to set a precedent from which to innovate and develop effective restorative methods when these specimens become damaged.
Insect pins were very useful to hold structures in position in order to proceed through the steps of the restoration process. After the repair was complete and the silicone adhesive had cured, smaller pins were easily removed from the tissue with forceps without leaving evidence of their prior usage. Larger insect pins, such as those used to position the infraspinatus in Figure 4a, left a visible hole where it had pierced the muscle prior to the gas-curing step. However, this can be avoided in the future with alternative placement of insect pins, if not by using smaller gauges.
Silicone adhesive is compatible with the S10/S3 impregnation solution used in most plastinated prosections, and therefore can mend broken plastinated structures while maintaining their integrity and relative flexibility. Another benefit of silicone adhesive is that once cured, it can be peeled away from the surface and reapplied in the event that a structure needs to be repaired more than once. Based upon the degree of damage, and the size of broken structures, evidence of previous injury may still be traceable even after being repaired with silicone adhesive. This can be resolved by integrating pre-cured, S10/S3-impregnated fascia to camouflage damage, and restore normal morphology and appearance.
The fascia used may be thin, loose or dense fibrous connective tissue, which is associated with the surfaces of muscles and organs. The pre-cured restorative tissues used in this paper came from the Plastinarium in Guben, Germany, and included fascia, muscle, artery, and nerve. They were shipped to NYU Dentistry upon request for the exclusive use of restoration and repair of the Department’s anatomical teaching collection.
This tissue is usually cleaned off a plastinated specimen during the “positioning” stage of the S10 plastination process when muscle and neurovascular structures are placed in their desired anatomical position with insect pins before they are gas cured. Rather than being discarded, the fascia can be recycled for the future purpose of rehabilitating damaged plastinated specimens. At this stage, the fascia is still soft, and can be unfurled over damaged tissue and integrated into neurovascular structures and muscles to rehabilitate tears and restore normal anatomical appearances. The “positioning” stage is also an opportunity for further dissection. Superfluous muscles, nerves, and arteries are usually trimmed off the specimen and discarded at this stage. Like fascia, these tissues can also be recycled for restorative purposes, by replacing detached structures. Pre-cured strips of muscle are also easily integrated into host tissue with silicone adhesive, as they are still soft, sticky and pliant.
Alternatively, some departments will restore previously broken structures with an acrylic paint after reattachment with silicone (Raoof, 2014). However, at NYU Dentistry, none of the neurovascular structures in our plastinated collection are painted, though some of the muscles are. Furthermore, the teaching specimens provided by von Hagens Plastination have color-injected vessels and are not painted, except occasionally, muscle. This is an aesthetic choice that we make in our department. We have found that the application of pre-cured fascia is a preferable and aesthetic alternative to acrylic paints for the restoration process. Additionally, pre-cured fascia recovers anatomical appearances of previously broken arteries and muscle, reinvigorates broken structures, and protects the original repair sites.
In all cases, silicone works as an effective adhesive to reattach broken structures, but it does have some limitations. Routine application of silicone adhesive to reattach the arteries in Figure 1 did not conceal evidence of previous damage, as tears in the walls of the arteries were still visible even after they were reconnected. Because the vessels were already injected with a dyed polymer, the insect pins were well supported within the lumen. This provided an effective means of maintaining reattachment between injected arteries after they were reconnected.
Due to the tautness of the platysma in Figure 2b, merely reattaching the broken ends with silicone adhesive could not close the gap produced by the tear beneath the mental eminence. Here, the additional strips of uncured, S10/S3-impregnated muscle were able to blend in with the host muscle and close the gap produced by the tear. This procedure needed to be performed twice to fully close the space.
Only small volumes of S6 Hardener were necessary in order to cure smaller muscles and other structures. Here we used small volumes of S6 (500 l) within and on the surface of the muscle in a ventilated space. Because the S10/S3-impregnated muscle had been kept at room temperature for 2-3 weeks, the impregnation mixture had already begun the cross-linking process, thus rendering the tissue viscous and pliant before exposure to S6. This slow-cure procedure and exposure to minimal amounts of S6 prevented a precipitate from forming on the surface of the muscle (Weiglien and Henry, 1993). To keep pre-cured, S10/S3-impregnated tissues from cross-linking, these tissues should be stored in a deep freezer at -20° C.
For large structures, volumes of S6 Hardener between 10-100 ml are recommended in order to minimize the potential for atmospheric contamination, and the tissue should be exposed to S6 in vapor form (gas cure). In such cases, a desiccant should be used to absorb excess solution (Weiglein & Henry, 1993).
Pre-cured, S10/S3-impregnated tissues can be made available in those institutions that already dissect cadavers and operate their own plastination laboratory according to the S10 cold temperature technique. It is recommended that spare tissues already impregnated with S10/S3 polymer, but not cured, be kept for future restorative purposes.
The collection of plastinated prosections at NYU Dentistry was purchased for the purpose of education, and with the knowledge that they would be handled by hundreds of students every year. Faculty and students are advised to handle teaching specimens carefully. At NYU Dentistry, we encourage the use of flexible wires by students when exploring and moving aside structures, in order to minimize wear and tear. However, while the technology of plastination itself ensures indefinite preservation, damage to structures and specimens is inevitable. Used periodically, the restoration and repair methods described in this paper can rehabilitate damaged plastinated prosections and allow them to resume their usual anatomical appearance and extend their shelf life and educational value for future use.
Acknowledgments
We thank Gunther von Hagens for the opportunity to work with his team at the Plastinarium in Guben, Germany, and Rudolf and Svetlana Theiß and Vladimir Chereminskiy for their insights and for providing the materials and tissues for the restoration procedures. We also thank Nadine Diwersi for her inspiration and dedication to our anatomy course. We finally thank Elena Cunningham for her help and advice during the writing of this paper.
Baker E, Scott PA, Terracio L, Cunningham EP. 2013: An innovative method for teaching anatomy in the predoctoral dental curriculum. J Dent Educ 77: 1498-1507.
https://doi.org/10.1002/j.0022-0337.2013.77.11.tb05626.x
de Jong K, Henry RW. 2007: Silicone plastination of biological tissue: cold-temperature technique Biodur S10/S15 technique and products. J Int Soc Plastination 22: 2-14.
https://doi.org/10.56507/ZLMJ7068
Raoof A. 2014: Restoring and repairing plastinated specimens to prolong usefulness and enhance educational value. Abstract presented at The 17th International Conference on Plastination Saint Petersburg, Russia July 14-18, 2014. J Plast 26(1): 43
von Hagens G, Tiedemann K, Kriz W. 1987: The current potential of plastination. Anat Embryol (Berl) 175(4): 411-21.
https://doi.org/10.1007/BF00309677
Weiglein AH, Henry RW. 1993: Curing (hardening, polymerization) of the polymer - Biodur S10. J Int Soc Plastination 7: 32 - 35
https://doi.org/10.56507/ABNZ7085