1- Department of Veterinary Anatomy, Iowa State University, Ames, Iowa, USA and
2-Department of Animal Science, College of Veterinary Medicine, The University of Tennessee, Knoxville, TN, USA
Sheet plastinated specimens have the highest acceptance among preserved specimens of body slices. Two techniques for sheet plastination are available: BIODUR E12, an epoxy-compound, is used for cross- sections of the body, while BIODUR P35, a polyester-compound, is used for brain slices. The procedures are similar, but for the sake of clarity, each procedure has been described in a separate manuscript.
This paper will discuss in detail the E12 procedure for preserving transparent body sections. With this technique cross-sections of the body are more detailed, transparent, projectable, more durable, and easier to handle.
E12; Sheet Plastination; Body Slices
Wolfgang Weber Department of Veterinary Anatomy, Iowa State University, Ames, Iowa, USA

![]()


Sheet plastinated specimens have the highest acceptance among preserved specimens of body slices. Two techniques for sheet plastination are available: BIODUR E12, an epoxy-compound, is used for cross- sections of the body, while BIODUR P35, a polyester-compound, is used for brain slices. The procedures are similar, but for the sake of clarity, each procedure has been described in a separate manuscript.
This paper will discuss in detail the E12 procedure for preserving transparent body sections. With this technique cross-sections of the body are more detailed, transparent, projectable, more durable, and easier to handle.
EQUIPMENT LIST:
Vacuum chamber large enough to hold the flat chambers; Aluminum baking pans as impregnation vats; Vacuum pump; Thermometer; Balance (scales); Ultra-low deep freezer and an additional freezer (Hussmann Refrigeration, Inc., Bridgeton, MO 63044); Manometer; Biodur Polymers: E12, E1, AE10 and AE30; Band saw with guide stop (refrigerated preferred); 45°C Oven (large enough to hold the flat chambers); Stainless steel (HD 18), aluminum or polyethylene grids; Polymer mesh (HD 16) or Fly screen; Covered basket (HD 08); Appropriate containers for storage and dehydration of specimens on their grids (HD 07); Plastic funnel (HS50) [sleeve or hose (to serve as a funnel)]; Insulated and Rubber gloves; Long bladed knife or spatula; Caliper; Scalpels; Stainless steel stiff wire (HS 55); Plastic wrap; Twine; and Trash bags. To assemble each flat chamber: 2 Tempered glass plates (5mm) (HS 01 or HS 02), 6mm Gasket (HS 06), and 15 large (HS
30) Fold-back clamps or 2 inch binder clamps (von Hagens, 1989).
BAND SAW MODIFICATION:
A butcher saw, i.e., a Butcher Boy SA30 or SA36 (Koch 1411 W 29th St, Kansas City, MO 64108, 816-753-2150); AEW 400 (AEW North America LTD, 640 S Wheeling Rd, Wheeling, IL 60090, 312- 459-3355); or a Hollymatic HiYield 16 (Hollymatic Corp., 600 E Plainfield Rd, Countryside, IL 60525, 708-579-3700) is adequate. Two major modifications prove beneficial: a sliding table and a cooled portion fence (guide stop). Two types of sliding tables are available: 1. full sliding or 2. half sliding. Both tables are on sliding rails. The full sliding table should have two pairs of rails to prevent warping. The full sliding table has a long, narrow (4 - 5mm) slot in the table to accommodate the saw blade. Two major disadvantages accompany the full sliding table: 1. the saw blade can deviate through the width of the slot, and 2. the slot is wide enough for the thin saw products to fall through, thus losing a valuable specimen during slicing. The portion fence should be bolted to the right of the saw blade, onto the table so that it moves with the table. Hence, no friction will be produced between the specimen and the portion fence, which is a major advantage of this construction.
Half sliding construction does not have a slot but only a very narrow space for the saw blade. Therefore, slices can not fall through and be lost. The portion fence may be mounted directly to the fixed part of the table; or to eliminate friction, it can be mounted to the sliding part of the table via a bracket.
It is easier to cut longer specimens (e.g., sagittal sections) with a full sliding table. Because of the lower cost and the lack of a sizable slot along the saw blade, a half sliding table may be preferable. Because full sliding tables have to be special manufactured, they are more expensive; where as, half sliding tables are stock items.
To produce slices of uniform thickness, the portion fence must be parallel to the saw blade from top to bottom and along its length of travel. Otherwise, wedge-shaped slices result. The fence must be adjustable in both planes, horizontal and vertical. Various mechanisms are available for adjustment of the fence, such as hinged or bolted fences. Hinged fences offer ease of adjustment but are more expensive. Vertical adjustment of bolted fences may be achieved by shimming the fence at the mounting holes.
It is necessary to cool the saw portion fence (guide stop) to prevent the specimen and slices from thawing causing wavy, uneven slices to be produced. A variety of options are available for cooling the fence. The simplest method is to attach an ice reservoir to the back of the portion fence. A hollow core portion fence or a fence with attached cooling coils that are connected to a refrigerated circulator are more sophisticated methods. Copper coils can be soldered to a stainless steel or brass plate. Meandering channels may be milled in an 2.5 cm aluminum plate and a gasket placed over the grooves and the channeled plate is bolted to the portion fence and connected to a refrigerated circulator. The refrigerated circulator must provide a constant temperature of 0° C (32 ° F). Lower temperatures cause ice to form on the portion fence , while higher temperatures allow the specimen to thaw.
FREEZER SPECIALIZATION:
A deep freezer with an open top (spot merchandiser, commercial freezer for frozen food display) is ideal. This type freezer is convenient for processing the slices, to scrape the saw dust from the slices without them thawing and to transfer them into cold acetone. Six - eight people are able to work around its perimeter and this type freezer circulates cold air to maintain a temperature of -20°C.
FIXATION:
The E12 technique may be done on formalin-fixed as well as fresh specimens. Kaiserling's solution is recommended for fixation in order to enhance the color of the muscle tissue. Injection and perfusion are the preferred modes of fixation. During perfusion the body or carcass should float freely in the solution in order to prevent deformation (flattened areas). Twine may be used to suspend the body in the fixative solution.
FREEZING WHOLE BODY FOR PORTIONING:
The objective when freezing is to preserve the normal anatomical shape of the carcass. After the body is frozen, it will be cut into smaller portions for slicing. This can be accomplished by hanging the carcass in a freezer by its ears and tail. The feet may touch the floor, but the trunk should not contact the walls.
After two or three days, when the body is thoroughly frozen, it is ready to be portioned on a band saw. The head and extremities are cut off in transverse section. The trunk is divided into thoracic and abdominal portions. All parts are packed separately in plastic bags, labeled, and stored in a freezer. Storage at -70°C in an ultra low freezer is ideal.
ORGANIZATION OF THE WORK PLACE:
The working area should be arranged the day before slicing. A rectangular vat is placed in the work freezer. Four lengths of twine (long enough to pass around the bundle of slices and tie) are laid across the vat. A rigid grid (HD18) is placed on the twine and a piece of fly screen is placed on the grid. Acetone is poured into the vat so that the fly screen is covered by 5 cm. Depending on the quantity of slices to be produced, up to eight workers are needed. Two workers saw slices, one pushes the specimen through the saw and the other holds the long knife (spatula) into the gap between the specimen and the slice, to keep the slice from freezing back to the specimen. One person will transfer slices from the saw area to the work freezer and 2-5 workers prepare the slices for dehydration by removing the saw dust.
SLICING THE BODY PARTS:
Body slices of 2.5mm (2.1-2.7) thickness are preferred. Thicker slices are less transparent while thinner slices break too easily. These slices are sawed on the customized band saw whose guide stop has been modified to assure production of frozen slices of uniform thickness. The guide stop is precooled and set for the appropriate slice thickness (2.5mm). Test slices are cut to determine if the portion fence is parallel to the saw blade and cooled to the correct temperature. It is advantageous to have an extra specimen frozen that can be used to adjust the portion fence to produce slices of the proper thickness. A test slice is sawed and measured with calipers at different sites to determine slice thickness (2.5mm) and uniformity. Once properly adjusted, the specimen is ready for slicing. Often, the first slice or two are uneven and may need to be discarded. As the slices are sawed, the long knife (spatula) is placed between the slice and the specimen to prevent refreezing of the slice to the specimen. The slice is quickly transferred into the work freezer, where the saw dust is removed. The specimen is grasped with the insulated gloved hand and the sawdust is scraped off with a scalpel. Immediately after dust removal, the slices are placed side by side onto the fly screen (like cookies on the baking tin) or singularly if slices are larger. The slices tend to float in the acetone so they must be gently submerged. It is important that the specimen is scraped and submerged in acetone within a five minute period to prevent freeze-drying. When a layer is filled, they are covered with 2 pieces of fly screen. Another slice layer is arranged on the fly screen and so on, until the stack has been built to the desired height. Cold acetone must be added periodically to the vat to keep the slices covered with acetone as the stack grows. The slices must be stacked so that the specimens will not be bent, to assure their contact with solvent, and to assure a compact bundle. When the stack is completed, the twines are tied to hold the layers as one unit and the unit is labeled using lead pencil on filter paper.
When the specimen being sliced starts to thaw, it is returned to the ultralow freezer. Another portion of the body is withdrawn from the freezer and slicing is begun on that portion. It is advisable to saw as many slices as possible in one session because preparation time and clean up time are particularly long.
FREEZE SUBSTITUTION:
Dehydration is by freeze substitution. After the stacks of slices are tied, they are transferred into cold acetone (>96%) in the dehydration freezer. Routine freeze substitution is carried out in 3 to 4 acetone changes with the last bath >99%. The stacks should be agitated daily to remove trapped bubbles and assure uniform dehydration. The large surface area and thin slice allow dehydration to be completed in two to three days.
DECREASING:
To produce transparent slices, degreasing is a vital step. Degreasing can be accomplished in room temperature acetone, by taking the acetone with the slices out of the freezer. Quicker and better degreasing, but with higher health hazard, is achieved with room temperature methylene chloride (dichloromethane). Methylene chloride should be used in a ventilated hood. Degreasing is considered complete when the fat tissue is clear. It often takes 2-3 weeks in room temperature acetone.
IMPREGNATION:
Slices are impregnated with an epoxy based reaction mixture which has a relatively short pot life. The pot life cannot be extended for a long time by freezing as with the silicone reaction mixture because the E12 crystallizes and becomes too viscous for the exchange process. Crystallization may occur during storage, but can be reversed by warming the polymer to 90°C. However, it must cool down to room temperature before the hardener is added.
The vacuum chamber is lined with plastic wrap to ensure easy clean up of splashing epoxy.
The polymer and hardeners are mixed as follows: E12 - 95 pbw, AE30 - 5 pbw, AE10 - 20 pbw, and E1 - 26 pbw (von Hagens, 1989).
Only enough volume of reaction mixture is set up to cover the intended volume of slices for impregnation. The reaction mixture is placed in the impregnation vat in the room temperature vacuum kettle. The vacuum pump is turned on to warm up. A stack of dehydrated slices from the acetone is placed into the impregnation basket and vat. The stack of slices tend to float and must be weighted down with a desiccator plate or held down by the basket lid. Polymer must cover the slices by 2 cm. Any remaining polymer mix is frozen at - 20 ° C. The total volume of reaction mixture used for impregnation is kept as small as possible because larger quantities of polymer cure faster. A thermometer is placed in the vacuum kettle and the impregnation vat is covered with plastic wrap to prevent the polymer from splashing out during impregnation. Once the vacuum kettle has been prepared, vacuum is applied. The rate of vacuum extraction is rapid. The acetone or methylene chloride boils out of the slices vigorously producing a cold temperature, which helps to control the exothermicity of the reaction mixture. Frequent regulation of the rate of evacuation is necessary to keep the impregnation boiling rate proper and to keep the temperature regulated between - 10°C to 10°C which is the best range. Polymer level must be observed and more reaction mixture is added when necessary. Duration of impregnation is between 24 and
48 hours. When bubbling decreases considerably, impregnation is complete, however bubbling may not completely stop.
CASTING:
While the slices are being impregnated, the work area is prepared for casting. The casting mold is referred to as a flat chamber and consists of 2 plates of tempered glass 3-5mm thick, a flexible 6mm gasket, and several large fold back clamps (HS30). The gasket is cut to a length equal to the perimeter of the glass plate. A few flat molds are assembled using 5mm instead of 6mm gasket. These molds will be filled with excess polymer to produce sheets of plastic which will be cut into spacer strips. These strips will be placed between the flexible gasket and the slices and also between slices when several small slices are cast in one sheet. If spacer strips are not thinner than the regular sheets (6mm), they would cause the molds to leak after filling with the reaction mixture. The casting molds for the slices are assembled by placing a glass plate onto a Styrofoam pad to prevent scratching of the glass. Plastic wrap, placed between the impregnation vat and the glass, will catch any dripping reaction mixture. The impregnation vat is removed from the vacuum kettle and placed on the work table. The desiccator plate or basket lid is removed and the stack of slices untied. The top grid and top fly screen are removed and excess reaction mixture allowed to drain into the impregnation vat. The first slice with its fly screen is lifted from the stack and brought over to the glass plate. Passing over the clear wrap confines any drips of polymer. The fly screen is turned over so that the adhered slice(s) will be deposited onto the glass plate. The screen is separated from the slice (Fig. 1) and placed into an appropriate container for clean up after casting has been completed. Once the plate is filled with slices, a flexible gasket is positioned parallel to the front edge of the glass (side next to you) and spacer strips are placed between the slices and gasket, between the slices, and between the slices and the right and left edges of the glass (Fig. 2). Two short pieces of flexible gasket (6mm) are placed near the right and left rear corners of the glass and another glass plate is centered on top of the slices and gasket (Fig. 3). The bottom side (next to the worker) of the flat chamber is clamped. The left and right parts of the gasket are inserted between the glass plates and the sides are clamped (Fig. 4).
 Figure 1. Four impregnated slices, adhered to fly screen, are placed on a glass plate and the screen is being removed. |
 Figure 2. Glass plate with 4 impregnated slices, 6 mm gasket and 5mm spacers inserted to keep slices separated. |
 Figure 3. Forming the two glass plate sandwich, with 4 impregnated slices, 5mm spacers inserted to keep slices separated, 6mm gasket (length cut to perimeter of mold) along front side, and two 6mm gasket spacers positioned near right and left rear corners. |
 Figure 4. Two glass plate sandwich |
FILLING THE MOLD:
The mold is stood upright and a plastic funnel (sleeve or hose) is inserted into the space between the two plates of glass to serve as funnel (Fig. 4). A cardboard support for the plastic funnel can be slipped over the glass plates and funnel. The formula of the casting resin is different from that of the impregnation resin, no AE10 is added. The casting reaction mixture should be mixed immediately prior to use and the ratio is: E12 - 95 pbw, AE30 - 5 pbw, E1 - 26 pbw (von Hagens, 1989). Addition of AE10 to the impregnation mixture produces a mixture with a lower viscosity which allows for the high speed impregnation. Also when cured, the impregnation resin is soft. Therefore, deletion of AE10 from the casting mixture produces a more viscous resin which reinforces the impregnated specimen so that the final sheet is rigid. To fill the mold 2" from the top, requires about 600 ml of reaction mixture. The plastic funnel is discarded and the filled mold is placed upright into a vacuum chamber.
DEAERATION:
The filled mold is placed upright into the vacuum chamber to be deaerated (degassed). Vacuum is applied and adjusted so that the molds do not overflow as the level of the casting resin rises because of expanding gases. Evacuation is maintained for 1-2 hours and then discontinued, even if some bubbles are still observed. The deaeration period affords an opportunity to clean up and prepare for the next step. Before the polymer hardens, the grids, fly screen and tools are soaked in acetone to remove the residual reaction mixture.
INSPECTION OF THE MOLD:
After the vacuum has been released, both sides of the mold are checked for air bubbles larger than 1mm; smaller bubbles will disappear without assistance once the resin cures. The large bubbles are removed using pieces of stiff stainless steel wire (HS 55), whose ends are bent into eyes and hooks. The wires are inserted to catch the bubbles and raise them to the surface; care is taken to not scratch the glass. Also, the alignment of the slices and spacers is checked and corrected using the wires. Now, it is necessary to lay the mold at an angle of about 15° to ensure the final positioning of the slices.
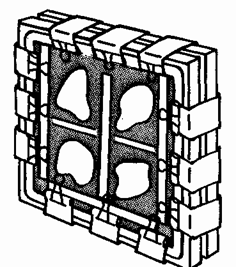
Figure 5. The completed flat chamber. Two glass plate sandwich (similar to figure 4) with 6mm gasket tucked in the at the top of the mold and the large fold back clamps seal the perimeter of the mold.
CLOSING THE MOLD:
After the large bubbles have been removed and the slices and spacers properly aligned, the ends of the gasket are inserted across the top of the mold and the clamps are secured (Fig. 5). This assures even pressure and even thickness of the whole sheet. In fact, the level of the resin rises as the clamps are secured. Closing the mold in this manner does not provide a complete seal at the top, so the mold needs to be laid at a 15° angle to keep the resin from leaking. This angle also assures an airspace above the resin, located away from the slices.
CURING:
Once closed, the molds are placed at an angle of 15° on a rack or tables so that the slices will settle toward the lower glass plate. This assures that the slice is covered on each side with casting resin, a thin layer at the under side and a thicker layer on the top side. If the resin was to be cured in an upright position, the specimen would migrate between the glass plates thus causing uneven layers of casting resin on both sides and the appearance of the specimen would be marred. The molds are left at this angle for 1 or 2 days until the polymer is jelly-like. To make sure, the top of a mold is opened and a rod inserted into the gap and pressed against the polymer to measure the consistency of the casting resin. If it is jelly-like or even hard, the mold can be stood upright and placed in the oven at 45°C. Final curing in the oven takes about one week. After a week in the oven, the sheets will start to separate.
DISMANTLING:
The sheets are removed from the oven and cooled to room temperature in a rack. Some sheets start to separate from the glass plates, while others must be separated manually. For separation, the mold is placed on a Styrofoam pad, the clamps are removed, and separation of the glass plates is started at the corners using the digital force. After the corners have started to separate, separation is continued along all sides. Sometimes it is necessary to use a scalpel to initiate the separation. The top glass plate is removed and put into a rack and the sheet taken from the other plate and immediately wrapped with plastic wrap. The sheets are highly electrostatic and tend to attract particles of polymer up to distances of 12-15cm. Therefore, antistatic spray and cotton balls are handy to remove these particles before wrapping the sheets with plastic wrap. Some polymer residue may remain on the glass plates. Luckily, this residue will be incorporated into the next sheet which is to be made with that glass. Therefore, glass washing is only necessary when the plates are otherwise contaminated.
FINISHING THE SLICES:
If multiple slices were in the large sheet, they need to be cut out individually. The sheets may be marked with a felt tip pen about 5mm outside the circumference of the slices. A band saw, with a narrow blade which allows for sharp turns in the cutting lines, is preferred to cut out the individual slices. A border of 5mm of plastic is left surrounding the specimen. Scroll saws are less suitable when cutting numerous sheets, because the vibrations of the saw numbs the fingers. After trimming the sheets, any ragged edges of the sheets need to be smoothed. A sanding disc or a slow rotating wet grindstone is suitable. Narrow curves and corners can be smoothed using a dremel tool with a grinder bit or a dentist's drill. After smoothing is complete, the plastic wrap is removed. The sheets are cleaned in warm soapy water. The warm temperature releases tensions that may have been induced by the sawing and sanding procedures. The sheet may be labeled by engraving the names of featured structures on the plastic surface. The sheets are easily scratched, therefore, it is advisable to protect them with adhesive plastic wrap prior to student or extended usage. The wrap slightly impairs the visual quality.
Hille Brands , Bernd : Costs of Plastination, oral presentation, 6th International Conference on Plastination, Queen's University, Kingston, Ontario, July, 1992.
von Hagens, Gunther: Heidelberg Plastination Folder. Anatomisches Institut I, Universitat Heidelberg, D-6900 Heidelberg, 1985.
von Hagens, Gunther, K Tiedman, W Kriz: The current potential of Plastination. Anat Embryol 175:411-421, 1987.
https://doi.org/10.1007/BF00309677
von Hagens, Gunther: Polymers for Plastination, Price list. Biodur Products, Heidelberg, Germany, May, 1989.