Department of Veterinary Anatomy, Iowa State University, Ames, Iowa 50011 and 1Department of Animal Science, The University of Tennessee, College of Veterinary Medicine, Knoxville, TN 37901-1071, USA.
Sheet plastinated specimens have the highest acceptance of preserved tissue slices. Two techniques are available: Biodur P 35, a polyester compound, is used for brain sections, while Biodur E 12, an epoxy compound, is used for whole-body sections. The procedures are similar, but for the sake of clarity, each will be described in a separate article.
This article will describe the P 35 technique. With this technique, sections of the brain are more detailed, more durable, and easier to handle than previous techniques.
P35; Biodur; sheet plastination
Wolfgang Weber Department of Veterinary Anatomy, Iowa State University, Ames, Iowa 50011

![]()


Sheet plastinated specimens have the highest acceptance of preserved tissue slices. Two techniques are available: Biodur P 35, a polyester compound, is used for brain sections, while Biodur E 12, an epoxy compound, is used for whole-body sections. The procedures are similar, but for the sake of clarity, each will be described in a separate article.
This article will describe the P 35 technique. With this technique, sections of the brain are more detailed, more durable, and easier to handle than previous techniques.
LIST OF NECESSARY EQUIPMENT:
A vacuum chamber large enough to hold the flat chambers (described below); Manometer; Biodur Polymers: P 35 and A 9, Biodur cobalt accelerator (PB 11), Meat slicer; 2 UVA-lamps, Stainless steel or aluminum grids; Grid basket (HD 09 or HD 10); Square buckets or appropriate containers for storage and dehydration of specimens. To assemble each flat chamber: 2 Tempered glass plates (5mm) (HS 01), 2 Thin glass plates (1-2mm) (HS 03), 6mm
gasket (HS 06), 4 small (HS 32) and 15 large (HS 30) fold-back clamps or 2 inch binder clamps, Plastic sleeve or hose (to serve as a funnel), and Pressure sensitive tape (von Hagens, 1989).
FIXATION OF BRAIN:
The brain should be fixed as a complete unit in a 10- 20% formalin solution. Once the brain is thoroughly fixed it is ready for slicing.
SLICING THE BRAIN:
Flush the brain in tap water, for 4 hours, to remove the fixative. After determining the proposed plane of the sections, the first cut is made with a brain knife. A case with adjustable cutting levels and guide slots for the knife is helpful. After cutting the brain into two pieces, place one portion back into the water and lay a wet filter paper on the cut surface of the other portion. The filter paper keeps the specimen moist, serves as a support to cradle the slice when it is made, and assures that no pieces of the brain slice get lost. With scissors trim the excess filter paper to the outline of each brain slice. To help hold the various portion of the brain slices as a unit, any brain or in particular brains with abnormalities or injuries may be embedded in gelatin prior to slicing.
Once the brain is ready for slicing on the meat slicer, the brain is placed onto the sliding table with the filter paper covered end toward the fence (guide stop). The thickness of the cut is set to produce 4 mm thick slices. Your right forearm may rest on the sliding table while your right hand holds the brain firmly against the guide stop. Keep fingers out of the path of the blade. Using a smooth, even, motion, push the brain all the way through the rotating knife while the left hand supports and holds the resulting brain slice (filter paper side). The slice is placed onto a rigid stainless steel grid (filter paper side onto the grid). Subsequent slices are made in a similar manner, placing a piece of wet filter paper on the new cut surface and trimming to shape to each new slice. Each slice is placed on a grid. It is beneficial for each end of the grids to be bent up IOO". Therefore when stacked, the next tray rests on these bent ends providing a clearance of 4 mm over the brain slice, which assures that acetone and later the polymer have free access to the entire surface of each slice.
The grids with filter papers and slices are placed into a stainless steel basket (capacity of 12 grids is convenient). In order to provide maximum opening size and ease of handling the trays, the basket has no front wall, as well as, no top. A lid designed to cover the top and the front wall is secured to the basket with two long pieces of twine which will serve as handles to allow the basket to be easily submerged and retrieved from the water, polymer mix, and acetone baths. Square polyethylene pails with lids are convenient in which to submerge the basket with the stacked grids and slices in water for storage until ready to proceed to the next step.
FLUSH THE BRAIN SLICES:
Fill the pail, containing the basket of slices on grids, with cold tap water and allow to flush for 4 hours via a slow flow of tap water from the bottom of the reservoir. Direct the water to the bottom of the pail via a hose.
COOL IN DEIONIZED WATER:
Fill a second pail with deionized water. Transfer the basket containing the slices into this deionized water. Because the brain slices are fragile, the basket should always be moved slowly and carefully. Store the brain slices overnight in the refrigerator (5*C) in the deionized water.
FREEZE SUBSTITUTION:
The next morning momentarily drain the slices and submerge in - 20° C cold 100 % acetone. One acetone bath of adequate fluid/tissue ratio is sufficient to dehydrate the brain slices without the need of a second change. Four baskets of brain slices can be properly dehydrated in IOO liters of cold acetone.
IMMERSION INTO POLYMER:
Prepare a polymer mixture (100:2) of P 35 (resin) and A 9 (hardener). An accurate weight of both components is important.
Immersion 1: After 48 to 96 hours of freeze substitution, transfer the brain slices into a cold (refrigerated) polymer mixture . Refrigerate and store specimens for 24 hours at 5°C. Subsequent first stage immersion may be done with remaining polymer mixture from immersion 2 of a previous batch. It is very important to conduct the transfer from acetone to the polymer mix with a quick but careful movement of the basket. The brains must be submerged as quickly as possible, to prevent drying and shrinkage. The exchange of acetone and polymer begins by diffusion.
Immersion 2: After 24 hours, transfer the specimens into a new or good polymer mix (100:2) which may come from the forced impregnation of the preceding batch of brains. The specimens remain in this polymer mix for 24 hours. When this stage is completed, the polymer mix from this stage may be used for immersion 1 of a following batch.
IMPREGNATION:
Prepare a fresh reaction mixture of P 35 (polymer) and A 9 (hardener) (100:2 ratio) for forced impregnation. Combine and stir the mixture with a stainless steel whip for 5 minutes and then deaerate (degas) via vacuum. After the components are mixed, the mixture must be kept in the dark. After deaeration, transfer the basket with the brain slices into the new polymer mix at room temperature. Loosely cover the container with mylar (clear plastic) wrap and fasten the wrap to the container at a few points with clamps. The clear wrap protects from dust and impregnation can be observed through it. P 35 forced impregnation is conducted at room temperature, in the dark, and takes at least 21 hours. It is convenient to start the vacuum at 11:00 a.m. and evacuate to 55 mm Hg. After this vacuum is achieved, increase the vacuum hourly until the vacuum is stabilized at 20 mm Hg by 5:00 p.m. The most important mechanism for regulation of vacuum is to keep the acetone evaporating steadily with penny-sized bubbles. For example, when impregnating 12 human brain slices, 10 bubbles at a time is not too many. Expect fewer bubbles with less and/or smaller specimens. The next morning the pressure will likely be around 12-15 mm Hg and no acetone bubbles will be observed. Trial and error is the only mechanism for proper regulation of your specific vacuum unit. Do not evacuate below 12 mm of Hg. The polymer contains styrenes which volatilize at 10 mm Hg and will harm the pump oil (von Hagens, et al, 1987).
PREPARATION OF "DOUBLE GLASS PLATES":
Tempered glass plates of 5 mm and 1-2 mm (window glass) thickness are used to make each side of the flat chamber (mold) for the slices. The thin glass plate is flexible so that the plastinated sheet will release from the glass after it has hardened. However, by itself, the 1-2mm glass is too flexible and will bulge out when filled with resin. The 5 mm glass makes the flat chamber more rigid and prevents bowing out. The mold is prepared by combining the two sets of the glasses as follows: 1.) Place a 5 mm plate on styrofoam or a pad to protect from breaking and scratching. 2.) Place a 1-2 mm plate on the 5 mm plate. On the side away from you, secure the two glass plates together with 2 fold-back clamps (Figure 1). At the front, seal the gap between the glass plates with a piece of removable adhesive tape. Two of these units must be prepared for each slice. In order to prevent scratches on the glass, store the plates with strips of plastic between them and cover to keep dust free. The double glass plates may be assembled before the casting day.
CASTING:
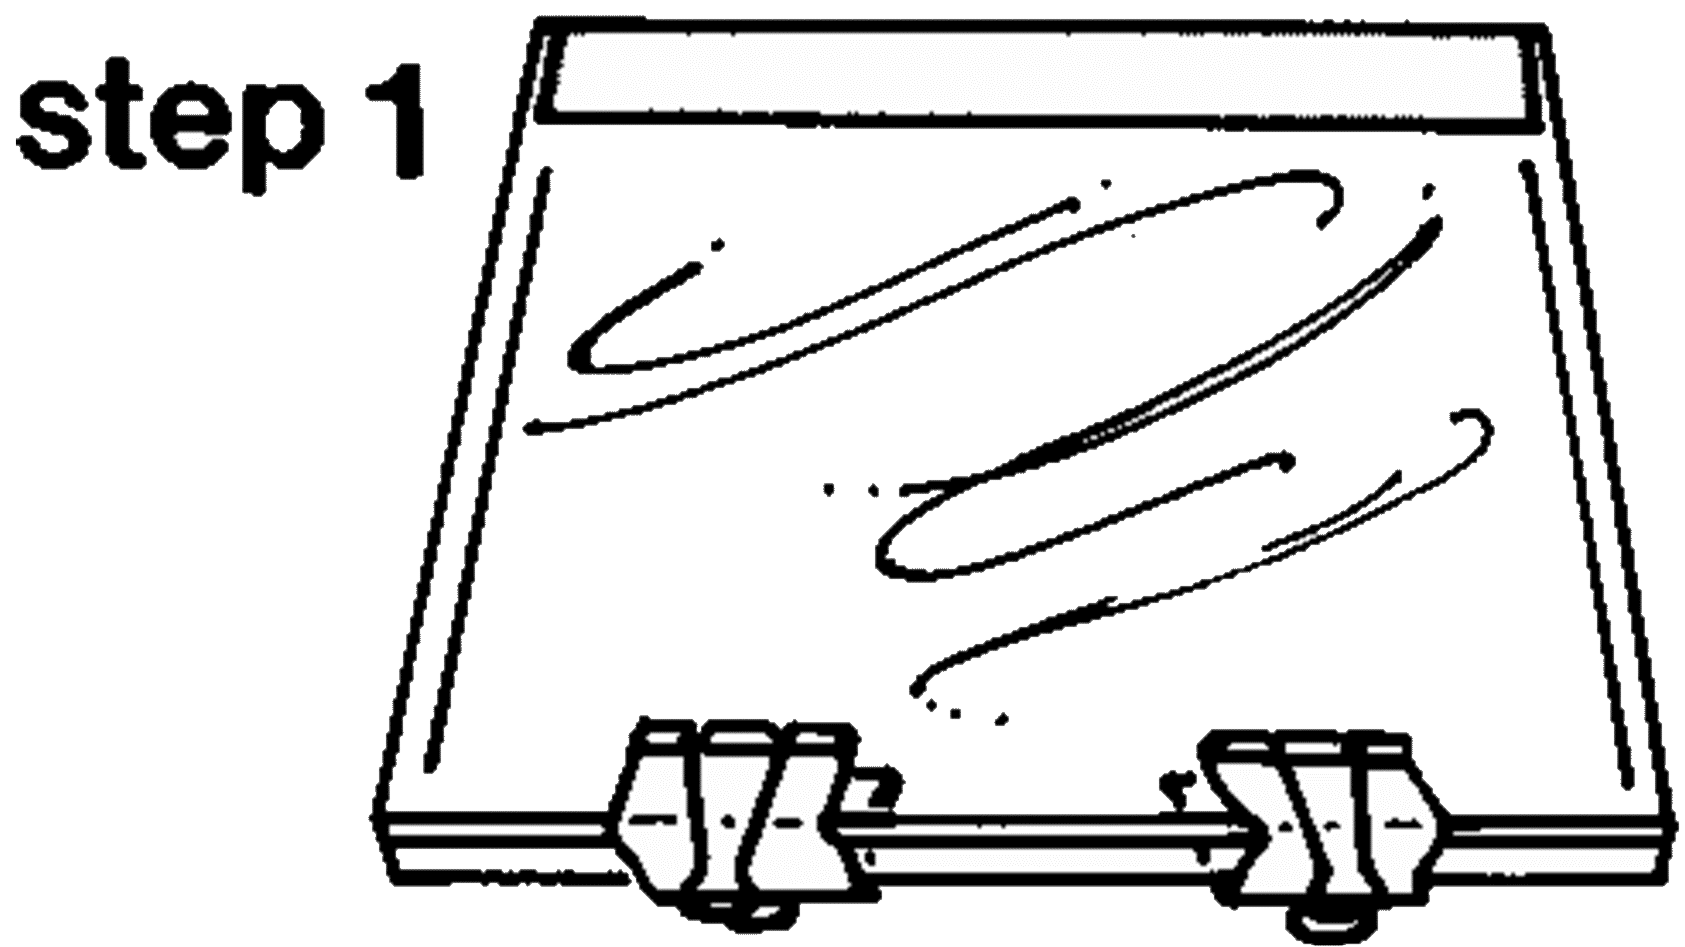 |
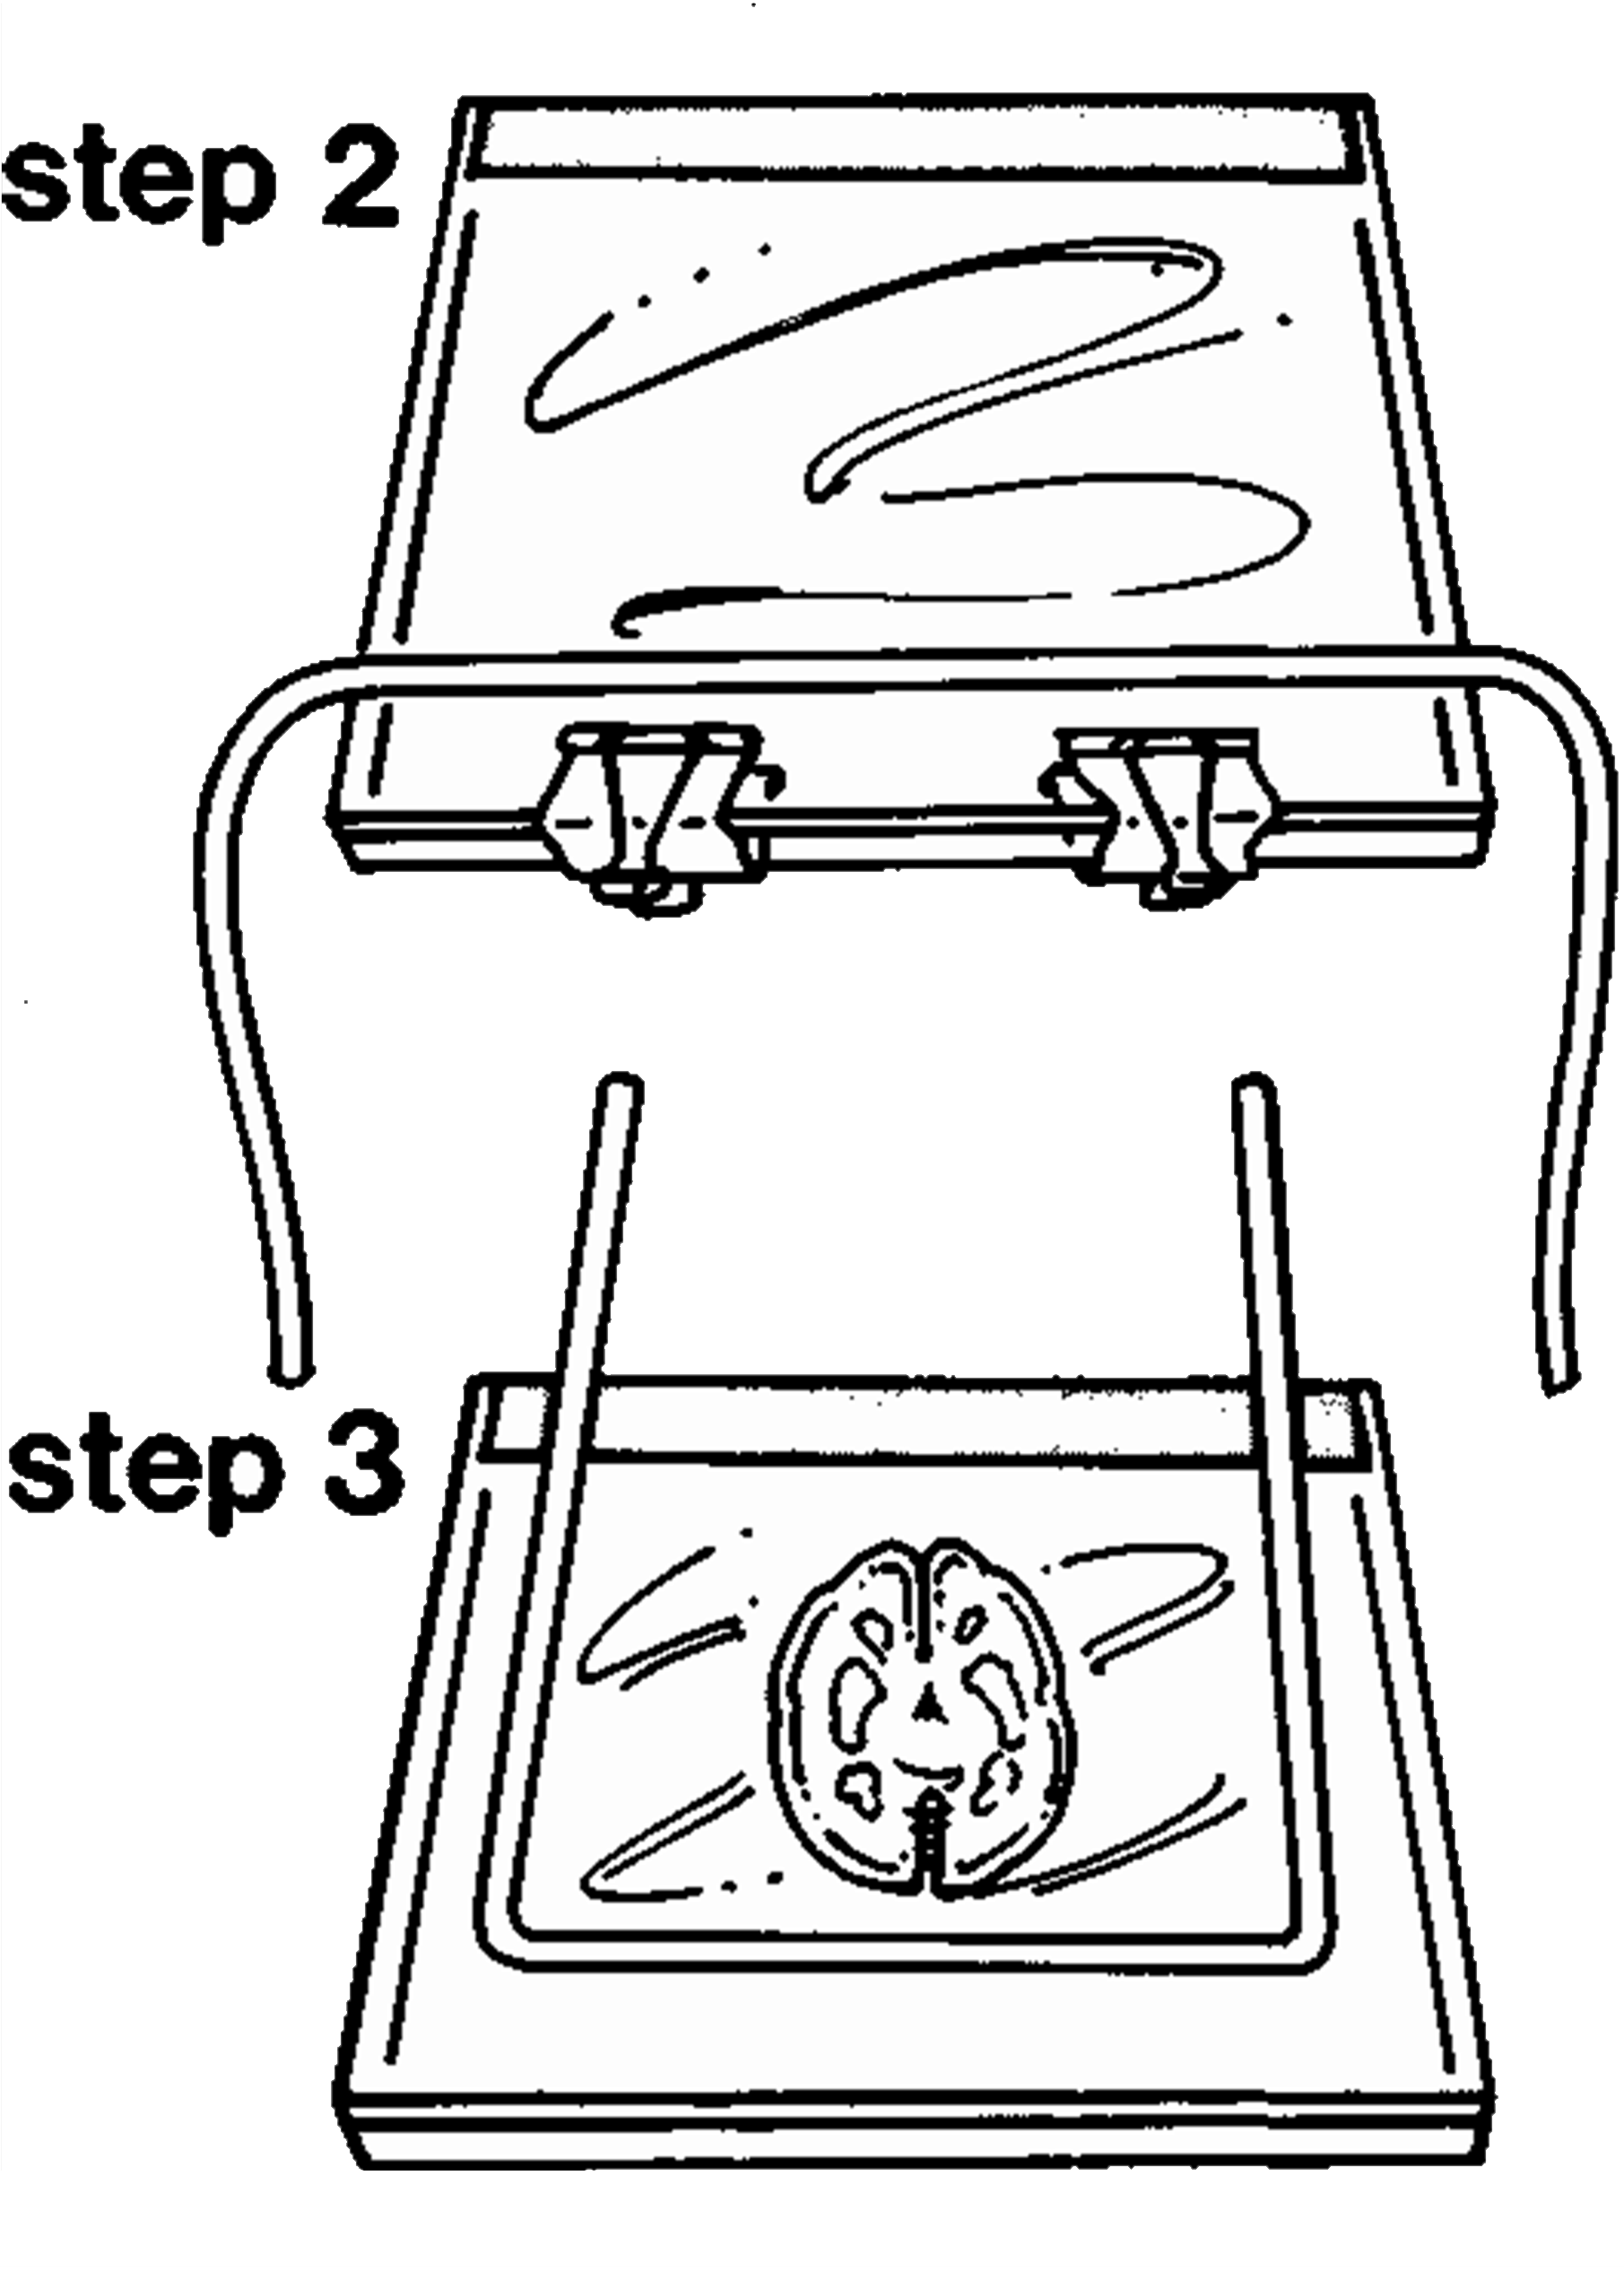 Figure 1. - Step 1: Assembly of double glass plates usingtape and clamps. Note the thin (2 mm) plate is on top. Step 2: Gasket is placed on thin plate. Step 3: Gasket is adjusted and brain slice is placed on thin glass plate side of the double plate. |
The assembly of the flat chamber (casting mold) is commenced by positioning a "double glass plate" on a styrofoam pad with the thin glass up and the adhesive tape away from you. Remove the clamps, which are on the side toward you. Center the 6 mm gasket, whose length is just shorter than the perimeter of the double glass plate, along the length of the thin glass plate (on the side next to you) 3 cm from and parallel to the edge of the glass plate (Fig. 1). Put disposable polyester gloves on and with a pair of pliers, lift a grid and brain slice out of the P35 bath. Grasp the grid with the free hand, lay the pliers down, and hold the grid with both hands. Let the excess P35 drip into the polymer container. Then quickly bring the grid over the glass plate and turn it over so that the specimen lands on the glass plate. Place the empty grid into a storage pail, along with the lid of the basket and the pliers. With a pair of thumb forceps, remove and dispose the filter paper. Remove the gloves. Place two small pieces of gasket (4 cm) near the rear corners of the glass plate. Check the specimen to make sure that it is all there and arranged properly. Place the second double glass plate, thin glass toward specimen, on the specimen, with the adhesive tape away from you (Fig. 2). Remove the fold-back clamps. Align the gasket and make sure that the "double plates" are exactly one over the other. Place a row of fold-back clamps along the front edge of the glasses which will hold both double glasses against the gasket. Place the gasket, hanging over each end, into the mold, parallel to the ends of the glass plates, remove the two small pieces of gasket at the rear corners, and secure the gasket at each end with a row of clamps. The ends of the gasket are now hanging over the side which is away from you. The mold is ready for casting.
FILLING THE MOLD:
Fold the clamp arms back onto the glass plates. Stand the mold upright (taped side up) in a rack or by using two larger clamps as supports. Insert a plastic sleeve (hose) into the gap between the double glass plates (Fig. 2) and secure the sleeve with small clamps. The sleeve serves as a funnel. Fill the flat chamber with fresh polymer mix (P35/A9) (100:2), about 600 cc. Remove the plastic
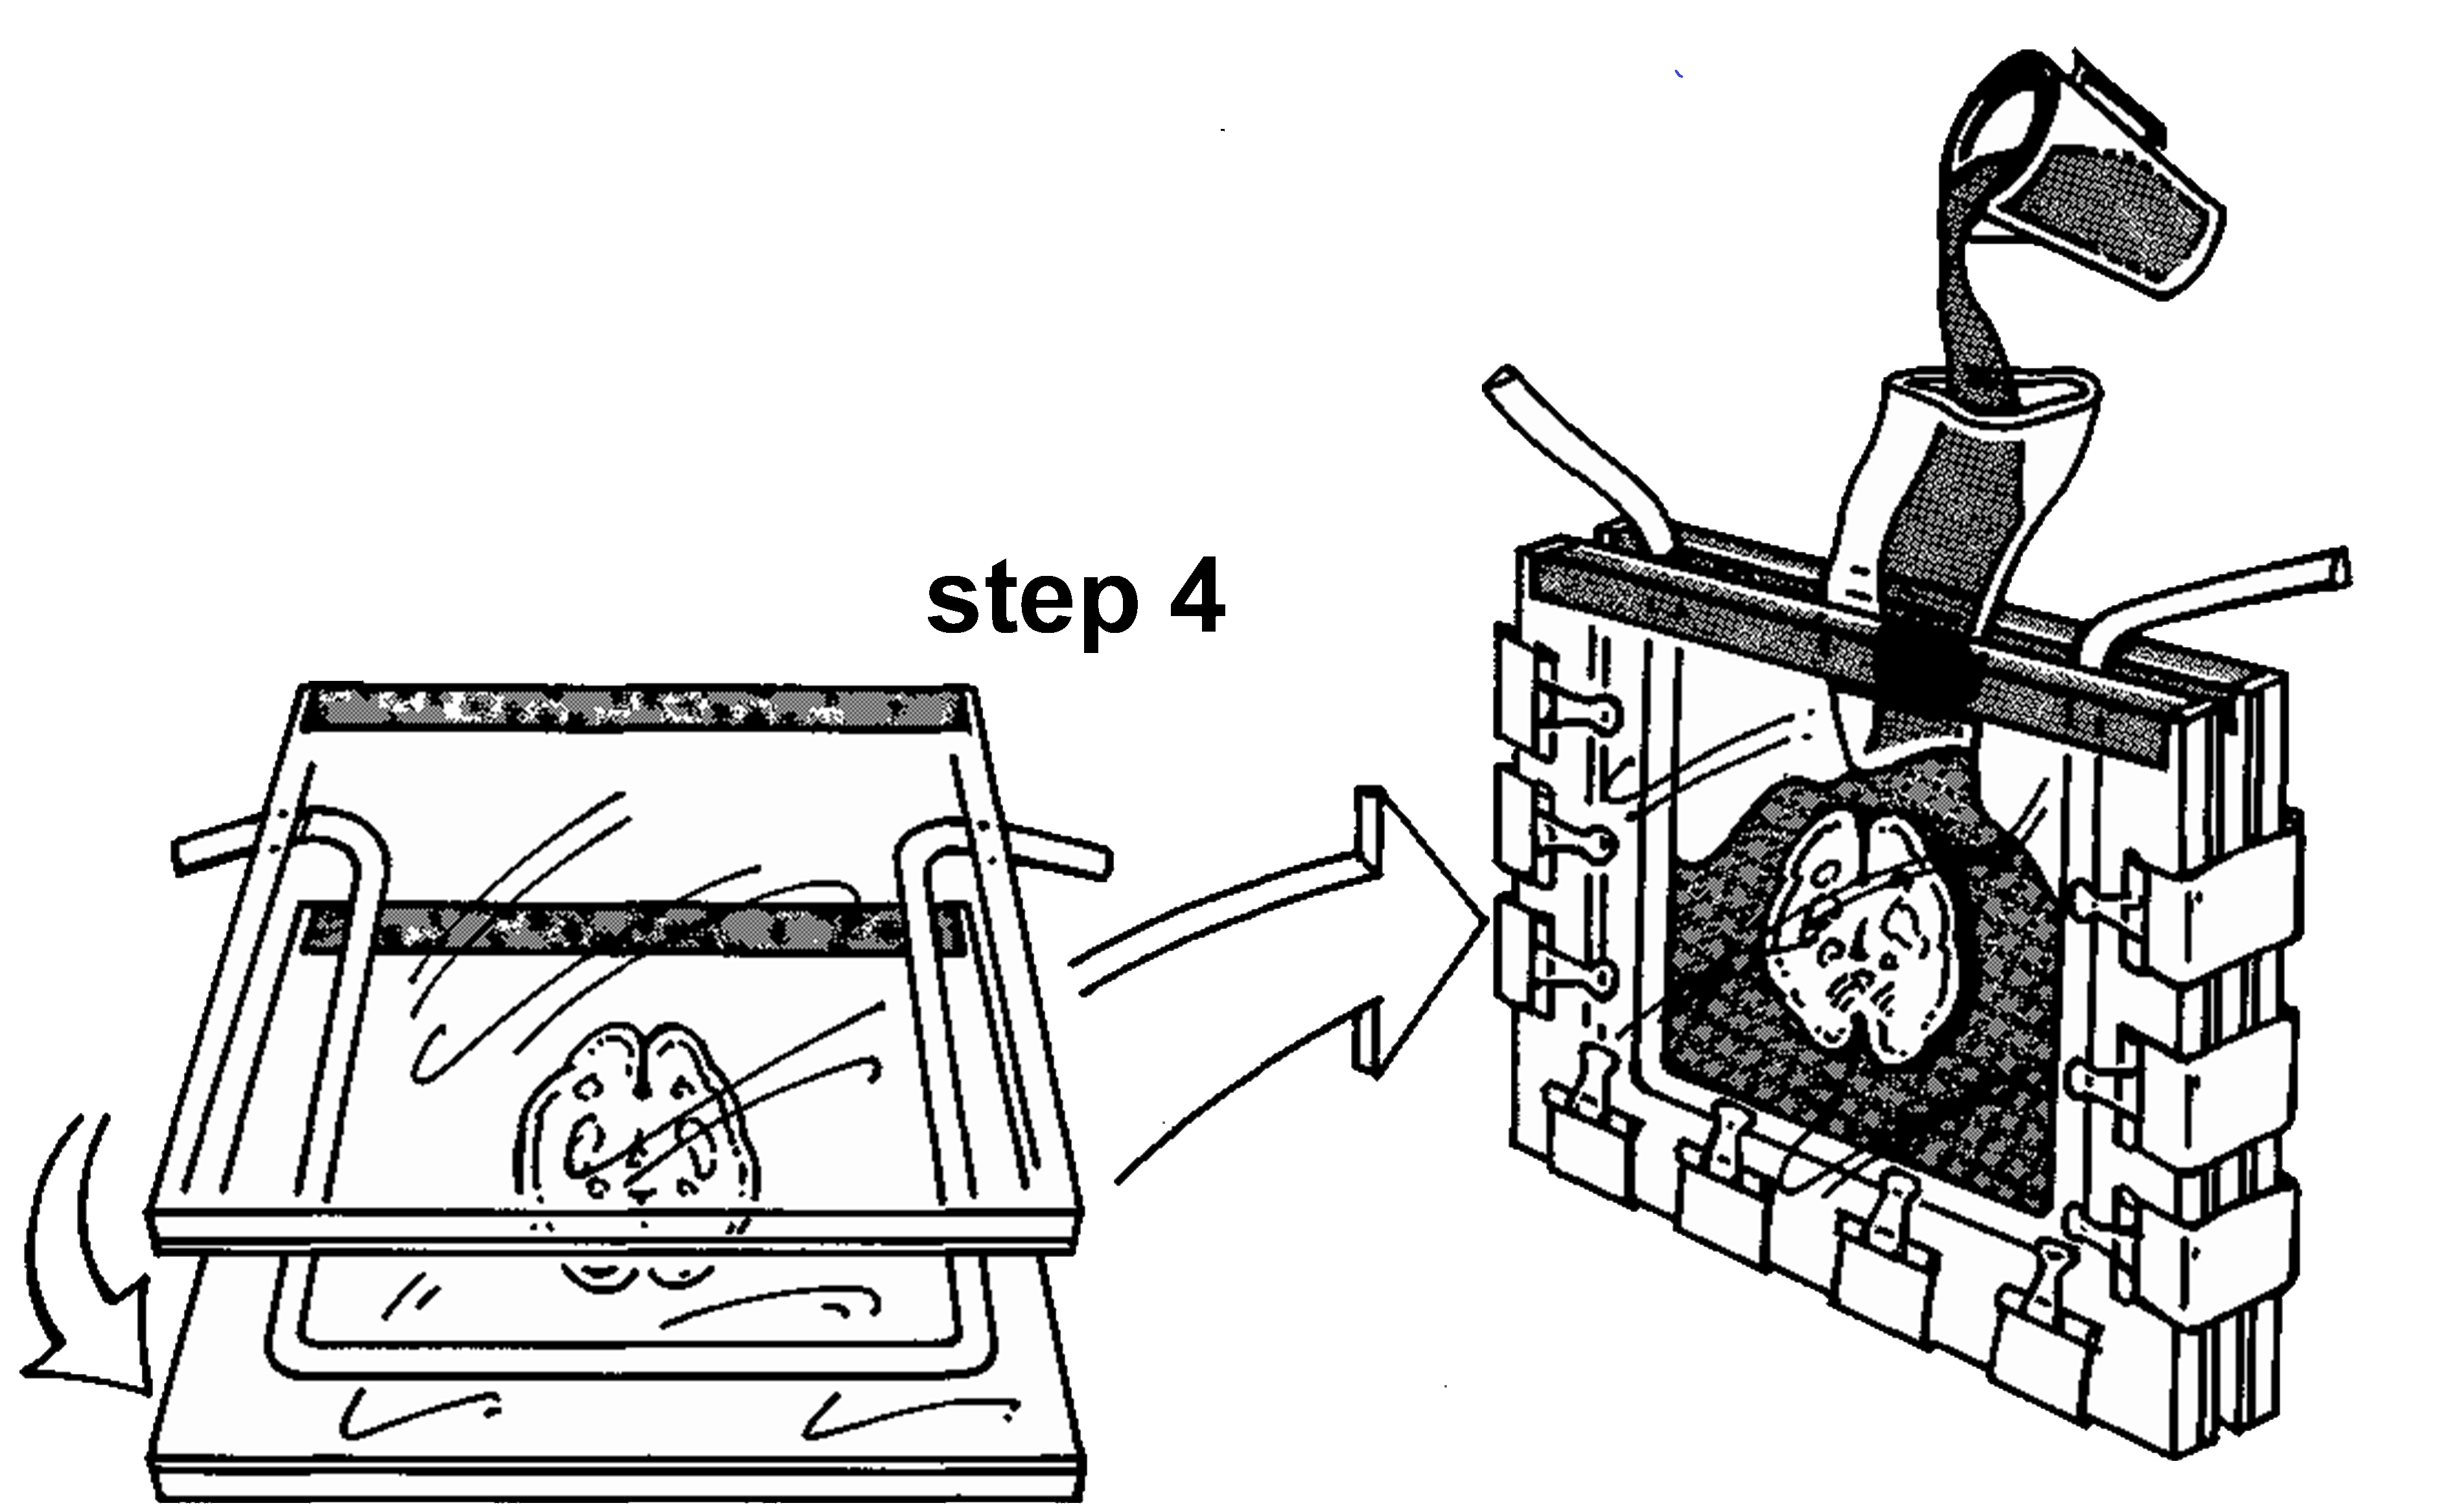
Figure 2. Step 4a: 2nd double glass plate unit is placed on top of the first double glass plate, gasket and slice. Step 4b: After clamps are in place, the flat chamber is raised vertically. A plastic sleeve (funnel) directs polymer between the plates to fill the mold.
sleeve and place the filled unit in a rack. To allow trapped air bubbles to rise to the surface, spread the gap between the double glass plates using a stack of 6 or 7 tongue depressors (blades) or a small block of wood. Also, use a depressor to keep the brain slice submerged. Store the unit, for 30 minutes, in a darkened area (to prevent early curing of the sheet) to allow the trapped bubbles to rise. Some bubbles will cling to the specimen and must be removed manually. Modify a few pieces of I mm gauge stainless steel wire, by bending the ends into an eye or hook which will be used to move the bubbles to the surface. A thicker (3-4 mm) rod is useful to position (center) the specimen in the mold for curing. Supporting the flat chamber at a small angle from the vertical, allows the correction work to be done with ease. It is necessary to check for bubbles on both sides of the brain. After the bubbles have been removed and the slice centered, remove the tongue blades and insert the end portions of the gasket into the gap at the top of the unit. Clamp the top of the mold (Fig. 3) and the sheet is ready for curing.
CURING:
Curing of P35 is initiated by UV-light (long-waved UV light, tanning lamps) and completed in a 45 °C oven. Light Curing: The UV light source must be applied to both sides of the flat chamber. Make sure that no polymer drains out of the mold and
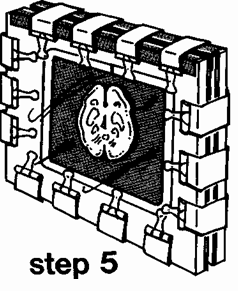
Figure 3. Step 5: The top of the gasket has been tucked in and clamps placed to seal the top of the mold.
that all clamp levers are folded back. The glass plates must be clean and scratch free to avoid photo effects. This curing process is very exothermic. Therefore, it is necessary to disperse the heat with a fan or blower. It is beneficial to devise a manifold to direct the air stream onto the sheets. After 45 minutes of UV exposure, curing is complete except for the center of the slice. To harden the center of the slice, it is necessary to use heat. Heat Curing: The flat chambers are placed in a 45 °C oven for 5 days. Lower temperatures won't activate the peroxide hardener and higher temperatures may cause white spots to appear in the specimen.
DISMANTLING:
After 5 days, the flat chambers are removed from the oven and most of the clamps are removed. A few clamps are left in place to secure the unit's integrity. Store the sheets upright in a rack for cool down to room temperature. During the cool down, cracking sounds are heard as some of the plastic sheets separate from the glass. However, not all sheets will separate by themselves and it will be necessary to gently spread the glass plates. Sometimes, a scalpel may be useful to initiate the separation. When taking the sheet from the glass, it is important to prevent traces of non-cured polymer from getting on and sticking to the sheet. As the sheet (specimen) is removed from the flat chamber, it should be covered with adhesive plastic wrap for protection.
TRIMMING:
The excess plastic sheet may be cut away from the perimeter of the specimen. It is beneficial to mark the intended saw line prior to sawing. A table, radial, or band saw is adequate. It may be beneficial to make a preliminary cut about 1 cm outside of the intended final circumference. For final cut, use the sharpest blade and use a slow speed. The slower speed will produce neater edges. After sawing, the edges often are sharp and need to be sanded after the protective film has been removed. A belt sander with a water bath is ideal. After the brain sheets have been sanded, they are dusty and need to be washed. Do not use water over 50° C as white spots may be produced. The warm water releases all tension which is produced on the sheet by sawing and sanding. The sheet is now ready for use.
CLEANING THE GLASS PLATES:
The thin glass plates have a polymer residue which is softened and partially removed by washing the plates with detergent in a dishwasher at 85°C. It is beneficial to interrupt the washing cycle after 10 minutes and manually remove the polymer which has been softened by the heat. Otherwise it is necessary to wash the glass several times.
DISPOSAL OF OLD POLYMER:
After a polymer bath has been used for impregnation and two immersion baths, it has to be discarded after it has been hardened. Harden the polymer by stirring in Cobalt promoter (0.5%) and transfer the polymer/cobalt mixture into old cans and keep under the hood. The reaction causes excess heat and fumes. No flammables are to be within the hood and plywood or an insulation pad should be placed under the cans. After the mixture has hardened and cooled, it may be discarded.
Practical hints: The sheet may be labeled by engraving the names of featured structures on the plastic surface. The sheets are easily scratched, therefore, it is advisable to protect them with adhesive plastic wrap prior to student or extended usage. The wrap slightly impairs the visual quality.
ACKNOWLEDGMENTS
Thanks to Carol Haynes of the CVM Art Department, The University of Tennessee for the excellent drawings.
von Hagens G, K Tiedemann, W Kriz: The current potential of Plastination. Anat Embryol 175:411- 421, 1987.
https://doi.org/10.1007/BF00309677
von Hagens, Gunther: Polymers for Plastination, Pricelist.Biodur Products, Heidelberg, Germany, May, 1989.