1 Lincoln Memorial University, DeBusk College of Medicine Harrogate, TN, USA
2 University of Tennessee, College of Veterinary Medicine, Knoxville, TN, USA
Coloration is helpful in bringing differentiating characteristics to human plastinates in order to provide a more effective teaching model. Following the cold-temperature Biodur® S10 technique, a pigmented mixture was added to the musculature, veins and arteries of a fully plastinated human upper extremity, revealing effective and durable visual results. Various methods, testing steps, durability testing and sample tissues were used in defining the final paint solution. The end result was a durable and aesthetically pleasing teaching specimen and the discovery of an easily-followed coloration technique to be used on plastinated specimens.
plastination; anatomy; plastinated; Biodur®
Jeremy McCreary, Lincoln Memorial University – DeBusk College of Osteopathic Medicine, Department of Anatomy, 6965 Cumberland Gap Parkway, Harrogate, TN, USA. Phone: 1(423)869-6337. Fax: 1(423)869-6006. Email: Jeremy.McCreary@LMUnet.edu

![]()


The time-consuming task of detailed dissection as well as inconsistencies between student dissectors, creates a need to plastinate material for long-term observation and study. The process of plastination is lengthy and particular; however, the process provides great benefit to the perpetually advancing medical education field. One of the largest expected problems with plastinated specimens is tissue discoloration. After dissection and plastination has been completed, it is typical for the biological tissues to lose their natural shading and color. Throughout the steps of fixation and dehydration, the tissues may lighten and darken to become indistinguishable from one another and other tissues in close proximity (i.e. muscle, skin, connective tissue, etc).
Resolving the undifferentiated coloration in plastinated specimens has been attempted numerous times and during various steps of the plastination process (von Hagens et al., 1987; Henry et al., 1997). One of the first attempts to preserve color was to stain the specimen before complete plastination using BiodurTM CR in the initial fixation phase (von Hagens et al., 1987). Other attempts have been aimed specifically at neural tissue with the addition of various solutions (i.e. Astra Blue, Mulligan’s solution) as a bath before the plastination process to achieve tissue differentiation (Suriyaprapadilok et al., 1997). Due to the thickness and
density of certain tissues, the staining procedures tend to apply the coloration to the entire surface of the specimens rather than individual tissues. These specimens also tend to lose color due to abrasion. Other attempts at coloration include the alteration of the biochemical makeup deep into the tissues through the addition of chemicals, addition of various pigment solutions before the dehydration step (Steinke and Spanel-Borowski, 2006) and addition of Imidazole to the impregnation mix in the classic S10 process (Sakamota et al., 2006). The problem with the addition of a stain or chemical bath is that the entire specimen is introduced to this coloration, or at least a gross portion. Therefore, this method makes application to certain muscular or neurovascular structures difficult and the specimen inherently loses some of its educational value.
Recently, researchers in plastination have attempted coloring of specimens by adding paint-like solutions to the completed plastinate. The only recorded attempt of this process used a variety of paints and coloring materials (Marchese et al., 2008). This method involved the direct application of acrylic paint to desired areas for the proposed differentiation of tissues and highlighting of specific areas within a specimen. Problems noted during this procedure included the thickness of the paint, patchy coloring, incompatibility with silicone and the need to apply a lacquer coat before and during the addition of the acrylic paint. Due to the water-based acrylic paint, layering of the lacquer coats was needed to prevent paint separation. A lacquer was applied and allowed to dry. After this step, acrylic paint could then be used on desired areas of the specimen.
A classic way to present the arteries and veins in a natural manner is to inject with latex or epoxy before dissection (Riepertinger and Heuckendorf, 1993). This process allows ease of dissection and dilates the arterial and venous structures to show normal physiologic distention as well as internal coloration.
Due to the encountered problems noted in previous research, a method is needed that encompasses the best features of prior attempts and includes modifications that result in the best educational specimen possible. The coloring mixture must be thin in consistency in order to reveal natural tissue surfaces, it must complement the plastination method used in order to bond with the specimen and it must penetrate the tissue surface in order to achieve color longevity. The method shown through this research attempts to address these problems and to provide a simple and replicable process to bring color to plastinates.
The painting process developed includes the following steps: specimen preparation, solution testing, durability testing, pigment trials and finally painting of the specimen.
Specimen Preparation
Dissection of the male human upper extremity from fresh frozen tissue was completed over a two-month period. After the thawing of the tissue, injections were made into the larger compartments with 5% formalin through large bore needles. Throughout the dissection process the limb was placed in a 5% formalin bath when not being actively dissected. The final dissection step included placing the extremity in an ice bath for several hours in order to firm the tissue to achieve sharp cross-sectional cuts. Once the dissection was complete the specimen was rinsed in tap water for two weeks. Following the dissection and fixation, the BiodurTM S10 plastination technique was followed (De Jong and Henry, 2007). The specimen was dehydrated in cold acetone (-20° C). Acetone percentage was monitored and changed to achieve a final stable reading of 99%. After dehydration, the tissue was placed in cold BiodurTM S10/S3 mixture under vacuum. Over twelve weeks the specimen was slowly saturated with the polymer catalyst mixture. After impregnation was complete, excess polymer-mix was drained from the specimen. After draining, the tissue was placed in an S6 environment to crosslink the polymer-mix. During curing, the limb was manicured with paper toweling to remove any polymer residue. Once paint solution trials were complete and the surface completely dry, the tissue was ready to have the surface coloration solution applied.
Solution Testing
Before paint was applied to the limb, several paint solutions were tested using plastinated bovine cardiac tissue, with epicardium removed. Bovine cardiac muscle was selected for testing due to its low fat content as well as the smooth surface to test the paint. The components used in the painting solution include:
Eleven test formulations were made to test paint consistency. MEK was constant at 5 ml (volumetric pipette) in each of the test solutions. The silicone varied from no silicone in test solution #1 to 1.0 g of silicone in test solution #11, added in 0.1 g increments. In the paint consistency testing stage, the pigment was added only to provide a tint of color, but was tested specifically in a later process. Therefore, for the consistency testing stage, the pigment was added using a micropipette to include 30 μL of pigment color paste. This small amount of pigment was also added to hold the combination in solution for the next durability-testing step; further aesthetic testing of pigment was tested at a later stage. The formulations were then applied to a specified area of bovine cardiac muscle in an incremental fashion as noted in Table 1. The paint was allowed to dry for 24 hours and visual observations were made.
Durability Testing
Three different durability tests were performed on the eleven paint samples. The tests performed were designed to mimic usage and handling during medical and anatomical education. The first test included scratching the various colored areas with a blunt pointer. Each solution was gently rubbed to represent using a pointer to present an anatomical structure. The second test involved using a gloved hand and applying severe frictional force. The last test consisted of scratching each test area with the back end of a #10 scalpel blade. (Granted this should never occur in an anatomical education setting with a fully plastinated specimen, but it represents one of the harshest actions this colored solution could be put through).
Pigment Trials
Once the consistency of the medium was decided, (best ratio of silicone and MEK), the amount of pigment added was altered and tested on another plastinated bovine heart. The Biodur® dye paste was added to the mixture in 10 μL increments. The test solutions were added to the bovine cardiac muscle in a similar fashion to the solution. The pigments used included:
The same paint consistency trials were performed for all three pigments used.
Application of the solution to the Specimen
The muscle regions of the upper extremity were painted first, followed by the vasculature. All of the exposed musculature in the final specimen was cross-sectional in orientation, which was different from the test tissue (the bovine cardiac tissue). The vasculature and nervous tissue, however, had an intact surface. Throughout the application of coloration solution to the specimen, notes were taken of not only the application of the cross-sectional orientated structures, but also of the intact surfaces.
Solution Testing
The consistency of the solution was tested by holding the MEK constant at 5 mL as well as the pigment of 30 μL as described in the Table 1. Only the quantity of silicone was varied.
|
Test Solution # |
MEK |
Pigment |
Silicone |
| 1 | 5 mL | 40 μL | 0 g |
| 2 | 5 mL | 30 μL | 0.1 g |
| 3 | 5 mL | 30 μL | 0.2 g |
| 4 | 5 mL | 30 μL | 0.3 g |
| 5 | 5 mL | 30 μL | 0.4 g |
| 6 | 5 mL | 30 μL | 0.5 g |
| 7 | 5 mL | 30 μL | 0.6 g |
| 8 | 5 mL | 30 μL | 0.7 g |
| 9 | 5 mL | 30 μL | 0.8 g |
| 10 | 5 mL | 30 μL | 0.9 g |
| 11 | 5 mL | 30 μL | 1.0 g |
Table 1: Formulated test solutions for amount of silicone used
The visual characteristics varied widely in the eleven solutions. The solutions containing silicone closer to the 1.0 g portion of the range (test solutions 8-11) were very glossy. The sheen produced by the larger concentrations of silicone was very odd and undesirable. With natural color being the only priority, the solution containing only pigment and MEK, test solution #1, had the best visual appearance.
It was noted that the more silicone added to solution, the more difficult it was to mix into suspension. However, when more silicone was added, the paint became thicker, the paint dispersion was better and the paint was more easily applied and less likely to run. After the paint was applied, observations were made including the glossy surface and the thickness of the paint.
Durability Testing
The three types of durability testing provide a unique insight into the long-term use of plastinates in education.
The first test, using a blunt anatomy probe, demonstrates the typical practice of pointing out structures in an educational or clinical environment. With this test, the solutions containing larger amounts of silicone tended to detach and roll off of the bovine cardiac muscle. This effect was especially noticeable in solutions containing greater than 0.5 g silicone (test solutions 7-11). A correlation noted was that with increased amounts of silicone, the adhesion to the surface of the specimen was greatly decreased.
The second test included firm rubbing of the tissues with a gloved hand to simulate normal continuous handling of plastinates. Results were similar to the probe test, including detachment and rolling of the paint. Solutions containing greater than 0.4 g silicone (test solutions 6-11) required less effort to cause the paint to detach from the muscle. However, solutions containing very little to no silicone in suspension blended into the muscle tissue to the point where it dispersed beyond visibility. The solution containing no silicone and only MEK proved to be the worst in this test category in that it completely dissipated. Therefore, with little to no silicone (solutions 1-3) the mixture hardly adhered to the surface of the specimen when frictional force is applied due to dissipation; whereas, larger amounts of silicone (solutions 8-11) added to solution caused the dried product to detach in whole amounts.
The last test involved scratching the painted surface using the spine of a #10 scalpel blade. Again, hopefully these forces do not simulate any actual actions to an otherwise fully plastinated finished product, but it is one of the harshest environments that could be used to test the solutions’ adherence. As projected, the scraping of the paint solutions was detrimental to most, but surprisingly not all of the test solutions. The solutions containing solely MEK or the addition of the lower amounts of silicone (solutions 1-4) in our testing range seemed to be mostly unscathed by the abrasive nature of the test. Because of the low viscosity of the paint and the ability of the muscle to absorb the predominant MEK solutions, the scalpel had nearly no effect on solutions below 0.5 g silicone (solutions 1-5). However, like the results seen previously with both the probe testing and gloved hand friction testing, the solutions containing larger amounts of silicone detached in whole amounts to leave the underlying tissue free of post-process coloration application.
After the visual and durability tests were completed, the authors drew conclusions about the best volumes/amounts of constituents to use in a final coloration solution. With the MEK held constant at 5 mL, the amount of silicone was adjusted to achieve both goals of long-lasting durability and aesthetics. The most appropriate solution consisted of 5 mL of MEK and 0.3 g silicone along with the addition of pigment.
Pigment Trials
Beginning with the solution of 0.3 g silicone and 5 ml of MEK, 10 μL of Biodur® AC51 dye paste was added and sampled on bovine cardiac tissue. The pigment is used to simulate the deep natural color of muscles and has historically been the most desired outcome needed in plastination science. A palette was assembled ranging from 10 μL – 70 μL as described in Table 2.
| Test Solutions |
Constants (MEK & Silicone) | Pigment Additions (AC51) |
| A | 5 mL MEK & 0.3 g silicone | 10 μL |
| B | 5 mL MEK & 0.3 g silicone | 20 μL |
| C | 5 mL MEK & 0.3 g silicone | 30 μL |
| D | 5 mL MEK & 0.3 g silicone | 40 μL |
| E | 5 mL MEK & 0.3 g silicone | 50 μL |
| F | 5 mL MEK & 0.3 g silicone | 60 μL |
| G | 5 mL MEK & 0.3 g silicone | 70 μL |
Table 2: Formulated test solutions for amount of pigment color paste used
Paint was applied to the various testing areas and allowed to dry for 24 hours. Once dry, the entire spectrum (test solutions A-G) on the bovine heart was held next to the upper extremity to choose the best mixture. In developing a wider scope for this technique, the arteries and veins were painted similarly to the muscles, providing more data for the various pigments.
The painting interval testing proved to be the most subjective portion. The final solution chosen for the natural color of the muscles included 0.3 g silicone, 5 ml of MEK and 40 μl of the BiodurTM AC51 dye paste, test solution D.
The other Biodur® dye pastes used, AC50 (bright red) and AC40 (blue), required different concentrations to achieve the desired color. For example, the AC50 had a tendency to turn pink or a very weak red color with the preset 40 μL amount. Therefore, increments of 10 μL were added to get to the final volume of 80 μL per 0.3 g silicone and 5 ml MEK. Another 40 μL of the blue AC40 pigment was required due to the low viscosity of the paint as well as the paint being dark and the veins being a very light colored tissue. The final combination comprised 120 μL AC40 solution with 0.3 g silicone and 5 ml MEK.
There were a different set of problems with the Biodur® AC40 pigment color paste in the preset solution. Whether it was the pigment itself or the increased volume of the pigment, it was very difficult to keep the various parts in solution. This difficulty was discovered while applying the final mixtures to the upper extremity. Luckily, when painting the muscles and arteries with the two different red paints, one 40 μL and the other 80 μL, this specific specimen could be painted with just a single mixture of each. However, the AC40 (blue) required changing the solution every 15 minutes. Because of the highly volatile MEK and other chemical processes, the paint quickly separated in the mixing container during the painting process; therefore, with every reapplication of paint to the brush it is necessary to stir the solution back into suspension in order to keep the paint consistent.
The AC40 solutions released the silicone out of solution on multiple occasions. This side-effect was most likely due to the Biodur® dye paste itself because of the consistency of the other proportions of the solution. Neither the AC51 nor AC50 dye pastes had this same problem of drawing the silicone out of solution.
Application of Solution to the Specimen
The muscle regions of the upper extremity were painted first, followed by the vasculature. The final paint solution chosen was of such low viscosity that it resembled more a watercolor rather than a thick paint. The depressions and cracks in the cross-sectioned tissue allowed for easy absorption of the thin, watery paint solution. Also, the topography of the tissue prevented the paint from running. Given the density/viscosity of the paint solution, two coats of paint were needed to achieve the deep color desired.
Painting the vasculature, however, was completely different. The texture of the arterial tunics and fascia was very different from the absorbent muscle tissue. The extremely smooth surface of the external tunics of the vasculature required an adapted technique of paint application. Rather than allowing the material to absorb the solution, as with the cross-sectioned muscle bellies, it had to be applied through several thin coats. The thin consistency of the paint made it difficult to keep the liquid paint from dripping on other structures while at the same time trying to apply enough coats to achieve the desired color. It was determined that six coats of the solution were sufficient in coating the vasculature.
Once a dissection has been completed and the plastination process has occurred, a differential coloration of the tissue is desired. Because of the fixation, dehydration, flushing and polymer processes, the tissue is left with a very unnatural color and many structures are indistinguishable, based on color characteristics alone. Therefore, a standard process is desired to allow colored revitalization of the tissue that is easily replicable and reliable. The method used in this research on human cadaveric tissue of an upper extremity can be redirected to other projects to achieve a natural coloration of tissue.
The cold-temperature Biodur® S10 technique was used for impregnation. The finished product was allowed to rest and dry for eight months in preparation for coloration. A protocol was designed which held MEK constant while varying the amounts of silicone and pigment color pastes. The optimal final solution included 5 mL of methyl ethyl ketone, 0.3 g silicone and varying volumes of pigment depending on which dye was used (40 μL of Biodur® AC51, 80 μL of Biodur® AC50 and 120 μL of Biodur® AC40).
The only difficulty in the developmental stages was drawing the pigment into the micropipettes. Some of the pigments were thicker and posed a problem with precision, but a slow draw enabled all the pigments to be drawn accurately. This difficulty poses a problem with consistency over a large project (i.e. if it is desired to paint a large specimen over a period of several days to weeks). However, it was noted that there was not a large difference in coloration or consistency with 10 μL incremental additions and even less with <5 μL additions or subtractions. The mixture using the Biodur® AC50 stayed in solution throughout the entire coloration of the musculature with only a single batch of 5 mL MEK, 0.3 g silicone and 40 μL pigment. Therefore, if the amount of dye paste used varies by ±5 μL, but the same mixture is used throughout, the difference will be unnoticeable. However, if multiple mixtures are needed, it is essential to have the exact same measurement each time. Another way to combat this inconsistency is to attempt the same procedure with varying amounts of a powdered dye. The amount of dye can be measured and added without the issue of dye paste viscosity.
The blue dye paste used for the veins, Biodur® AC40, presented quite a problem with the consistency of the solution. By the time the first coat was applied, the pigment had separated out and it was necessary to remix a new batch before beginning each new coat. Because so many solution changes had to be made to finish the application of six total coats of blue dye solution to the venous structures, it was very important, and at times difficult, to maintain the consistency of the color. With the bright red dye paste used to color the arteries, Biodur® AC50, all six coats needed to achieve the desired hue could be made using just one batch of paint. There is room for exploration into discovering a blue pigment that will not only achieve a desired coloration but also stay in suspension for longer periods of time to make the process easier.
There are also other tests that could be performed on this method to shed light on its durability. Such tests include longevity trials, and the addition of heat and ultraviolet light (Steinke and Spanel-Borowski, 2006). As seen in previous research, there are multiple points along the plastination process to interject a coloration method. Interjecting this technique at a different stage could reveal data with increased durability.
Throughout the formation and testing of this method, especially with the vasculature, there were instances where removal of the solution was necessary. Before the solution had time to completely set it was easily removed from the specimen solely with MEK. It penetrated through the material and re-suspended the mixture in order to allow it to then be removed. Fortunately, this technique did not disrupt the previously applied and dried coats underneath the layer being removed. This experience leads to the conclusion that MEK does not penetrate through and re-suspend solution once it has dried and would not serve as a sufficient coloration removal solution if desired. Prior attempts at coloration, including the use of a stain containing astra blue, were able to be removed with a 0.1% HCl mixture (Bickley, 1996). This technique, however, was not verified during this research because it was not needed.
In the field of plastination and medical education, the use of this coloration method has an insatiable need. This work can serve as a foundation/starting point for future research on achieving coloration of plastinated specimens. The method outlined in this research allows for the visual detail that pushes the longevity of plastination towards a more realistic and natural educational tool.
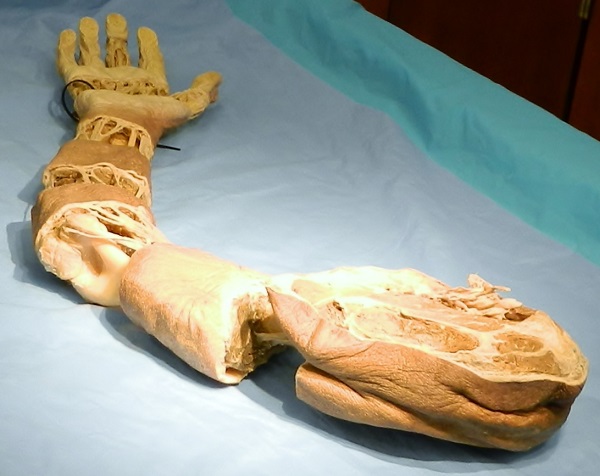
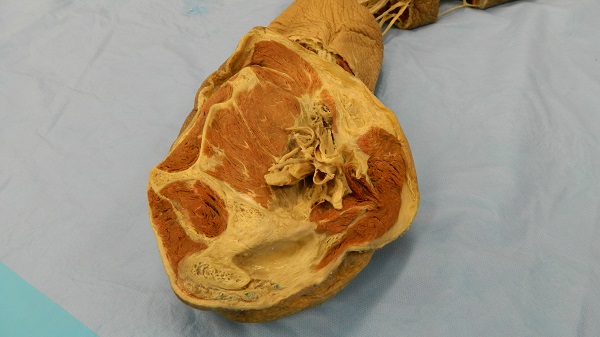
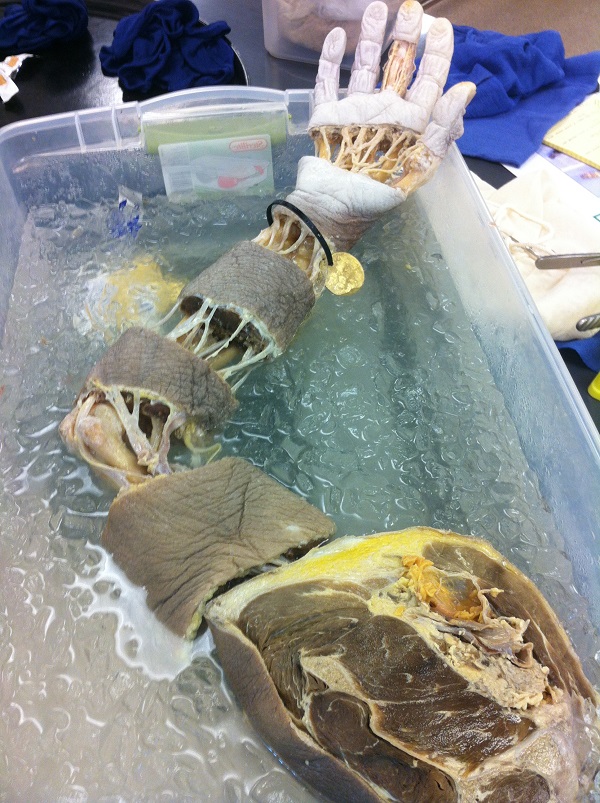 Figure 1 – Final dissection of upper extremity prior |
|
||
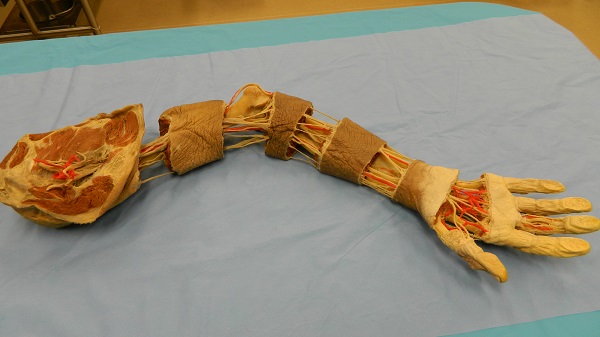 Figure 4 – Overview of the plastinated specimen with application of the coloration technique to both the musculature and arterial vasculature. |
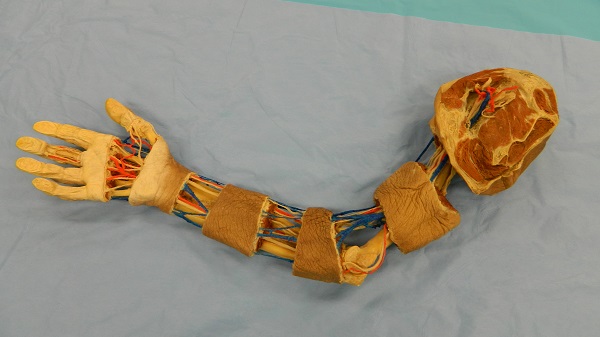 Figure 5 – Overview of the plastinated specimen after completion of the coloration technique to the musculature and total vasculature. |
||
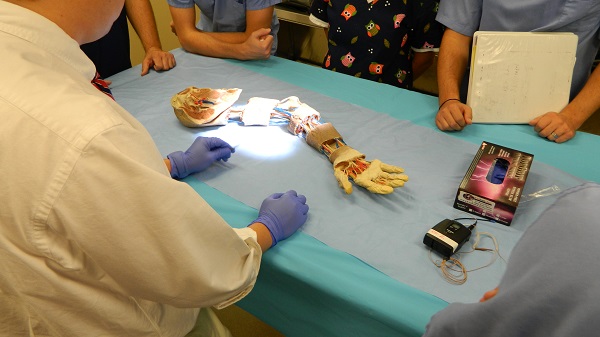 Figure 6 – Using the complete plastinated specimen |
Bickley H. 1996: The staining of brain slices by impregnation. J Int Soc Plastination 10:8.
https://doi.org/10.56507/RJEL8056
DeJong K, Henry RW. 2007: Silicone plastination of biological tissue: cold-temperature technique BiodurTM S10/S15 technique and products. J Int Soc Plastination 22:2-14.
https://doi.org/10.56507/ZLMJ7068
Henry RW, Janick L, Henry C. 1997: Specimen preparation for silicone plastination. J Int Soc Plastination 12(1):13-17.
https://doi.org/10.56507/HVSK9838
Marchese A, Marchese L, Wischmeyer A, Falk K. 2008: Enhancing the understanding of anatomy through the coloration and plastination of anatomical specimens. U of Mich Undergraduate Research Forum Issue 5, Winter.
Mendez BA, Romeo RL, Trigo FJ, Henry RW, Candanosa AE. 2008: Evaluation of imidazole for color reactivation of pathological specimens of domestic animals. J Int Soc Plastination 23:17-24.
https://doi.org/10.56507/HZTR8339
Riepertinger A, Heuckendorf E. 1993: E 20 color-injection and plastination of the brain. J Int Soc Plastination 7:8-12.
https://doi.org/10.56507/YHON8469
Sakamoto Y, Miyake Y, Kanahara K, Kajita H, Ueki H. 2006: Chemically reactivated plastination with Shin-Etsu Silicone KE-108. J Int Soc Plastination 21:11-16.
https://doi.org/10.56507/BSRA2644
Steinke H, Spanel-Borowski K. 2006: Coloured plastinates. Ann Anat 188:177-182.
https://doi.org/10.1016/j.aanat.2005.10.001
Suriyaprapadilok L, Withyachumnarnkul B. 1997: Plastination of stained sections of the human brain: comparison between different staining methods. J Int Soc Plastination 12(1):27-32.
https://doi.org/10.56507/YISQ6047
von Hagens G, Tiedemann K, Kriz W. 1987: The current potential of plastination. Anat Embryol 175(4):411-421.
https://doi.org/10.1007/BF00309677