1-Department of Anatomy and Embryology, Academic Medical Center, Amsterdam, The Netherlands, Europe.
2-Department of Comparative Medicine, College of Veterinary Medicine, University of Tennessee, Knoxville, TN, USA.
Since its development nearly thirty years ago, S10 silicone plastination has become the gold standard for preservation of biological tissues. Silicone plastination is the most versatile plastination methodology as it may be used for whole cadavers or organs and portions or slices thereof. The Biodur/German/vonHagens' /cold-temperature technique yields the most exquisite specimens with accurate surface detail and is the classic method of plastination. Ambient temperature silicone plastination yields similar results as cold plastination and will also be described.
plastination; silicone; S10; S15; S6; S3
K. DEJONG -Department of Anatomy and Embryology, Academic Medical Center, Amsterdam, The Netherlands, Europe. Telephone: (31) 20 566 9111; Fax:(31)20 697 6177; E-mail:k.h.deJong@amc.uva.nl

![]()


The goal of plastination is to replace tissue fluid with a curable polymer. Most often silicone, polyester or epoxy is used (von Hagens, 1979a; 1979b; 1986; von Hagens et al., 1987; Bickley et al., 1987; Henry and Nel, 1993). Once the polymer is inside the specimen (cells and interstitium) , the polymer is cured (hardened) to keep the silicone in the specimen and to make the specimen dry.
Chemicals used in silicone-plastination include:
The general steps of Biodur® silicone plastination are described in addition a listing of the specific details of Biodur® S 10 silicone-plastination. These basic tenants of plastination are also applicable to the generic plastination polymers. This basic protocol may be modified to utilize the generic silicone products and other methodologies.
Plastination consists of the following steps:
With silicone plastination, fresh or embalmed (formalin-fixed) specimens may be used. In general, using fresh tissue may yield a more flexible and pristine specimen than if specimens are embalmed or stored for a long time in formalin. Selected specimens may or may not be fixed with formalin. However, tissue may be fixed to prevent any potential biohazard risk associated with the handling of human tissue (Ulmer, 1994; Smith and Holladay, 2001).
In substituting the solvent (acetone) for the silicone polymer-mix, a mixture of silicone polymer (S 10 or S15) and catalyst with chain extender (S3) is prepared and referred to as the reaction-mixture or impregnation mixture. Mixing the silicone polymer with the catalyst and chain extender starts the reaction of elongating the silicone molecules, thus over time silicone chain length increases which results in a more viscous impregnation reaction-mixture. Chain elongation is retarded at temperatures lower than -15°C. Therefore, a deep freezer at -15°C is used when impregnating with the reaction-mixture or when storing the reaction-mixture. A temperature of -25°C or lower is best.
The Biodur® products for silicone plastination include:
S10: Silicone polymer
S15: Silicone polymer of lower viscosity than S10 S3: Catalyst and chain extender (pre-mixed)
S6: Cross-linker
The basic steps of silicone plastination are specimen preparation, dehydration, degreasing, impregnation and curing.
Specimen preparation
Plan and Dissect: The specimen should be planned before starting the project. Consider how the final specimen should look and proceed with dissection to carry out the plan (Henry et al., 1997). The plan may be modified as needed or desired. If vessels are to be highlighted by filling the vascular system, injection should be done prior to dissection and sufficient time allowed for the injection material to solidify, since vessels are often damaged and leak during dissection. Keep the desired structures intact but remove excess fat and/or connective tissue. Begin as soon as practical to position (form) the specimen into the shape/position you desire for its final presentation .
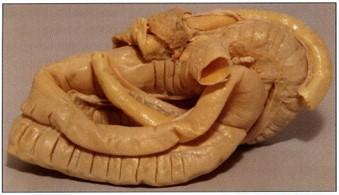
Figure 1. Hydrostatically, dilated ascending colon and cecum of equine foal. S10 Cold-temperature.
Hollow organs (chambers of the heart, airways, gastrointestinal and urogenital organs) should be flushed with running tap water to remove contents and cleanse the interior of the specimen. Appropriate sized cannulas or tubing, inserted via natural ports and secured in position, will aid and allow efficient flushing and dilation. Dilate gastrointestinal organs to the desired volume with water (Fig.I). As well, hydrostatically dilate hearts to over come systole and rigor (Tiedemann and von Hagens, 1982; Henry, 1987; Oostrom, 1987a).
Fixation:
Fixation is desirable, but not essential (Oostrom, 1987b; Smith and Holladay, 2001). Formalin with no additives is best. To maintain the shape of thin walled hollow structures and assure proper dilation during curing, it is beneficial to fix such specimens in their desired contour and dilated volume with 10% formalin. The best heart preparations must be hydrostatically dilated and then fixed by dilation (Henry, 1987; Oostrom, 1987b). Specimens may also be prepared without fixation. Eliminating the fixation step in some instances may yield a more flexible specimen. Specimens which autolyze rapidly (pancreas, brain) or are contaminated with pathogens should always be fixed (Riepertinger, 1988; Smith and Holladay, 2001). If fixation is used, perfusion of the vascular system or hollow parts of the specimen with 10% formalin, followed by immersion is an efficient method for fixation. Some routine fixation fluids may be used . However, those containing alcohols, glycerin, glycols and/or phenol should not be used. Such chemicals may yield a brittle specimen and/or may interfere with the curing process, as well as, precipitate on the specimen surface years later.
When using formalin for fixation, concentrations are calculated as follows: commercially available solutions of formaldehyde gas in water are typically 33%-37%. When preparing an X% solution for preservation, consider the 33-37% as a 100% stock solution, which will be diluted with water to the desired percent. Therefore, a 10% formalin solution is created by mixing 10pbv of the stock solution (33-37%) with 90pbv water. In the ideal case, specimens remain in the fixative just long enough for fixation. A shortened fixation time using a low percent of formalin may yield a specimen with more flexibility. However, even with longer fixation, the specimens may be plastinated and will still be useful. Hollow organs retain their shape better with harder fixation. Brains always need to be fixed hard.
Redissection:
During the process of plastination, due to inevitable artifacts, specimen quality likely will diminish. Therefore, only the best dissected specimens will yield superior results (Poorly dissected specimens introduced into the process = garbage output!). After fixation is complete, check the specimen and trim any loosened and/or unwanted fragments. Special attention should be given to the form/shape of the specimen and to surface detail of the specimen.
Cut edges (limbs for instance) should remain l-2cm longer than the desired final specimen. After curing, the correct length can be determined and the final cut made which will yield a neater surface. Small holes (2mm) can be drilled in long bones every few centimeters in obscure positions to allow better defatting of the medullary cavity of the bone. For better defatting, the marrow cavity can be flushed (water or ethanol) by introducing a small nozzle into one of the drilled holes.
Dehydration
Principles of dehydration: Dehydration replaces tissue fluid/water (both inter- and intra-cellular) with an organic solvent. This solvent must be miscible with water and preferably volatile enough to serve as a volatile intermediary solvent which is the key to the impregnation step Common dehydrating solvents include acetone and alcohols. Common volatile intermediary solvents include acetone and methylene chloride (dichloromethane) (MeCl).
Although alcohols are good dehydrating solvents, they are not suitable for use as the volatile intermediary solvent because their vapor pressure at -1S°C is too low to be extracted gradually and continually. Although methylene chloride (MeCl) is a superb volatile intermediary solvent, it is not miscible with water and therefore not a dehydrating solvent. For these reasons and others, acetone has become the universal dehydrating solvent for the plastination process although alcohols may be used. If alcohol is chosen for the dehydrant, after dehydration the specimen must then be saturated with acetone or MeCl to serve as the intermediary solvent.
During dehydration, some shrinkage always occurs. Shrinkage is usually less in long-term formalin-fixed specimens or specimens containing less fat. Shrinkage is greater in fresh tissue specimens and those containing an increased percentage of fat. Dehydration in -2S°C acetone decreases shrinkage because the water in the specimen freezes and stabilizes the form, structure and size of the specimen. Low temperature , -25°C, does not decrease the quality or rate of dehydration. This technique is known as "freeze substitution" and is the preferred method of dehydration for plastination (Schwab and van Hagens , 1981; Tiedemann and Ivie, 1988; Brown et al., 2002).
Preparation for dehydration: Before starting dehydration, be sure that glycerin, glycol or phenol, often components of embalming fluids, are not in the specimen. To remove these chemicals, immerse the specimen in 50% ethanol for seven days and stir the solution and specimens twice a day. After one week, rinse the specimen in running tap water for a few hours and then place it in a fresh 50% ethanol solution for seven more days and stir twice daily. After the second ethanol bath, rinse the specimen in tap water for one week to remove the ethanol. Ethanol removal is necessary as its specific gravity is the same as that of acetone. Specific gravity is used to determine acetone purity . Therefore, ethanol in the specimen will give a false increased purity reading of the acetone dehydration bath.
| Day 1 | Pre-cool specimens to 5°C over night. |
| Day 2 | Place specimens in an aliquot of -25°C acetone (>90%). 1:10 (specimen :acetone) ratio. |
| Day 9 | Measure & record purity of used acetone. Place the specimens into a fresh aliquot of new (99-100%) acetone (-25°C). |
| ·Day 16 | Measure & record purity of used acetone. Place the specimens into a fresh aliquot of acetone (-25°C). If purity is >95%, sit receptacle with specimens and acetone out to room temperature (RT) for degreasing. |
| Day 23 | Check acetone purity and color, as well as, fat color: a. If purity is >98% and fat is negligible, place specimens into the cold impregnation-mix.
b. If purity is <98% and fat is not opaque and the acetone is yellow, place specimens into a new aliquot of fresh acetone or MeCL |
| Day 30 | Check acetone purity and color, as well as, fat color: a. If purity is >98% and fat is negligible or opaque, place specimens into the cold impregnation-mix .
b. If purity is <98% and fat is not opaque, place specimens into a new aliquot of fresh RT acetone or MeCL |
| Day 30
+ X |
When acetone purity is >98% and specimen is adequately defatted, place specimens into the cold impregnation-mix. |
Specimens fixed in formalin without additives, need to be rinsed in tap water for two to four days to remove the formalin. If not carried out, formalin is leached out of the specimen into the acetone during dehydration . During acetone distillation, paraformaldehyde precipitate will form in the distillation coil and may eventually clog the coil.
Dehydration equipment and chemicals for dehydration :
Dehydration procedure: Precool the specimens to 5°C in tap water. After pre-cooling: Drain excess water from the specimens. Arrange specimens in an anatomical position in the specimen basket. Fill hollow structures/organs with cold acetone. Assure proper anatomical position. Do not attempt to over dilate as cold acetone freezes the specimens and will not allow further dilation.
Close the basket lid and submerge specimens into an aliquot of -2S°C acetone (90-100%) (Fig. 4) and place in the freezer. An acetone to specimen ratio of 10:1 is desirable and fool proof methodology.
After six days, check and record the purity of the acetone. Fill an appropriate sized cylinder with the used acetone, monitor temperature (warm or cool acetone as necessary), insert and read the acetonometer (Figs. 5, 6). Water tends to settle to the bottom of the receptacle .Therefore for an accurate purity reading, gently stir or agitate the used acetone prior to the purity reading. On day seven (the usual time needed for the acetone to equilibrate in the specimen and vat), check and record acetone purity . If this purity is the same as or similar to the purity on day six, raise the specimens and allow excess surface acetone to drip from the specimens. Caution, do not let the specimen surface become dry. Place specimens in a new aliquot of -25°C acetone and back into the freezer. Filter the used acetone and use for your next specimens or recycle/distill. If purity has decreased, monitor acetone purity daily until it remains the same and then change to new acetone.
Repeat procedure weekly until the acetone concentration in the dehydration bath remains >99%, which will also be the concentration in the specimen when equilibrium is reached after 7 days. At this point, dehydration is considered to be complete.
Principal: If pure acetone is used and a 1:10 specimen: acetone ratio has been maintained , a dehydrated specimen can be assured after 3 weekly changes. For large specimens it may be desirable to check purity again at 8 or 9 days to assure equilibrium has been reached.
Tip: Stirring or agitating the acetone/specimens daily may hasten dehydration with equilibrium resulting in 4 or 5 days.
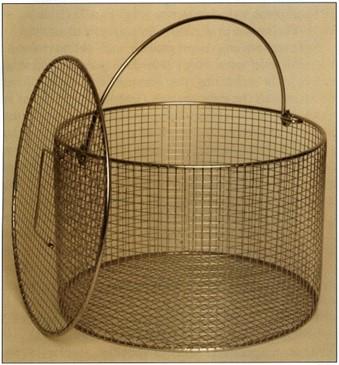 Figure 2. Specimen basket with lid |
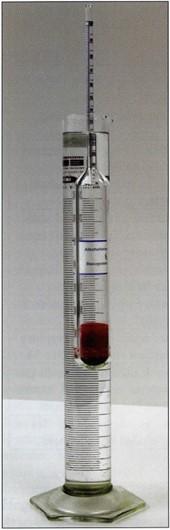 Figure 5. Monitoring acetone purity with acetonometer calibrated for +20°C. |
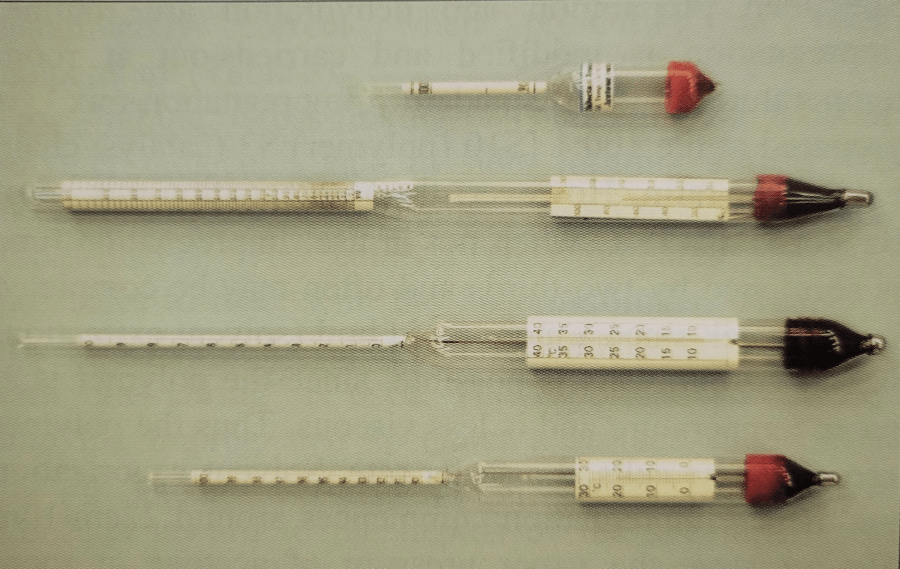 Figure 3. Assortment of acetonometers |
|
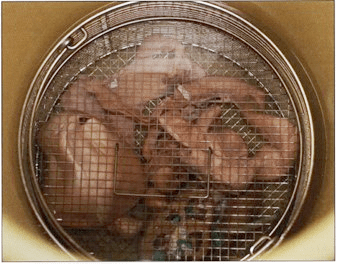 Figure 4. Dehydrating specimens in basket being transferred to fresh acetone. |
 Figure 6. Acetonometer registering 92%. |
Defatting (degreasing)
Defatting is the removal of excess fat/lipid from the specimen. Lipid does not impregnate well. Too much lipid may decrease specimen durability. Fat is translucent. However, nervous tissue should not be defatted since lipid (myelin sheath) is a major integral part of neural specimens. Excess defatting of neural specimens causes excessive, unacceptable shrinkage.
Procedure: When specimen acetone content/acetone purity is >95%, remove receptacle with the >95% dehydrated specimens from the deep freezer to room temperature (RT) for several days to weeks. For better safety, place receptacle with the acetone and specimens in or by a fume hood or room exhaust. The lid must fit tightly to avoid excess acetone loss by evaporation. Sealing the lid with plastic wrap (foil) will decrease evaporation loss of solvent. Stirring or agitation will likely hasten defatting, but is not necessary . Check weekly for color change of acetone from clear to yellow. Lipid turns the transparent acetone yellow. Transfer the specimens to a fresh, 98% - 100% acetone bath at room temperature to continue degreasing until the fat on the specimens has begun to loose its white color (becoming slightly opaque). Repeat the above procedure weekly, until the desired decrease in lipid content is reached (between white and opaque), 2-6+ weekly changes. When degreasing is judged complete, place the specimens in the silicone impregnation-bath. Place the fatty/yellow acetone in a -25°C freezer over night. The dissolved fat will congeal and much fat can be filtered from the acetone using a cloth/towel (Fig. 7). The defatted/filtered acetone is reused or distilled .
Methylene chloride [dichloromethane (MeCl)] is a powerful degreaser (Figs. 8, 9). Remove dehydrated specimens in their basket from the 99% acetone or alcohol. Drain excess dehydrant from specimens and place specimens in an appropriate aliquot of MeCl (enough to cover the specimens) for 2 - 7+ days, until the desired defatting is accomplished. MeCl quickly renders opaque fat to semitransparent. The defatted specimens are then placed into the impregnation-bath. MeCl is hazardous and must be used in a ventilated hood.
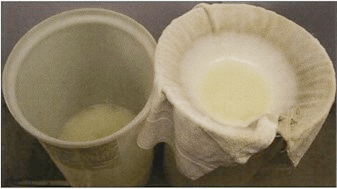 Figure 7. Degreasing acetone: Left - prefiltration; Right - Congealed fat after filtration |
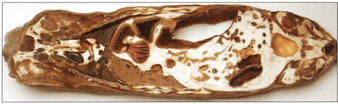 Figure 8. Degreasing : Horizontal section of caprine illustrating less than desirable acetone degreasing . S10 Cold temperature . |
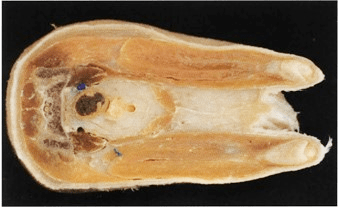 Figure 9. Transverse section of domestic feline at the level of the sacroiliac joint plastinated with the S10 cold temperature method illustrating optimum degreasing |
Forced impregnation
Principles of forced impregnation: Forced impregnation is the replacement of the volatile solvent in a biological specimen with a curable polymer. For this to occur, the volatile intermediary solvent must be miscible with the silicone polymer and must have a sufficiently high vapor pressure at -l5°C to be gradually, continuously and completely extracted during the impregnation step of the plastination process. As the principal of dehydration is to replace tissue water/fluid with acetone, the impregnation principal is to replace the volatile intermediary solvent (acetone or MeCl) with the reaction-mixture of S10/S3. However, the reaction mixture is too viscous to come to equilibrium with the solvent (acetone/MeCl). Therefore, a force (vacuum) is needed to get the reaction-mixture inside the specimen (hence the term forced impregnation).
| Day 1 | Load specimens and allow to equilibrate over night. |
| Day 2 | Start pump, slowly decrease pressure to atmosphere to: 22cm/9in Hg. |
| Day 3 | Slowly decrease pressure, 1/3 current pressure reading to: 14cm/5.5in Hg. |
| Day 4 | Slowly decrease pressure, 1/3 current pressure to: 9cm/3.5in Hg. Air bubbles form but not continually rising. |
| Day 5 | If no bubbles nsmg, slowly decrease pressure 1/3 current pressure to: 6cm/2in Hg. |
| Day 6 | If bubbles actively rising to the surface and bursting, do not decrease pressure. If no bubbles, slowly decrease pressure 1/3 current pressure to: 4cm/l .5in Hg. |
| Day 7 - Day X | Active bubbles, Do not decrease pressure! When bubbles cease or slow dramatically, decrease pressure 1cm Hg. |
The solvent filled (acetone/MeCl) specimens, in the specimen basket (Fig. 10), are submerged in the liquid silicone reaction-mixture in the vacuum kettle (plastination chamber) which is in the -15°C deep freezer. Applying vacuum to the reaction-mixture and the specimens, causes the solvent to vaporize/boil (at a known pressure) and leave the specimen, pass through the reaction-mixture and finally the vaporized solvent is pumped out through the vacuum pump exhaust. Vaporization of the acetone from the specimen leaves a tissue void or negative pressure inside the specimen and the reaction-mixture is drawn into the specimen. Hence, for this exchange to take place, there must be enough time for the viscous polymer-mixture to enter the cells of the specimen. Therefore, if the pump speed is too great and generates excess vacuum too quickly, too much acetone will leave and the tissue will collapse. The collapsed tissue will not allow the viscous reaction mixture to enter. This results in shrinkage and desiccation of the specimen. Hence, two fine adjustment needle-valves (Biodur® HI 14) are recommended for delicate control of pressure.
Impregnation equipment:
Reaction-mixture preparation : Biodur® S10 or S15 polymer is mixed with S3 (Catalyst with Chain extender) at 100:1 to prepare the reaction-mixture.
Thorough stirring is necessary, as per the manufacturer 's instructions for 10 minutes at a medium speed. Using an electric drill and stirrer (paint) is recommended. However an old fashioned stir stick will work. During mixing, the reaction-mixture will first tum opaque, then clear. This polymer-catalyst-mix should be deaerated. Place the mix in a vacuum chamber and reduce pressure to 30cm Hg. The air will boil out and then the reaction-mixture is ready to be used at -15°C for impregnation or to be stored in the deep freezer (preferably less than -25°C).
Vacuum adjustment: Speed of lowering the pressure in the vacuum chamber is dependent on temperature and/or viscosity (age) of the reaction-mixture. At higher temperature or lower viscosity, pressure can be lowered faster because of the decreased viscosity of the polymer-mix. The following scheme, is a rule of thumb for cold temperature (-15°C) impregnation. If in doubt, go slower, to prevent shrinkage.
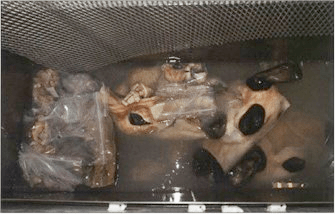 Figure 10. Dehydrated/degreased specimens in silicone polymer awaiting the grid to keep them submerged . S10 Cold-temperature. |
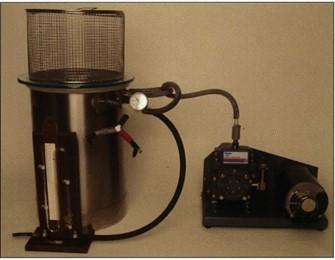 Figure 11. Impregnation setup. Vacuum kettle with basket, gauge and needle valves; vacuum pump; Bennert manometer |
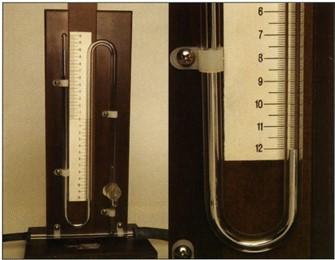 Figure 12. Bennert manometer reading 22cm (10cm+12cm) Hg pressure |
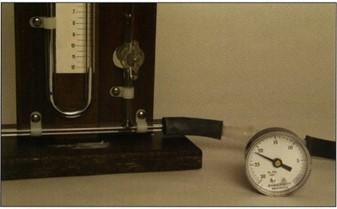 Figure 13. Bennert manometer reading 22cm Hg pressure and vacuum gauge showing 21.5 in gauge vacuum which is equal to 21.Scm Hg pressure. |
Impregnation regimen :
Day 1: The dehydrated and degreased specimens are taken from the solvent (acetone or MeCl), excess solvent is drained and the dehydrated solvent filled specimens are placed in the cold polymer reaction mixture. Submerge immediately to prevent solvent evaporation from the specimens and drying of their surface. Be sure all specimens are submerged, acetone-soaked specimens tend to float in the reaction-mixture. Hence, a grid to keep specimens submerged or a specimen basket to contain and submerge the specimens is necessary . Fill hollow organs with the cold reaction-mixture (heart chambers, gut etc.) or cut small ports in organs to prevent collapse and alteration of their shape during the lowering of pressure and to keep polymer in contact with all surfaces of the specimen (Fig. 14). Place the lid (glass) on the vacuum chamber and let the specimens accommodate/equilibrate over night.
Day 2: Turn on the vacuum pump and run for 10 minutes to warm to operational temperature. A hot pump will prevent condensation of acetone or MeCl vapors in the pump oil. Seal the chamber by closing the vacuum adjusting unit (needle valves) and applying the vacuum. Once the seal is accomplished, allow the pressure to lower slowly to 22cm/9in Hg. The Bennert mercury manometer will commence to measure pressure near this pressure level (Fig. 12). Stabilize pressure at this level by opening the needle valves incrementally and slowly, as needed, to stabilize the pressure near 22cm/9inches Hg). During this time small bubbles (trapped air) will rise through the polymer-mix. The goal from this point will be to: Daily, decrease pressure l/3 of the current daily pressure level until the solvent begins to vaporize.
Day 3: Slowly decrease pressure 1/3 of the current daily value (22cm/9in) to 14cm/5.5in Hg.
Day 4: Continue to slowly decrease pressure 1/3 the current daily value to 9cm/3.5in Hg.
Day 5: Continue to slowly decrease pressure 1/3 the current daily value to 6cm/2in Hg (as suggested in the table below). Daily decrease of pressure is continued until lcm bubbles continually rise to the polymer surface and burst.
The goal is to reduce pressure slowly (1/3 of the current reading) over a four to six day period to the point where the intermediary solvent will begin to vaporize/boil and leave the tissue at a slow steady rate. This will allow the reaction-mixture to enter the tissue void created by the vaporizing and exiting acetone. The pressure at which the solvent's boiling point is reached will vary with temperature and the solvent used. When at this point, 1 cm bubbles will arise continually to the surface and burst. Before this point a few sporadic bubbles will rise but likely sit on the polymer surface. For acetone, this steady extraction of solvent @ -l 5°C occurs around 3cm Hg pressure or l .5cm Hg pressure @ -25°C. For MeCl @ -15°C, extraction occurs at a higher pressure 7cm Hg pressure or around 3.5cm Hg pressure @ -25°C (Pereira-Sampaio et al., 2006).
Day 6: Pressure is now close to the boiling point of acetone. If bubbles are rising to the polymer surface and bursting, do not decrease pressure. However, if bubbles are not rising, slowly decrease pressure 1/3 of the current value daily to 4cm/ l.5in) as suggested in table 2 below and 1cm bubbles will likely rise to the polymer surface and burst.
Rule: If bubbles are actively rising to the top of the polymer and bursting, do not decrease pressure! It is better to decrease pressure too slow than too fast. Once bubbles are active (solvent vaporizing), decrease of pressure is not recommended until bubble activity slows. Bubbles should rise slowly but continually as simmering water, not as rapid boiling water. Acetone removal and hence polymer impregnation at cold temperature will take 3 to 5 weeks depending on volume of specimens and pump speed. **If bubbles cease to rise, slowly and incrementally close the needle valve to decrease pressure until active bubbles start to rise again. Usually it is necessary to lower pressure only l -2mrn Hg to continue active bubble production. It may take a few minutes after incremental valve closure before bubble production is observed.
Evacuation of acetone/solvent too quickly will result in incomplete impregnation of the specimen with the polymer-mix and shrinkage.
Impregnation is complete when the needle valves are closed and no more acetone bubbles appear at the surface of the reaction-mixture for several hours and/or near zero pressure has been maintained for a few days.
Specimen removal: Turn off vacuum pump. This is a good time to drain the oil from the pump while warm and refill with new oil. It may be beneficial (but not necessary) after this oil change to run the pump for one hour with the fresh oil and then drain and change the oil once more. This aids removal of any residue of acetone and/or MeCl from the pump. Vacuum oil is inexpensive. Vacuum pumps are expensive.
Open valves and allow vacuum chamber and specimens to return to atmospheric pressure slowly. A sudden release of pressure will allow the Hg in the Bennert manometer to rush to the top of the glass tube causing the glass to break. It may be beneficial to leave the specimens in the reaction-mixture for 24 hours to equilibrate.
Day 1: Raise specimen basket from the reaction mixture and let the excess polymer-mix drain from the specimens into the vacuum chamber. Turning the specimens a few times that day will allow more complete drainage of polymer-mix from the surface, crevices and hollow parts of the specimens. Initially, this may occur in the deep freezer. Specimens may be stored or drain indefmitely in the freezer if schedule does not permit manicuring of the specimens.
Day 2: Remove specimens from the freezer and allow draining to continue into a container at RT. This captured polymer-mix should be returned to the cold impregnation chamber daily.
Day 3+: Place specimens on absorbent paper. Turn, reposition/shape and dilate hollow specimens with air or absorbent toweling daily. They can continue to drain for several days to weeks at room temperature. Change absorbent paper as needed and wipe the surface of specimens and manicure daily.
Day 4 or X: Once the specimen is no longer oozing silicone, it is ready for gas curing (cross-linking).
Curing/Hardening/Cross-linking
During curing, the impregnation reaction-mix within the specimen is cross-linked and the specimen made dry. This is a two-step process consisting of chain extension and cross linkage of polymer.
| Day 1 | Bring specimens to atmospheric pressure and allow cold draining |
| Day 2 or longer | Bring specimens to room temperature to drain excess surface polymer. |
| Day 3 | Manicure specimen surface and dilate and/or position anatomically. Allow specimens to drain. |
| Day 4-X (Several Days or weeks) | Manicure specimen surface and dilate and/or position anatomically . Allow specimens to drain. At the appropriate time: Expose specimens to gas cure agent (S6) and manicure surface. |
| Day X plus 1 | Manicure surface and Expose specimens to gas cure. Follow fast cure regime from day 4 |
Chain extension: Chain extension of the silicone molecules is an end to end alignment, thus forming longer chains via the chain extender portion of the S3 impregnation-mixture which is now in the specimens. This first reaction, known as "pre-curing", results from the reaction of the S3 with the S10. This is also known as "slow cure" (Table 3). It is advantageous to pre-cure for at least two or three days. However, longer pre curing is even better and may yield more flexible specimens. Specimens may remain at RT for a few days to a few weeks to allow maximum chain extension. During this time the specimens must be positioned anatomically correct and dilated to assure correct position as chain extension progresses . Theoretically, chain extension starts when the S3 (catalyst & chain extender) and S10 polymer are mixed. However, this reaction is slowed dramatically by cold temperature (less than - l 5°C). The polymer reaction-mixture may be kept for a few years in the cold (less than -25°C). Longer chains result in more viscous polymer. At room temperature, the elongation occurs at an increased rate. In six to ten months, at RT, the reaction-mixture will become too viscous for impregnation. Therefore , it . is advisable to have the specimens positioned anatomically correct when pre-curing at room temperature (Table 3).
Cross-linking: Cross-linking or connecting the silicone polymer molecules side to side, forming a firm 3-D meshwork of the silicone polymer, is caused by the S6 (cross-linker). The catalyst (S3) prepares the S 10 molecules to react with the S6 cross-linker. The S6 is more reactive in its vaporized (gaseous) state, hence the term "gas curing" is used. The vaporized S6 diffuses onto the impregnated specimen's surface. The cross linking reaction starts on the specimen's surface and proceeds inward to the depths of the specimen (von Hagens, 1986; Weiglein & Henry , 1993). Larger specimens may take longer to cure. Cross-linking may be started soon after removal of the specimens from the deep freezer and polymer-mix with minimal draining time = fast cure (Table 4). However, it is desirable to let specimens drain a few days before gas curing. Fast cure at this timing will likely take at least one week to complete. Or cross-linking may be done after several weeks of draining and manicuring at room temperature. This is called pre-cure or "slow cure" (Table 3). After a long slow cure, cross-linking likely may take only one or two days.
Equipment for curing:
| Day 1 | Bring specimens to atmospheric pressure and allow cold draining. |
| Day 2 | Bring specimens to room temperature to drain excess surface polymer. |
| Day 3 | Manicure specimen surface and dilate or position anatomically. Allow excess polymer to drain from specimens. |
| Day 4 or Longer | Manicure surface. Expose specimens to gas cure agent (S6). |
| Day 5 | Manicure surface. Expose specimens to gas cure agent (S6). |
| Day 6 | Likely surface will be nearly dry. Manicure the surface and expose to S6. |
| Day 7 | Likely surface will be dry. Leave in gas chamber or enclose in bag to assure curing to the depths of the specimen. |
| Day 8 | Use specimen as desired or leave contained in the closed environment. |
Cross-linking regimen for fast cure: At the beginning of the week, it is beneficial to start early in the morning to manicure specimens preparing them for cross-linking (expose to S6). This will assure at the end of the week the surface of the specimen is cured with no silicone oozing .and a dry surface.
Dilate all specimen cavities that are collapsed, using compressed air or toweling to restore normal anatomical size and shape. Slowly inject 0.1 to 0.3ml S6 into the compressed air hose/tubing to start curing of the interior of the specimen. This will help establish its anatomical shape during the curing process. Repeat S6 injection via the tubing daily as often as necessary.
Place the desiccant (CaS04) and specimens into the curing chamber on absorbent paper. Assure normal anatomical shape and position of the specimen. Place a small container of S6 (10-20cc) in the curing chamber. Close chamber and vaporize S6 via an aquarium pump or fan for a few minutes 2 times a day.
Curing starts on the specimen's surface as the S6 vapor contacts the specimen. The first day it is necessary wipe the surface every 2-3 hours and tum the specimen to prevent silicone drips or runs. After that, manicure the surface and tum the specimens twice a day. The specimens may be placed in the deep freezer overnight to slow the curing process if seeping of polymer has been excessive. The next morning (or when it is convenient) the specimens are placed back in the curing chamber.
After a few days, depending on surface concentration of S6 on the specimen surface and the degree of chain extension, the surface of the specimen will become tacky and then dry. Once the surface is sealed (dry), the specimen may be used. However , the interior of the specimen may not be cured. The specimen must be stored in an airtight plastic bag or in the curing chamber to assure complete internal hardening of the polymer and hence eliminate oozing of polymer later on. Avoid direct contact of the liquid S6 with the specimen. Depending on the size of the specimen this final deep curing may take a week or two. After thorough curing, the specimen is ready for permanent use (Table 4).
 Figure 14. Collapsed, dilated human heart. S10 Cold temperature. |
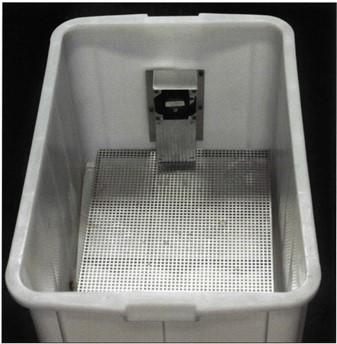 Figure 15. Curing chamber with spark-proof ventilator. |
 Figure 16. Human lung. S10 Cold-temperature. |
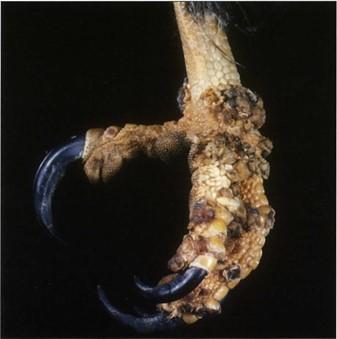 Figure 17. Pathological specimens. Eagle foot/pes with avian pox. S 10 Cold-temperature |
 Figure 18. Boa constrictor. S10 Cold-temperature. |
 Figure 20. Noncollapsed , nondilated human heart. S 10 Cold tempertaure. |
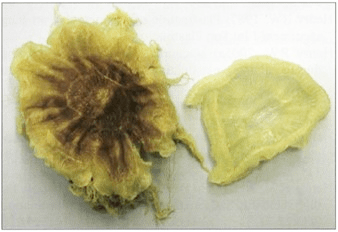 Figure 21. Jelly fish. SlO Ambient-temperature technique |
Biodur® S10 plastinated specimens serve as the gold standard among silicone plastinated specimens as well as specimens preserved by other mechanisms . Surface clarity is superb. Thinner specimens exhibit flexibility. All specimens are durable, free of offensive odor and dry. They may be used as teaching aids both in the class room and the clinical setting. They may be used as a library of specimens for normal, exotic and pathological anatomy. They are irreplaceable public relation tools.
Specimens produced by the Biodur® S10 silicone methodology are of superb quality (Figs. 1, 8, 9, 14, 16- 21). Surface clarity is perfect and some flexibility is associated with thinner specimens. All specimens are durable, free of offensive odor and dry. They may be used as teaching aids both in the class room and the clinical setting (Bickley et al., 1981; Latorre et al., 2001). They have been used as a library of specimens for normal (Figs. 1, 8, 9, 14, 18-20), exotic (Figs. 17-19) and pathological anatomy (Fig. 16, 17) (Bickley et al., 1981; Latorre et al., 2001, Sakamoto et al., 2006).
Note concerning impregnation and polymer level: Polymer level over 50cm/20in deep poses a potential problem for extracting the intermediary solvent from the depths of the polymer-mix. Intermediary solvent is more difficult to extract from the specimen due to the pressure exerted by the depth of polymer overlying the specimen (Henry and Thompson, 1992; Henry, 2005a; 2005b; von Horst, 2006). Therefore, depth of polymer should not be excessive. A stronger pump will be necessary for deep polymer reservoirs.
To efficiently utilize available acetone, less that pure acetone (>80%) may be used for the first and second acetone baths. However, this will necessitate more changes of acetone. Principal: Always place specimens into acetone of a higher percent than that from which they were taken.
The Biodur® S10 or S15 polymer and Biodur® S3 catalyst-mix may also be used for impregnation at ambient temperature. The protocol is similar to the above description for cold impregnation. The exception is that impregnation is carried out at room temperature . Specimen preparation and dehydration are routine. Impregnation is modified and carried out at room temperature. The standard impregnation-mix is prepared at the 100:1 [S10 (polymer):S3 (catalyst/chain extender)] ratio. However, the impregnation-mix must be stored at -25°C when not in use. Impregnation time is shortened by two-thirds and often may be completed in one week since a more rapid boil (solvent extraction) is carried out. This is possible, since the polymer is at room temperature and is less viscous. Thus the polymer can enter the cells at a faster rate. Solvent vaporization and hence impregnation commences around 22cm/10 in Hg pressure, the vapor pressure of acetone at room temperature (25°C). MeCl's vapor pressure at RT is higher (43cm/17 in Hg) and hence impregnation of specimens saturated with MeCl will commence at a higher pressure, 43cm Hg pressure and hence this solvent will be removed easier than acetone. Vapor pressure of the solvent is proportional to temperature .
Draining of excess impregnation-mix is more rapid since the polymer is less viscous. Therefore, gas cure may commence the same day as impregnation ends. Gas cure may be via either slow or fast methodology. However, longer pre-cure is recommended. The polymer-mixture is stored at -25°C or colder immediately upon completion of impregnation and draining of the specimens.
Ambient-temperature impregnated Biodur® S10 silicone plastinated specimens have the same ultimate quality as that of cold Biodur™ S10 silicone plastinated specimens. Surface clarity is perfect and some flexibility is associated with thinner specimens (Fig. 16). All specimens are durable, free of offensive odor and dry. They make excellent teaching aids both in the class room and the clinical setting (Bickley et al., 1981; Latorre et al., 2001). As they are accumulated, they can become a fantastic library of specimens for normal, exotic and pathological anatomy.
Bickley HC, von Hagens G, Townsend FM. 1981: An improved method for the preservation of teaching specimens. Arch Pathol Lab Med 105:674-676.
Bickley HC, Donner RS, Walker AN, Jackson RL. 1987: Preservation of tissue by silicone rubber impregnation. J Int Soc Plastination 1(1):30-39.
https://doi.org/10.56507/XVDP9663
Brown MA, Reed RB, Henry RW. 2002: Effects of dehydration mediums and temperature on total dehydration time and tissue shrinkage. J Int Soc Plastination 17:28-33.
https://doi.org/10.56507/XNQM4606
Henry RW. 1987: Plastination of an integral heart-lung specimen. J Int Soc Plastination 1(2):20-24.
https://doi.org/10.56507/KQKI2988
Henry RW. 2005a: Vacuum and vacuum monitoring during silicone plastination. Abstract presented at The 8th Interim Conference on Plastination- Lake Ohrid, Macedonia, July 5-11, 2005. J Int Soc Plastination 20:37.
Henry RW. 2005b: Silicone impregnation and curing. Abstract presented at The 8th Interim Conference on Plastination- Lake Ohrid, Macedonia, July 5-11, 2005. J Int Soc Plastination 20:36-37 .
Henry RW, Thompson JR. 1992: Vacuum, vacuum gauges and manometers. Abstract presented at The 6th International Conference on Plastination -Kingston, Ontario, Canada - July 1992. J Int Soc Plastination 6:10- 11.
Henry RW, Nel PPC. 1993: Forced impregnation for the standard S10 method. J Int Soc Plastination 7(1):27-31.
https://doi.org/10.56507/WUXP9436
Henry RW, Janick L, Henry C. 1997: Specimen preparation for Silicone Plastination . J Int Soc Plastination 12(1):13-17.
https://doi.org/10.56507/HVSK9838
Latorre R, Vaquez JM, Gil F, Ramirez G, L6pez-Albors 0, Orenes M, Martinez-Gomariz F, Arencibia A. 2001: Teaching anatomy of the distal equine thoracic limb with plastinated slices. J Int Soc Plastination 16:23-30.
https://doi.org/10.56507/ACRF7155
Oostrom K. 1987a: Plastination of the heart. J Int Soc Plastination 1(2):12-19.
https://doi.org/10.56507/YWZL8112
Oostrom K. 1987b: Fixation of tissue for plastination: General principles . J Int Soc Plastination 1(1):3-11.
https://doi.org/10.56507/WLZH2223
Pereira-Sampaio MA, von Horst C, Marques-Sampaia BPS, Smodlaka H, Favorito LA, Sampaio FJB, Henry RW. 2006 : Theoretical considerations and preliminary studies on alcohol as an intermediary solvent. Abstract presented at The 13th International Conference on Plastination - Vienna, Austria, July 2 to 7, 2006. J Int Soc Plastination 21 :27-28.
Riepertinger A. 1988: Fixation of the brain for plastination: Special considerations. J Int Soc Plastination 2(1):8-12.
https://doi.org/10.56507/XMBX2600
Sakamoto Y, Miyake Y, Kanahara K, Kajita H, Ueki H. 2006: Chemically reactivated plastination with Shin Etsu Silicone KE-108 . J Int Soc Plastination 21: 11- 16.
https://doi.org/10.56507/BSRA2644
Schwab K, von Hagens G. 1981: Freeze substitution of macroscopic specimens for plastination. Acta Anat 111:139-140.
Smith BJ, Holladay SD. 2001: Risk factors associated with plastination: II. Infectious agent considerations. J Int Soc Plastination 16:14-18.
https://doi.org/10.56507/GFGP6952
Tiedemann K, von Hagens G. 1982: The technique of heart plastination . Anat Rec. 204:295-299.
https://doi.org/10.1002/ar.1092040315
Tiedemann K, lvic-Matijas D. 1988: Dehydration of macroscopic specimens by freeze substitution m acetone. J Int Soc Plastination 2(2):2-12.
https://doi.org/10.56507/SCLL2742
Ulmer D. 1994: Fixation: The key to good tissue preservation. J Int Soc Plastination 8(1):7-10.
https://doi.org/10.56507/OEVY7072
von Hagens G. 1979a: Impregnation of soft biological specimens with thermosetting resins and elastomers. Anat Rec 194(2):247-255.
https://doi.org/10.1002/ar.1091940206
von Hagens G. 1979b: Emulsifying resins for plastination. Der Praparator 25(2):43-50.
von Hagens G. 1986: Heidelberg Plastination Folder: Collection of technical leaflets for plastination . Biodur Products, Rathausstrasse 18, Heidelberg, 69126. pp 2:1-6, 3:1-13, 4 :1-20, 5:1-17.
von Hagens G, Tiedemann K, Kriz W. 1987: The current potential of plastination. Anat Embryo} 175(4):411-421.
https://doi.org/10.1007/BF00309677
von Horst, C. 2006 : Influence of solvent vaporization in plastination . Abstract presented at The 13th International Conference on Plastination - Vienna, Austria, July 2 to 7, 2006. J Int Soc Plastination 21:27.
Weiglein AH, Henry RW. 1993: Curing (Hardening, polymerization) of the polymer - Biodur S10. J Int Soc Plastination 7(1):32-35 .
https://doi.org/10.56507/ABNZ7085
Product distribution:
Biodur™ Products, Drs. Gunther von Hagens and Angelina Whalley , Rathausstrasse 11, 69126 Heidelberg, Germany. www.biodur.de, Ph: (49) 6221 3311-11, Fax: (49) 6221 3311-12 .