Department of Comparative Medicine, College of Veterinary Medicine, University of Tennessee, Knoxville, TN, USA.
With the emergence of the Biodur® S10 plastination process as the gold standard for preservation of biological tissue, similar products and processes have been developed. The North Carolina cold-plastination process is a modification of such. The alteration of the technique is when the chain extender is used: From during impregnation to prior to curing. The NCSX and XI polymers and additives (catalyst, chain extender, cross-linker) yield exceptionally beautiful and aesthetically pleasing plastinated specimens of similar quality to Biodur® specimens. The North Carolina Cold-temperature technique is used for whole cadavers, organs or portions thereof.
plastination; silicone; polymer; NCSX; NCSXI; NCSIII; NCSV; NCSVI
Robert Henry, Department of Comparative Medicine, College of Veterinary Medicine, University of Tennessee, Knoxville, TN, USA. Telephone: (865) 974 - 5822; Fax: (865) 974 - 5460; E-mail: rhenry@utk.edu

![]()


Silicone plastination replaces tissue fluid with a curable polymer. Several other silicone polymers and additives, other than the Biodur® products, have been developed to carry out the silicone plastination process (Henry et al., 2001). The basic ingredients of each process are well known products of the silicone industry (Henry et al., 2002). Principally, methods of placing the silicone into the biological specimen are similar: Using an intermediary solvent (acetone) along with a decrease in pressure to remove the acetone (von Hagens, 1986; Henry and Nel, 1993; Henry, 2004). Removal of the solvent produces a tissue void and the polymer-mix is drawn into the cells. Each of these variants of the cold temperature silicone plastination technique produces high quality durable plastinates.
Chemicals used in this "generic" silicone-plastination process are similar to the ones used in the Biodur® S10 plastination process:
The general steps of silicone plastination are described earlier in this volume. This manuscript will highlight the differences with respect to this generic process which occur with impregnation and curing of the plastinated specimens.
The basic steps of plastination are utilized for each plastination technique : Specimen preparation, dehydration and defatting (degreasing)
Specimen preparation, dehydration and defatting are similar for all plastination methods. However, it is necessary to prepare high quality dissected specimens to produce excellent plastinates . Please refer to: "The SI0/15 Plastination Technique" for the basic, as well as, additional and more in depth information for specimen preparation and cold dehydration.
North Carolina products for silicone plastination: NCSX (lowest viscosity): Silicone polymer NCSXI (low viscosity): Silicone polymer NCSIII: Catalyst NCSV: Chain extender NCSVI: Cross-linker
Replacing the volatile solvent (acetone/methylene chloride) in a biological specimen or tissue with a curable polymer. For this to occur, the chemicals must meet similar criteria as the chemicals used in the "Biodur® S10 Cold-temperature Technique".
Impregnation equipment: Similar to Biodur® S10 requirements - Vacuum chamber (kettle), Vacuum pump (oil preferred), Vacuum gauge, Vacuum tubing, Needle valves, Manometer, Specimen basket and Deep freezer.
Preparing the reaction-mixture: NCSX or NCSXI polymer is thoroughly mixed with NCSIII (Catalyst) at 100:20-30 to prepare the impregnation reaction mixture . The reaction-mixture is stored lower than - 25°C and used for impregnation in a - l 5°C deep freezer. The impregnation-mix is not stable at room temperature and will become too viscous over a 6-10 month interval if stored and/or used at room temperature continually.
Adjusting the vacuum: Pressure is generally lowered by closing the air intake valves which are located in line between the vacuum kettle and pump. Speed of lowering the pressure in the vacuum chamber is slow and comparable to the Biodur® S10 process. The NCSX and XI polymers have a lower viscosity than Biodur® S10 and hence, impregnation may be faster. The impregnation-mixture is reactive and therefore needs to be kept at cold temperature. When monitoring bubble formation, a slow boil is recommended . As with any plastination procedure, if in doubt, reduce pressure slower, to prevent incomplete impregnation which will result in shrinkage.
Impregnation regimen: Similar to the Biodur® S 10 Cold-temperature technique (Table 1).
Rule: If bubbles are actively rising to the top of the polymer and bursting, do not decrease pressure! It is better to decrease pressure too slow rather than too fast.
| Day 1 | Load specimens. Allow to equilibrate over night. |
| Day 2 | Start pump, Decrease pressure to: 18crn/7in Hg, by closing the needle valves incrementally. |
| Day 3 | Decrease pressure to: 8crn/3in Hg, by closing the needle valve incrementally. |
| Day 4 | Bubbles form but do not continually rise. Decrease pressure to: 5crn/2in Hg, by closing the needle valve incrementally. |
| Day 5 | If bubbles actively rise to the surface and burst, do not decrease pressure. If no bubbles nsmg, decrease pressure to: 4crn/1 .5in Hg. |
| Day 6 | If bubbles actively rise to the surface and burst, do not decrease pressure. If no bubbles nsmg, decrease pressure to: 3crn/ lin Hg. |
| Day 7 - Day X | Likely active bubbles, do not change pressure! When bubble formation slows dramatically or ceases, decrease pressure lcm Hg. |
Once bubbles are active, solvent vapor pressure has been reached. More pressure decrease is not recommended until bubbling activity slows or nearly ceases. Bubbles should rise slowly but continually as simmering water, not as rapid boiling water. Acetone removal and hence polymer impregnation at cold temperature will likely take 3 to 5 weeks depending on volume of specimens and pump speed. **If bubbles cease to rise and the pressure is >3mm Hg, close the needle valve to decrease the pressure until active bubbles start to rise again. Usually it is necessary to lower pressure only 1 mm to resume active bubble production (vaporization of solvent); but it may take a few minutes before bubble production is observed.
Evacuation of acetone/solvent too quickly will result in incomplete impregnation of the polymer-mix into the specimen and result in shrinkage.
Impregnation at -15°C is complete when needle valves are closed and no more acetone bubbles appear at the surface of the reaction-mixture for several hours and/or near zero pressure has been maintained for a day. Specimen removal: Similar to Biodur® S 10 Cold technique . Drain excess surface polymer back into the impregnation kettle.
Equipment for curing:
Curing, hardening and cross-linking the reaction-mix within the specimen to make the specimen dry is a two step process.
Chain extension of the silicone molecules is end to end linkage of the silicone molecules. After the impregnated specimens have been drained of their excess polymer and wiped, the chain extender (NCSV) is applied via vaporization of the NCSV in a closed environment for two or three days. During this time, longer silicone molecules are forming. After exposure of NCSV to the specimens, the specimens should remain at room temperature for a few days to a few weeks to allow maximum chain extension (slow cure). During this time the specimens must be positioned anatomically correct and dilated to assure correct position as chain extension progresses.
Cross-linking or connecting the silicone polymer molecules side to side, thus forming a firm 3-D meshwork of the silicone polymer, is caused by the NCSVI component. This reaction and process is similar to that of Biodur® S 10 cold-technique. The drained and chain lengthened specimens are place in a closed environment with 10 - 20ml of NCSVI (cross-linker). The NCSVI is volatilized for 5 -10 minutes which commences the cross-linking of the silicone on the surface of and in the specimen.
| Day 1 | Bring specimens to atmospheric pressure and allow to drain in the cold chamber. |
| Day 2 | Bring specimens to room temperature to drain. Return drained impregnation-mix to freezer daily. |
| Day 3 | Allow specimens to drain. Manicure specimen surface and dilate or position anatomically . Apply the chain extender NCSV via vaporization. |
| Day 4 | Expose specimens to NCSV chain extender and manicure surface. |
| Day 5 | Allow specimens to slow cure for days to several weeks. |
| Day 6 or longer | Expose specimens to gas cure NCSVI and manicure Surface. |
| Day 7 or X+1 | Surface will be nearly dry. Manicure the surface and expose to NCSVI. |
| Day 8 or X+2 | Likely surface will be nearly dry. Manicure the surface and expose to NCSVI. Leave in gas chamber or enclose in plastic bag or container to assure curing to the depths of the specimen. |
| Day 9 or X+3 | Likely surface will be dry. Leave in gas chamber or enclose in plastic bag or container to assure curing into the depths of the specimen. |
| Day 10 or X+ 4 | Use specimen as desired or leave contained in the closed environment. |
The NCSX or XI cold-impregnated specimens have the same great qualities of the Biodur® S10 cold technique specimens, including clarity of surface detail (Fig. 1). They are dry, durable, free of offensive odors and thin specimens exhibit some flexibility . North Carolina plastinated specimens are the real specimen and not a model (Figs. 1-3). NC cold-temperature specimens are used as teaching aids both in the class room and in clinics. When assembled in a group, they make an impressive library of specimens of normal, exotic and pathological anatomy. Silicone preserved specimens are useful in research, especially to preserve findings.
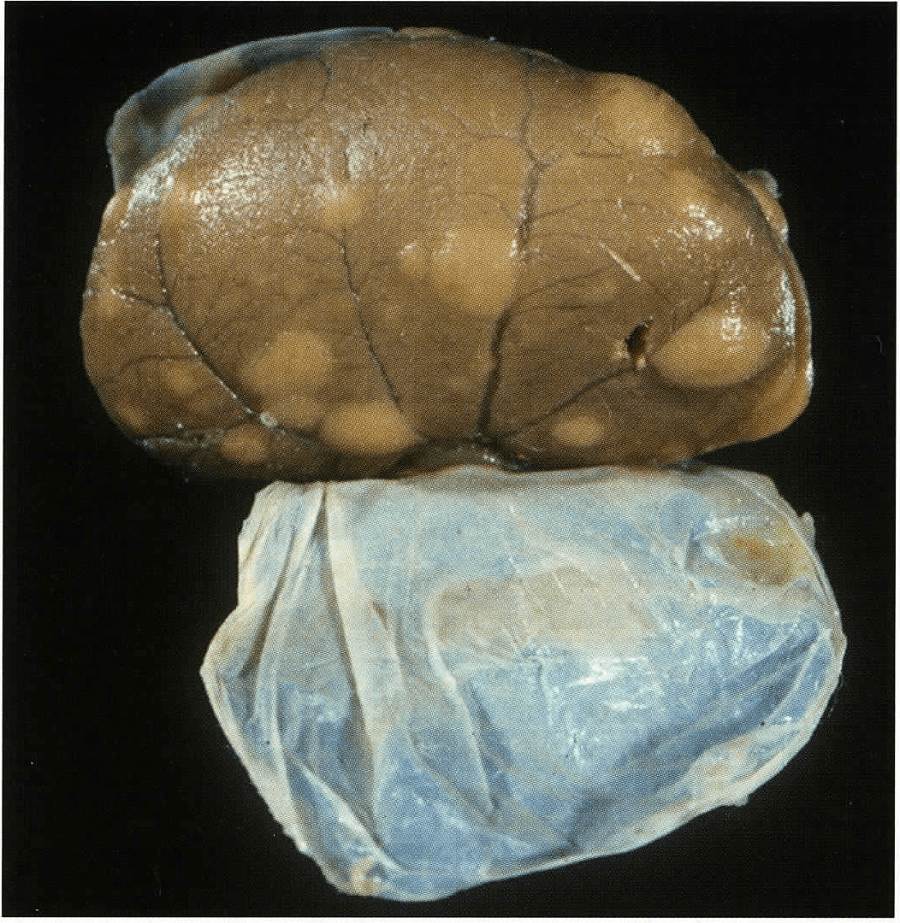 Figure 1. Pathological specimen: Cat Kidney Lymphosarcoma metastasis. North Carolina Cold-temperature technique. |
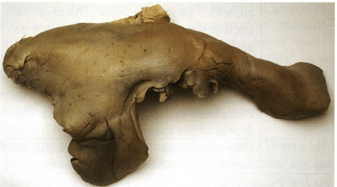 Figure 2. Camel liver, parietal surface. North Carolina Cold temperature technique. |
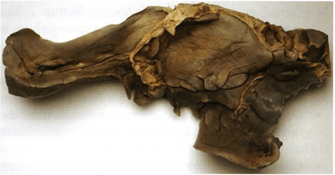 Figure 3. Camel liver, visceral surface. North Carolina Cold temperature technique |
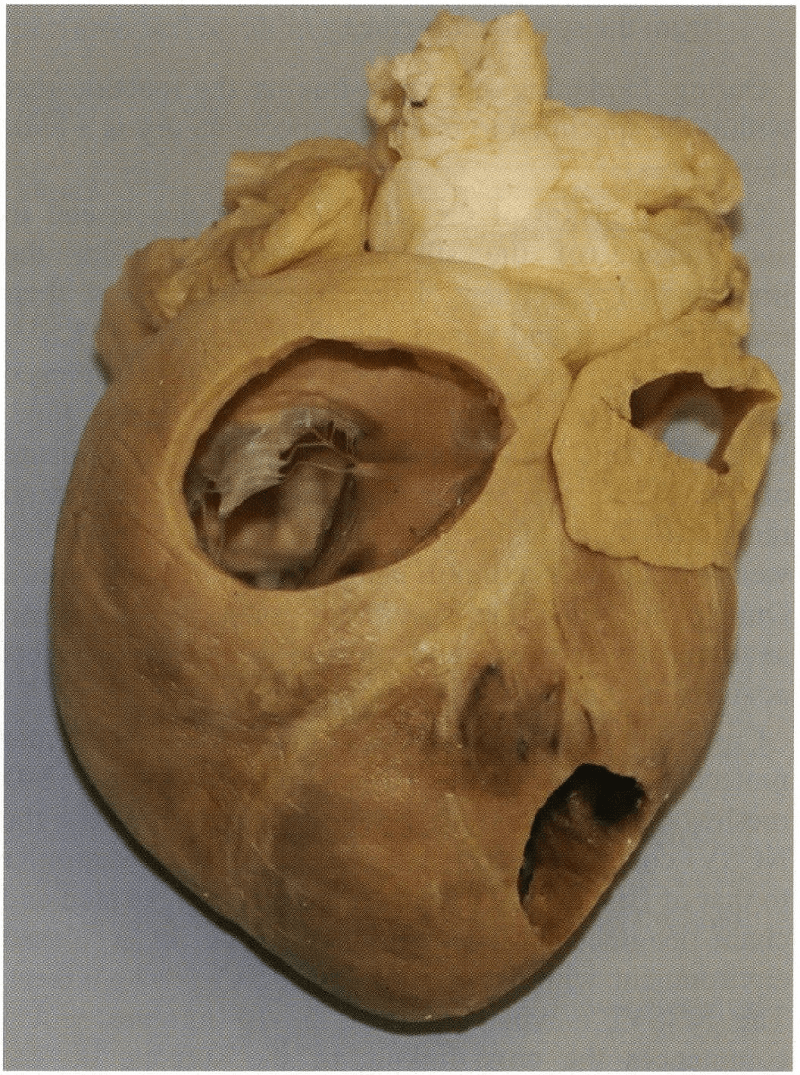 Figure 4. Dog heart auricular surface. North Carolina Ambient-temperature technique. |
NCSX or NCSXI cold (Figs. 1-3) or ambient temperature (Fig. 4) impregnated specimens have the great qualities of specimens produced by the Biodur® S10 ambient and cold-techniques, as well as superb clarity of surface detail (Smodlaka et al., 2005). They are dry, durable and free of offensive odors. As well, flexibility is inversely proportional to specimen thickness. Both cold and ambient-temperature specimens have been used as teaching aids both in the class room and the clinical setting (Latorre et al., 2001). Also, specimens have been used to compile a library of specimens for normal, exotic and pathological anatomy (Henry, 2005a; Sakamoto et al., 2006) and in research.
It should be understood that in cold, impregnation, using a deep pool of polymer >40cm, makes it difficult to get the pressure low enough for the solvent (acetone) to vaporize from the bottom specimens (Henry and Thompson, 1992; Henry, 2005b). The departing bubbles have to overcome the weight of the overlying polymer (von Horst, 2005). Therefore impregnation should be monitored closely.
The NCSX or XI polymer and NCSIII catalyst may also be used for impregnation at ambient-temperature . The protocol is similar to that of the "Biodur® S10 ambient-temperature technique" (von Hagens, 1986). Impregnation can be completed in one week . The same precaution with the polymer impregnation-mixture must be adhered to. After impregnation , the mix must be returned to at least a minimum of a -25°C freezer to minimize thickening of the impregnation reaction-mix .
Henry RW. 2004: Principles of plastination. Abstract presented at The 12th International Conference on Plastination, Murcia, Spain July 11-16, 2004. J Int Soc Plastination 19:5-6.
Henry RW. 2005a: Teaching with plastinated specimens in veterinary medicine. Abstract presented at The 8th Interim Conference on Plastination- Lake Ohrid, Macedonia, July 5-11, 2005. J Int Soc Plastination 20:38- 39.
Henry RW. 2005b: Vacuum and vacuum monitoring during silicone plastination. Abstract presented at The 8th Interim Conference on Plastination- Lake Ohrid, Macedonia, July 5-11, 2005. J Int Soc Plastination 20:37.
Henry RW, Thompson JR. 1992: Vacuum, vacuum gauges and manometers. Abstract presented at The 6th International Conference on Plastination -Kingston, Ontario, Canada - July 1992. J Int Soc Plastination 6:10- 11.
Henry RW, Nel PPC. 1993: Forced impregnation for the standard S10 method. J Int Soc Plastination 7(1):27-31.
https://doi.org/10.56507/WUXP9436
Henry RW, Reed RB, Henry CL. 2001: "Classic" silicone processed specimens vs "New formula" silicone plastinated specimens: A two year study. J Int Soc Plastination 16:33.
Henry RW, Seamans G, Ashburn RJ. 2002: Polymer chemistry in silicone plastination. Abstract presented at The 11th International Conference on Plastination, San Juan, Puerto Rico, July 14-19, 2002. J Int Soc Plastination 17:5-6.
Latorre R, Vaquez JM, Gil F, Ramirez G, L6pez-Albors 0, Orenes M, Martinez-Gomariz F, Arencibia A. 2001 : Teaching anatomy of the distal equine thoracic limb with plastinated slices. J Int Soc Plastination 16:23-30 .
https://doi.org/10.56507/ACRF7155
Sakamoto Y, Miyake Y, Kanahara K, Kajita H, Ueki H. 2006: Chemically reactivated plastination with Shin Etsu Silicone KE-108. J Int Soc Plastination 21: 11- 16.
https://doi.org/10.56507/BSRA2644
Smodlaka H, Latorre R, Reed RB, Gil F, Ramirez G, Vaquez-Auton JM, L6pez-Albors 0, Ayala MD, Orenes M, Cuellar, Henry RW. 2005 : Surface detail comparison of specimens impregnated using six current plastination regimes. J Int Soc Plastination 20:20-30.
https://doi.org/10.56507/FIHG2408
von Hagens G. 1986: Heidelberg Plastination Folder: Collection of technical leaflets for plastination . Biodur Products, Rathausstrasse 18, Heidelberg, 69126. pp 2:1-6, 3:1-13, 4:1-20, 5:1-17.
von Horst, C. 2006: Influence of solvent vaporization in plastination. Abstract presented at The 13th International Conference on Plastination - Vienna, Austria, July 2 to 7, 2006. J Int Soc Plastination 21 :27.
Product distribution:
Silicone Inc., High Point, NC, USA. Distributed by : RW Henry, 1455 A. R. Davis Road, Seymour, TN 37865, USA. rhenry@utk.edu, Ph: (865) 982 - 4354.