1 Department of Anatomy, Dalian Medical University, Dalian, P. R. China
2 Dalian Hoffen Bio-Technique Co. Ltd., Dalian, P. R. China
Plastination is a method of biological preservation. Sheet plastination has relevance in education and research. Both epoxy and polyester sheet plastination are currently used. P45 is a polyester plastination technique. P45 sheet plastination produces an intact, semi-transparent anatomical structure, with well highlighted connective tissue. The technology comes at a low cost; it’s easy to produce, and easy to handle. We present here an updated protocol for the P45 polyester plastination technique.
plastination; sheet plastination; polyester method; body slices; polyester resin; P45 technique
Hong-Jin Sui. Tel.: +8613904287577; Email: suihj@hotmail.com

![]()


Plastination is simply the process of replacing water and lipid molecules from biological tissues with curable polymer. Sheet plastination was developed for the preservation of body slices, and has been extensively used over the past decade as a teaching and research tool (Thomas & Steinke, 2004; Sora & Gender-Strobl, 2007; Ottone et al., 2018). The E12 method is a sheet plastination technique that uses Epoxy resin for impregnation, while P35 and P40 sheet plastination utilize polyester for impregnation (Latorre et al., 2004). The E12, P35, and P40 sheet plastination methods were invented by Gunther von Hagens (von Hagens et al., 1987). The P45 sheet plastination method uses polyester for impregnation, and was invented by Hong-Jin Sui in 2003, and patented in China in 2006 (Sui, 2006). All of these sheet plastination techniques utilize forced impregnation and casting between glass plates. The techniques for the different sheet plastination methods are similar. However, E12, P35 and P40 use a flat chamber technique, while P45 uses an open vertical chamber technique. Another difference in technique is in the curing process: unlike the other methods, the P45 technique utilizes warm water for curing. This article presents an update of the P45 slice plastination technique.
The methods have been previously described by Gao et al. (2006) and Sui & Henry (2007). The P45 plastination technique can be divided into four basic steps: specimen preparation and slicing, dehydration, impregnation, and curing.
Specimen preparation and slicing
Equipment needed for specimen preparation and slicing: bandsaw, grids and screen, wood or metal box of appropriate size (see below).
Procedure for specimen preparation and slicing
Fresh or fixed tissue specimens can be processed. Formalin fixation may reduce or eliminate any potential biohazard, but may affect the color of the specimen. Nevertheless, fixing the specimens can be done before or after slicing.
The specimen is first frozen in an ultra-cold deep freeze at -70° C for about two days to two weeks, depending on the size of the specimen. Freezing the specimen allows for easy and stable slicing of the specimen. Before freezing, any undesirable tissue on the surface of the specimen can be removed, for example trimming of the hair, etc. After freezing, the specimen is further enhanced for slicing by embedding it in a polyurethane block.
Procedure for embedding in polyurethane
An appropriate wooden or metal box is used. The box is first lined with a plastic sheet for protection against the polyurethane. The specimen is positioned appropriately in the middle of the box, allowing a gap at the perimeter. The cutting line should be marked, with the specimen placed in the correct position, depending on the type of section desired, i.e. coronal, sagittal, or horizontal, etc. The polyurethane mixture is poured into the box, around the specimen. The polyurethane is then allowed to rise, foam and solidify. The specimen is then ready to be sectioned.
Slicing
Excess polyurethane is first trimmed off. The specimen is then cut into smaller sections of about 2-3 mm thickness, by first setting the guide stop of the bandsaw, and then slicing the specimen. The tissue lost as tissue dust between adjacent slices due to the blade thickness is approximately 1 mm thick. A bandsaw with appropriate blade thickness, and saw teeth size and inter-distance should be utilized. We use a 3/4 teeth blade, which means there is a larger tooth after each three smaller one. The size of the selected blade depends upon the size of the specimen: the bigger the size of specimen, the bigger the teeth.
Slices are placed on a polyethylene grid, with a cotton fiber screen. The grid should be acetone resistant. The sawdust on the sliced sections is removed with stream of gently running water, or by carefully scraping it off with a blunt knife. It is not necessary to keep the slices frozen during this stage. The grids with their washed slices are stacked and then tied with twine to hold each stack as a unit. The stack should be as small and portable as possible for easy transfer during the dehydration step. The stacked unit is then transferred into the first cold acetone (-25° C) bath or a fixative bath.
Fixation and Bleaching
This is an optional step. The slices can be fixed in formaldehyde for one or two weeks at room temperature by submerging the stacked unit in a 10% formalin bath. After completing the fixation process, excess formaldehyde is removed from the tissue slices by rinsing in cold running water overnight. Slices can then be immersed in 5% hydrogen peroxide (bleach) overnight, to improve tissue color brightness and transparency. Subsequently, excess bleach is washed off by rinsing in running water for one hour or more. Bleaching is suggested for any tissue that is dark in color.
Dehydration
The dehydration process is performed by using the freeze substitution method. Dehydration using acetone also performs a second function of degreasing. A preliminary step is to pre-cool the slices to 5° C in order to prevent ice crystal formation, and minimize shrinkage upon placement into the cold acetone. The stacked unit of slices is first submerged in a bath of 100% acetone at -25° C for one week. The stacked unit is then transferred into another fresh acetone bath at -15° C for one week. Finally, the stacked unit is transferred into a bath of 100% acetone at room temperature for another week. From the first to the third change of acetone, the concentration of acetone in the acetone bath is monitored each day using an acetonometer. Once the concentration of acetone remains stable for three consecutive days, the stacked unit is ready to be moved on to the next dehydrating solution.
If more transparency of fat is desired, the dehydrated slices may be placed into methylene chloride (dichloromethane) and monitored daily until the desired degreasing is achieved.
Forced impregnation
Impregnation equipment: Vacuum chamber with a transparent lid, vacuum pump, vacuum tubing and fine adjustment needle-valves, vacuum gauge, and Bennert mercury or digital manometer.
Forced impregnation in this step involves the replacement of acetone with P45 polyester resin. This is based on a difference of vapor pressure of acetone and P45 polyester resin.
Constructing the casting chamber
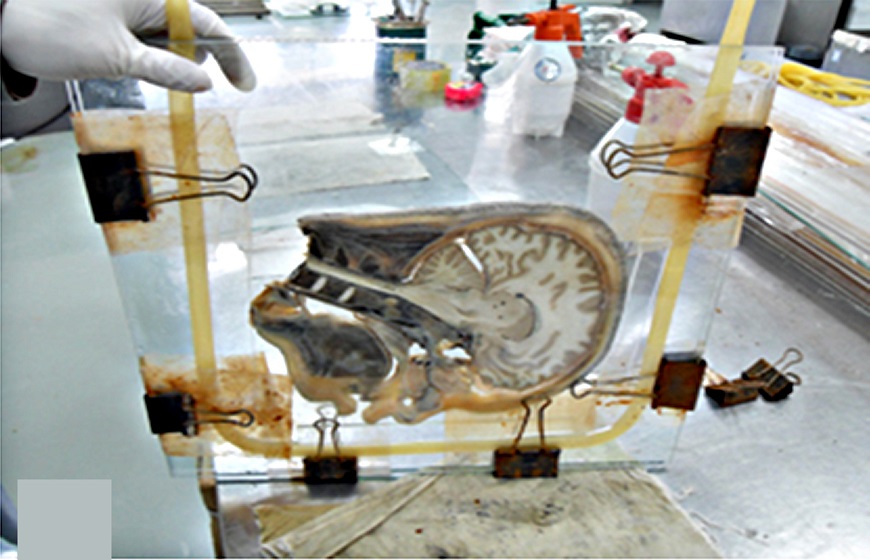 Figure 1. An open vertical chamber with sagittal head |
The casting chamber used in this step is an open vertical chamber. The top part of the chamber remains open (while the bottom and two sides of the casting chamber are clamped), and this chamber is then placed vertically in the vacuum chamber, i.e. standing on its bottom end. The open vertical chamber is constructed from two plates of 5 mm tempered glass, flexible 4 mm latex tubing, and several large fold-back clamps.
The tubing is placed between the two tempered glass sheets, round the margins of the sheets (except for the top edge). The glass sheets and tubing are clamped together around the perimeter of the bottom and sides of the glass using the fold-back clamps (Fig 1). A piece of hardened P45 is placed at the bottom of the chamber to prevent the specimen slice from touching the latex tubing.
Preparing the P45 polyester mixture
The impregnation resin mixture is prepared as follows: 1000 ml P45 resin (Hoffen polyester, China) is mixed with 10 g of P45A, 30 ml P45B, and 5 g of P45C. The P45A and P45C are plasticizers, and P45B is a hardener. The P45 resin is mixed just before constructing the open vertical chamber, since it thickens over time. Refrigeration of the P45 resin mixture will retard its thickening, and can be used to store the mixed resin for subsequent use.
Procedure for forced impregnation of the slices
The slices are removed from the final acetone bath and placed into the open vertical chambers. The chambers are then filled with the P45 polyester resin mixture (Hoffen polyester, China) using a customized funnel. After pouring the P45 resin mixture into the open vertical chamber, air bubbles can be manually removed from the casting chambers using a 1 mm stainless steel wire. The open vertical chambers are then placed upright into the vacuum chamber for impregnation at room temperature.
The absolute pressure in the vacuum chamber is gradually decreased to 0 mmHg. Bubbles are slowly released from the tissue slices. The vacuum is maintained at 0 mmHg until bubbling ceases. The bubbling activity occurring during this step can be monitored through the transparent glass lid of the vacuum chamber. The duration of the impregnation step is usually around eight hours.
Curing
 Figure 2. A. Water bath with chambers undergoing curing; B. Close-up of an open vertical chamber with |
After impregnation, the pressure in the vacuum chamber is released, and the casting chambers are transferred to a curing chamber. The slices in the open vertical chamber may need to be aligned properly, and any residual trapped air bubbles should be removed. Both these procedures are done with the 1 mm stainless wire. The curing chamber is a warm water bath maintained at 40o C, with a small attached circulatory pump which equilibrates the temperature of the water in the water bath, since water is a poor conductor of heat. The casting chambers are kept in the warm water bath for three days (Fig 2).
Finishing
After curing, the open vertical chambers are removed from the water bath and allowed to cool to room temperature. The chamber is then dismantled by removing the clamps, tubing, and glass. The P45 slice is then taken out and wrapped with a plastic sheet or lightweight foil, for protection against scratches. A bandsaw is used to trim off excess cured resin, and to give the P45 slice the desired shape. A wood sander is used to smooth the edges of the slice. Following sanding, the slice is wrapped in a new plastic sheet or foil, to avoid scratches on the surface of the slice. The P45 plastinated sheet is now ready for use or storage.
The P45 sections are semi-transparent, durable slices with a clear delineation of the tissue morphology including the connective tissues. Shrinkage is 2-8% (Okoye et al., 2019), and the refractive index is 1.49.
Most sheet plastination uses the flat chamber technique. Instead of a flat chamber, the casting chamber utilized in the P45 technique is an open vertical chamber, and it is a potential time saver. In the other sheet plastination techniques, such as E12, P35, and P40, the resin for impregnation is replaced with fresh resin before curing (Latorre & Henry, 2007; Weber et al., 2007; Ottone et al., 2018). However, in the P45 technique, the same resin and casting chamber that is used for impregnation is also used for curing. This also means that the amount of resin used in this technique is minimal. Furthermore, curing is performed in a warm water bath, and this saves on the amount of energy used in the plastination process, reduces monitoring of the process, makes complex equipment unnecessary, and saves time, since no dismantling or mounting is required at the curing step. Like other polyester techniques, the P45 sections are not just embedded in the resin, but the slices are incorporated as part of a single cured sheet of P45 polyester resin. Thus, the P45 technique is not complicated, and requires less time and equipment. The P45 sections show good anatomical details. The soft tissues, connective tissue, and myofascial fibers of the P45 plastinated specimens are clearly defined.
Gao H, Liu J, Yu S, Sui HJ. 2006: A new polyester technique for sheet plastination. J Int Soc Plastination 21:7-10.
https://doi.org/10.56507/JPVW6850
Latorre R, Henry RW. 2007: Polyester plastination of biological tissue: P40 technique for body slices. J Int Soc Plastination 22:69-77.
https://doi.org/10.56507/CARV3913
Okoye CS, Dou Y-R, Sui HJ. 2019: Tissue shrinkage after P45 plastination. J Plastination 31(2): 25-33.
https://doi.org/10.56507/DNIB6497
Ottone NE, Baptista CA, Latorre R, Bianchi HF, Del Sol M, Fuentes R. 2018: E12 sheet plastination: techniques and applications. Clin Anat, 31(5):742-756.
https://doi.org/10.1002/ca.23008
Sora M-C, Gender-Strobl B. 2007: The sectional anatomy of the carpal tunnel and its related neurovascular structures studied by using plastination. Eur J Neurol 12:380-384.
https://doi.org/10.1111/j.1468-1331.2004.01034.x
Sui HJ. 2006: Sheet plastination of biological tissue and its production method. China patent, Patent No. ZL 03 1 34109.8.
Sui HJ, Henry RW. 2007: Polyester plastination of biological tissue: Hoffen P45 technique. J Int Soc Plastination 22: 78-81.
https://doi.org/10.56507/IJSL3572
Thomas M, Steinke H. 2004: Thin layer plastination of the shoulder. Clin Sports Med Int 1:9-15.
von Hagens G, Tiedemann K, Kriz W. 1987. The current potential of plastination. Anat Embryol 175:411-421.
https://doi.org/10.1007/BF00309677